
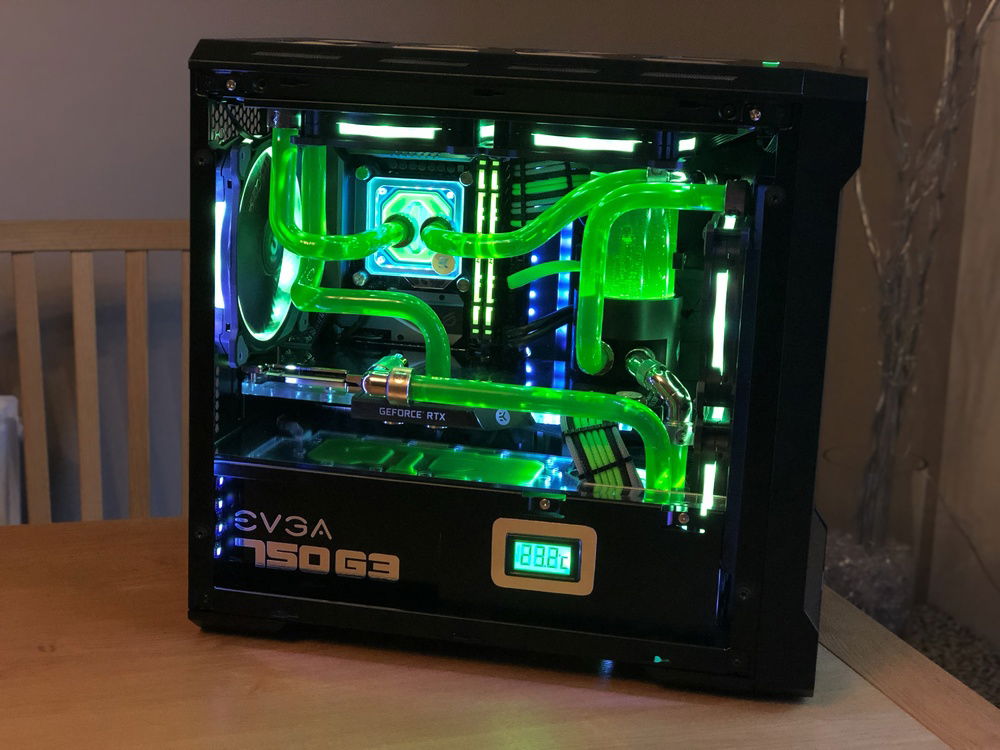
The Little Green Watercooled Machine
AD:
This is actually the first time I have built a full PC and I went all out on a hardline watercooled ITX system because apparently I'm a nutter.
I had a desktop PC when I was a teenager that I tinkered with and upgraded but then had a laptop and a Mac for a while. I put together a 1080p Gaming PC a few years ago using an MSI Nightblade barebones system as a base but I wanted a new PC to take advantage of my 4K TV and decided if I was going to spend money on a new PC I may as well spend a bit more and make it the PC I really want rather than just another PC that's good enough as I already had something good enough.
I spent months scouring the internet, on this subreddit, and watching videos to learn as much as I could about watercooling, overclocking, case modding and of course RGB-ing, and now I can finally join in with my own build - The Little Green Water Cooled Machine.
System Specs:
Case:
Components:
PSU:
Storage:
Water Cooling:
Lighting:
Case Modding:
I had the top panel custom plasma cut and then I fitted it with lab-grade steel mesh as dust filtration. I had to cut out parts of the case to fit the radiator up in the top as I wanted to maximise the space inside the case but didn't want to hide the fans away.
I also cut out an opening in the radiator tray to allow easier filling of the reservoir and cut a hole for the temperature display screen in the PSU shroud. This was the first time I have used a rotary tool though and the hole was not perfect so I used a silver piece to frame the sensor and hide any imperfections in the cutting.
I had to drill holes to mount the pump in the bottom of the case as I couldn't use the slots the case comes with as there would have been no room for the cables, I also had to cut out a slot to mount the reservoir with some sliding adjustment. The amount of cutting and case modding I ended up having to do was well beyond what I was expecting.
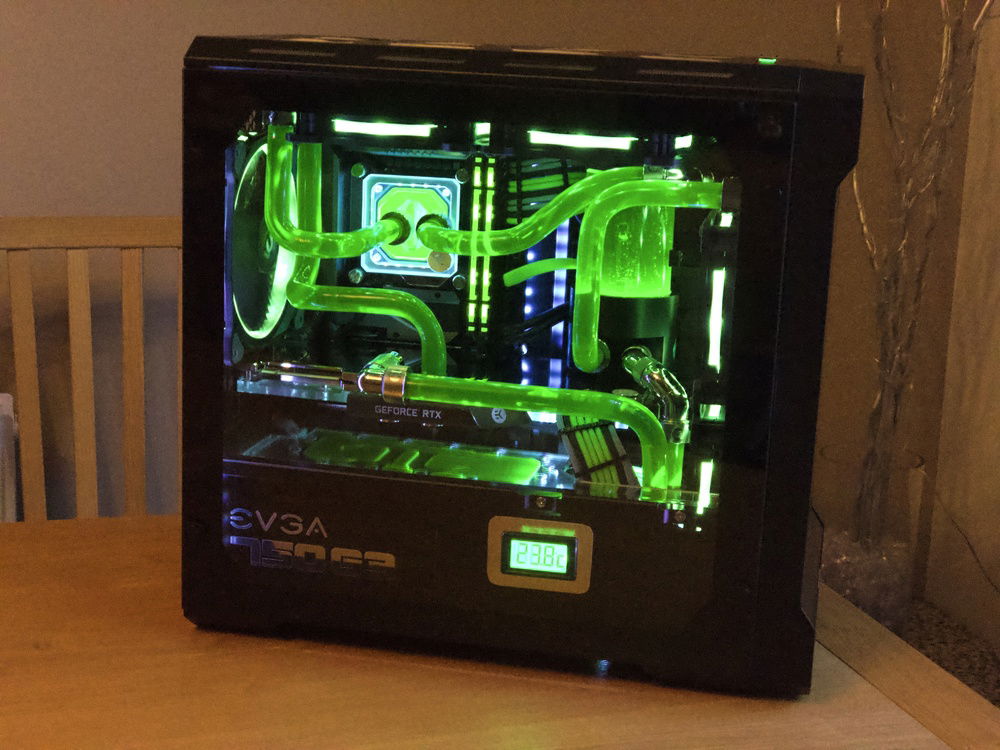
Temperatures:
3D Mark TimeSpy Extreme Score
It was a lot of work but it was great fun other than when I accidentally ripped one of my favourite t-shirts by getting it caught on something. Temperatures could probably be lower in a bigger case with better airflow and bigger/better radiators, but I was willing to sacrifice some cooling potential for aesthetics and a smaller build and I'm glad I did as I love how it turned out.
I had a desktop PC when I was a teenager that I tinkered with and upgraded but then had a laptop and a Mac for a while. I put together a 1080p Gaming PC a few years ago using an MSI Nightblade barebones system as a base but I wanted a new PC to take advantage of my 4K TV and decided if I was going to spend money on a new PC I may as well spend a bit more and make it the PC I really want rather than just another PC that's good enough as I already had something good enough.
I spent months scouring the internet, on this subreddit, and watching videos to learn as much as I could about watercooling, overclocking, case modding and of course RGB-ing, and now I can finally join in with my own build - The Little Green Water Cooled Machine.
System Specs:
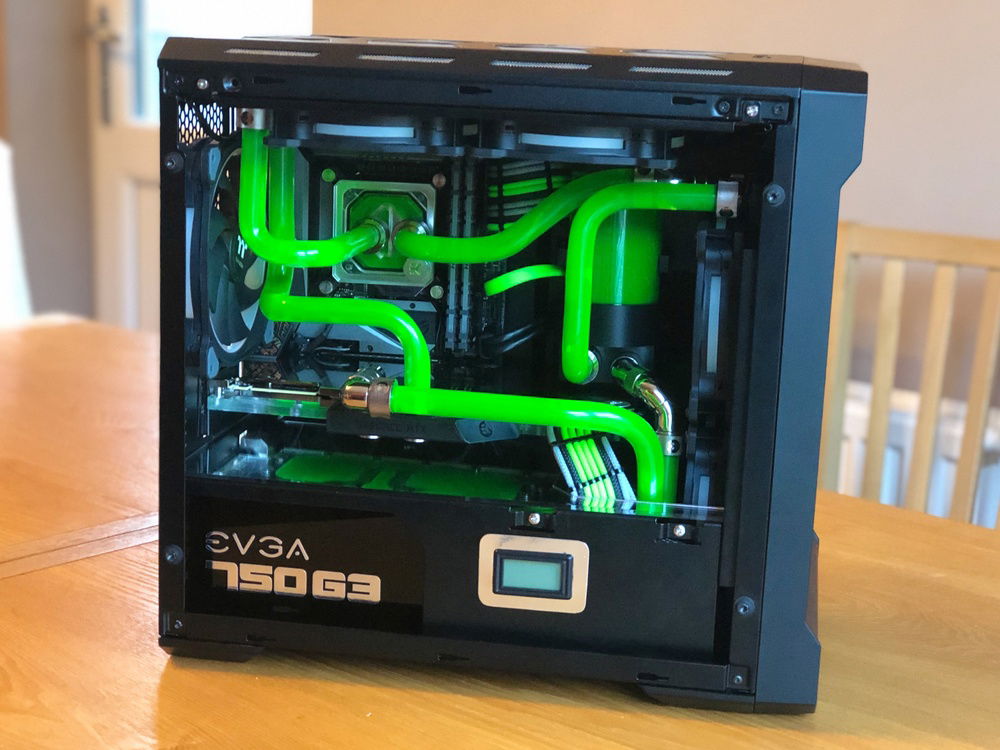
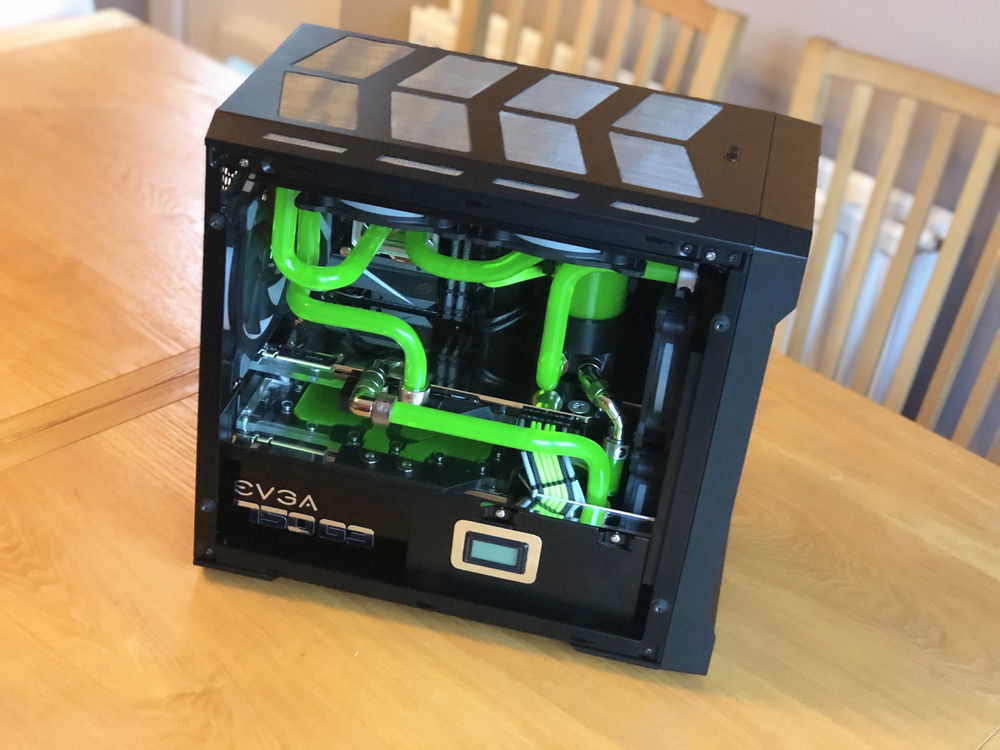
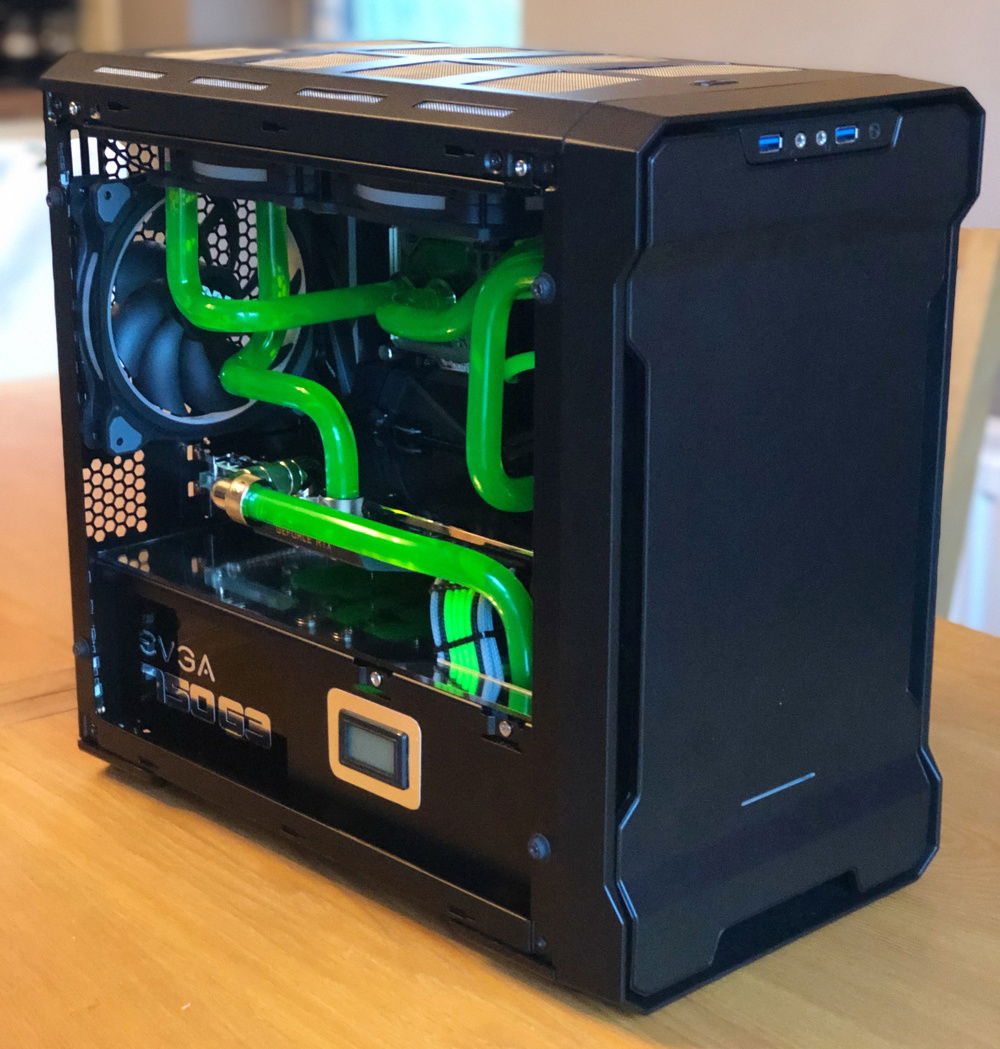
Case:
- Phanteks Enthoo Evolv ITX - Tempered Glass Edition
Components:
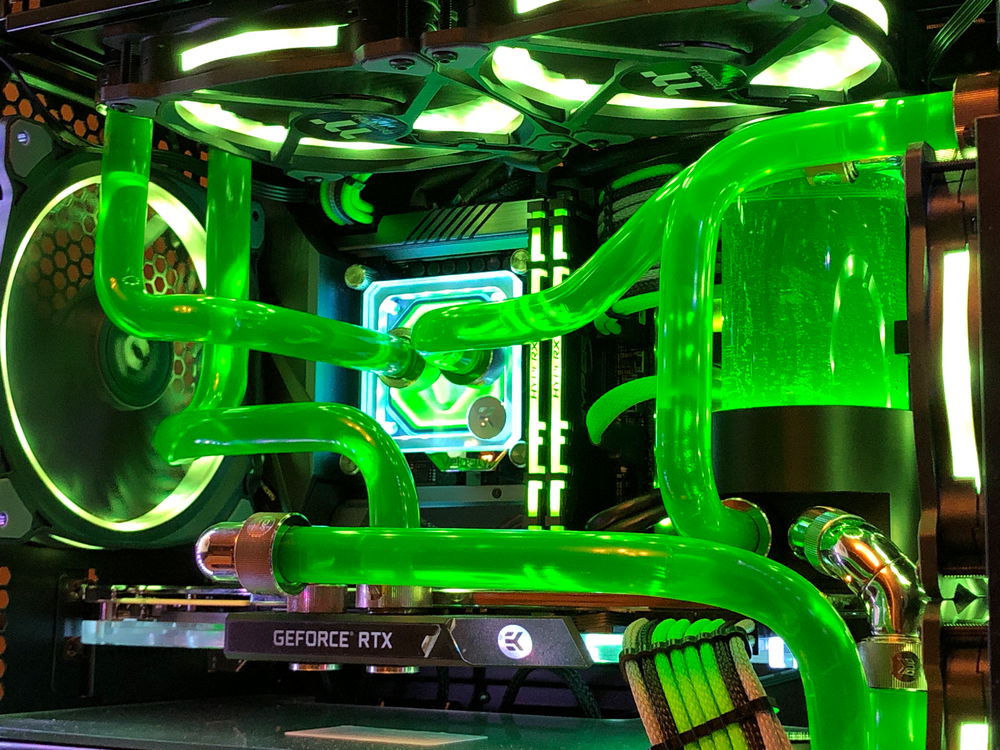
- ASUS ROG Strix Z390-I Mini ITX Motherboard
- Intel Core i7 9700k CPU @ 5Ghz on all cores
- Nvidia RTX 2080Ti Founder's Edition GPU @2100Mhz
- 32GB HyperX Predator RGB DDR4 RAM @3200Mhz
PSU:
- EVGA Supernova 750 G3 750W PSU
- Custom MDPC-X Fully Sleeved Cables by PexonPCs
Storage:
- Samsung 970 Evo 500GB NVMe M.2 SSD (Boot Drive/OS)
- Crucial MX500 1TB SATA M.2 SSD (Game Storage)
- Seagate Baracuda 4TB 2.5" HDD (File Storage)
Water Cooling:
- 2x EKWB CoolStream SE 240 Radiators
- 4x Thermaltake Riing 12 Plus 120mm Radiator Fans
- Thermaltake Riing 14 Plus 140mm Exhaust Fan
- EKWB Revo D5 RGB PWM Pump - Plexi Top
- EKWB EK-RES X3 150 RGB Reservoir
- EKWB Vector RTX 2080Ti RGB GPU Block - Nickel & Plexi
- EKWB Vector RTX GPU Backplate - Nickel
- EKWB Velocity RGB CPU Block- Nickel & Plexi
- EKWB CryoFuel Acid Green
- EKWB 16mm OD PETG Tubing
- EKWB Nickel Fitings
- Barrow 5-way Ball Splitter - Nickel
- XSPC Ball Valve - Nickel
- 2x XSPC Temperature Sensors
- XSPC Temperature Display - Green
Lighting:
- Thermaltake TT Sync Controller
- XSPC 8-Way RGB Hub - Black
- WOWLED PC Addressable RGB LED Strips
Case Modding:
I had the top panel custom plasma cut and then I fitted it with lab-grade steel mesh as dust filtration. I had to cut out parts of the case to fit the radiator up in the top as I wanted to maximise the space inside the case but didn't want to hide the fans away.
I also cut out an opening in the radiator tray to allow easier filling of the reservoir and cut a hole for the temperature display screen in the PSU shroud. This was the first time I have used a rotary tool though and the hole was not perfect so I used a silver piece to frame the sensor and hide any imperfections in the cutting.
I had to drill holes to mount the pump in the bottom of the case as I couldn't use the slots the case comes with as there would have been no room for the cables, I also had to cut out a slot to mount the reservoir with some sliding adjustment. The amount of cutting and case modding I ended up having to do was well beyond what I was expecting.
Temperatures:
- CPU - ~35 when idle, ~70 under load.
- GPU - ~35 when idle, ~65 under load.
- Water - ~30 when idle, ~45 under load.
3D Mark TimeSpy Extreme Score
It was a lot of work but it was great fun other than when I accidentally ripped one of my favourite t-shirts by getting it caught on something. Temperatures could probably be lower in a bigger case with better airflow and bigger/better radiators, but I was willing to sacrifice some cooling potential for aesthetics and a smaller build and I'm glad I did as I love how it turned out.
Color(s): Black Green Silver
RGB Lighting? Yes
Theme: Color
Cooling: Custom Liquid Cooling
Size: Mini-ITX
Type: General Build
Contests
This build participated in 3 contests.
| Rank | Contest | Date |
|---|---|---|
| #158 | EK 10K Challenge | ended |
| #137 | SFFPC meets builds.gg Contest | ended |
| #573 | The builds.gg 10K Challenge | ended |
Hardware
CPU
$ 243.30
Motherboard
$ 298.02
Memory
$ 123.02
Graphics
$ 859.99
Storage
$ 167.00
PSU
$ 199.98
Case
$ 211.92
Case Fan
$ 28.99
Case Fan
$ 28.99
Case Fan
$ 28.99
Case Fan
$ 28.99
Case Fan
$ 109.99
Cooling
$ 33.12
Cooling
$ 33.12
Cooling
$ 103.99
Cooling
$ 193.41
Cooling
$ 70.00
Cooling
$ 124.99
Accessories
$ 20.99
Estimated total value of this build:
$ 3,266.39
Approved by: