


Most Recent Build
Best Build
AD:
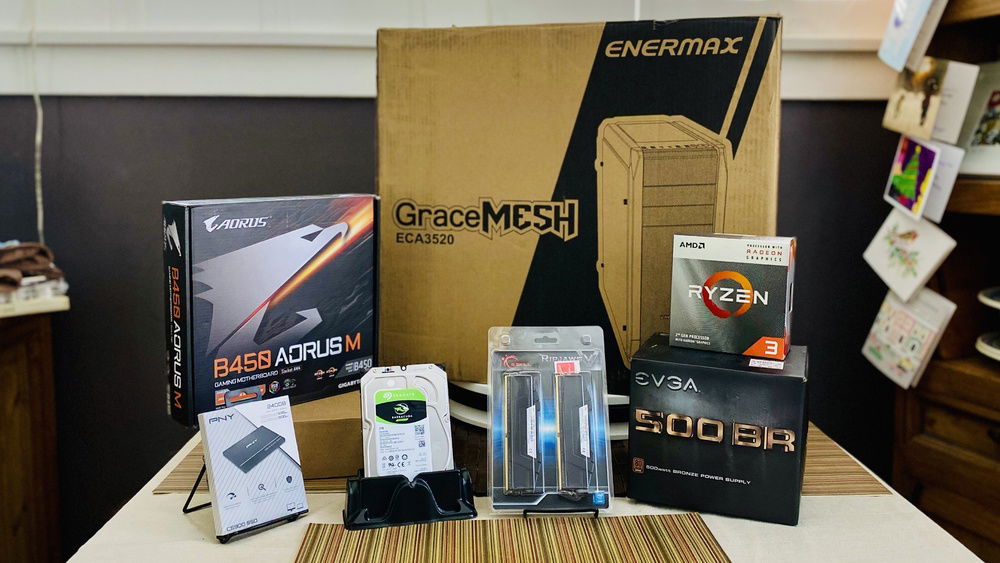
Group photo! Here's all the components I'll be using in the build.
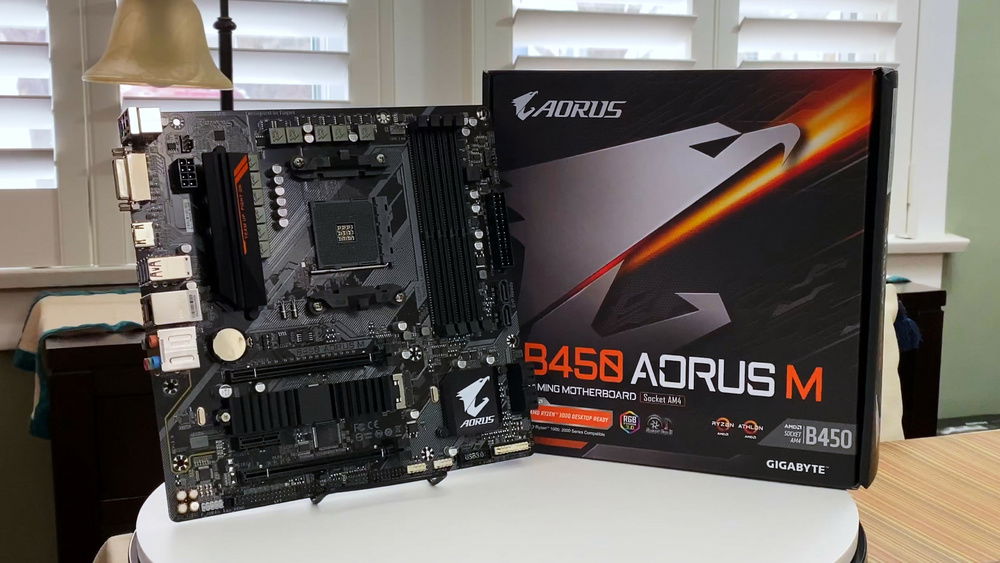
Just showing off the motherboard and box.
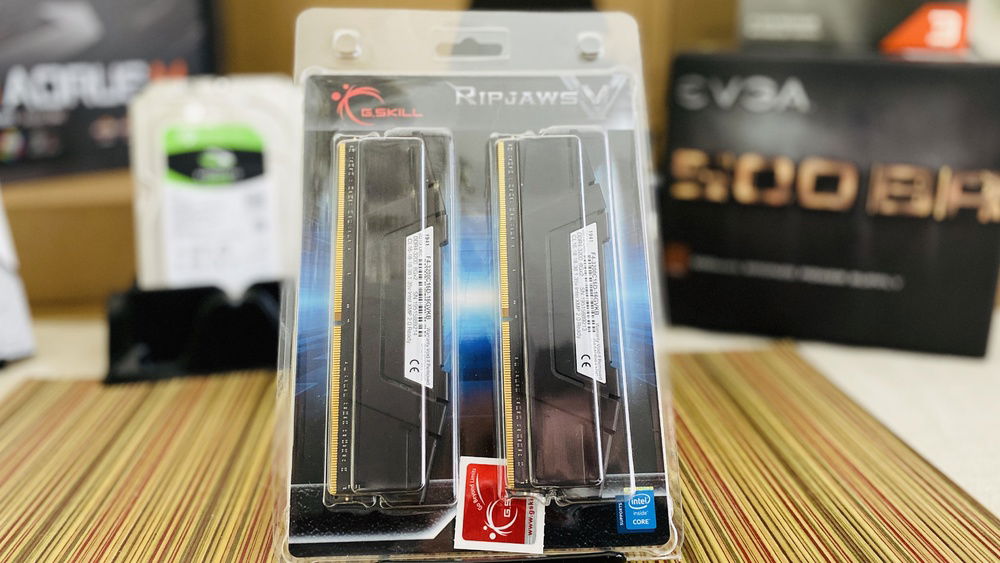
G.Skill Ripjaws V RAM, DDR4 3200, CL16. I've never used this RAM although I've used many kits by G.Skill in the past such as their DDR3 Sniper line and DDR4 Trident Z RGB.
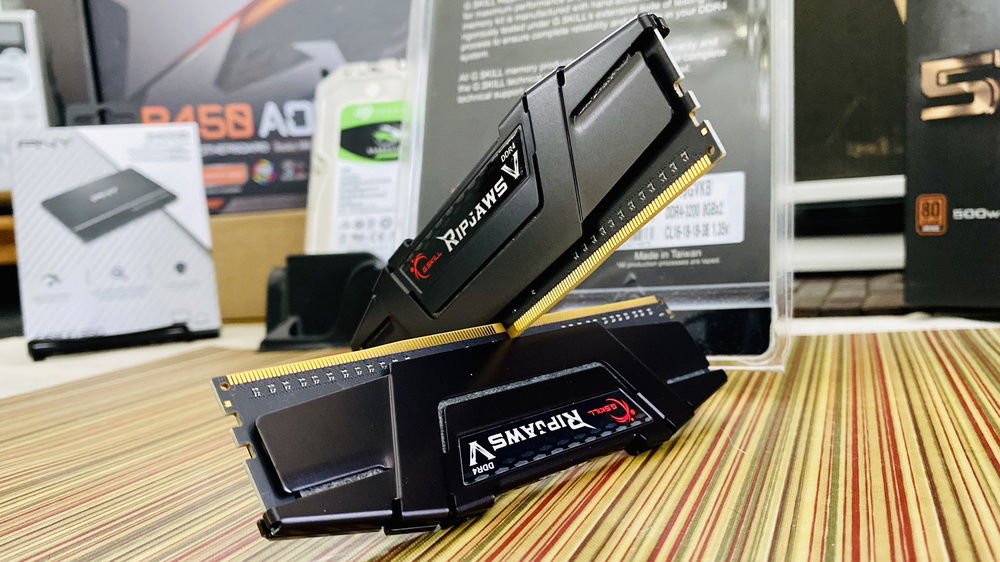
Strike a pose G.Skill!
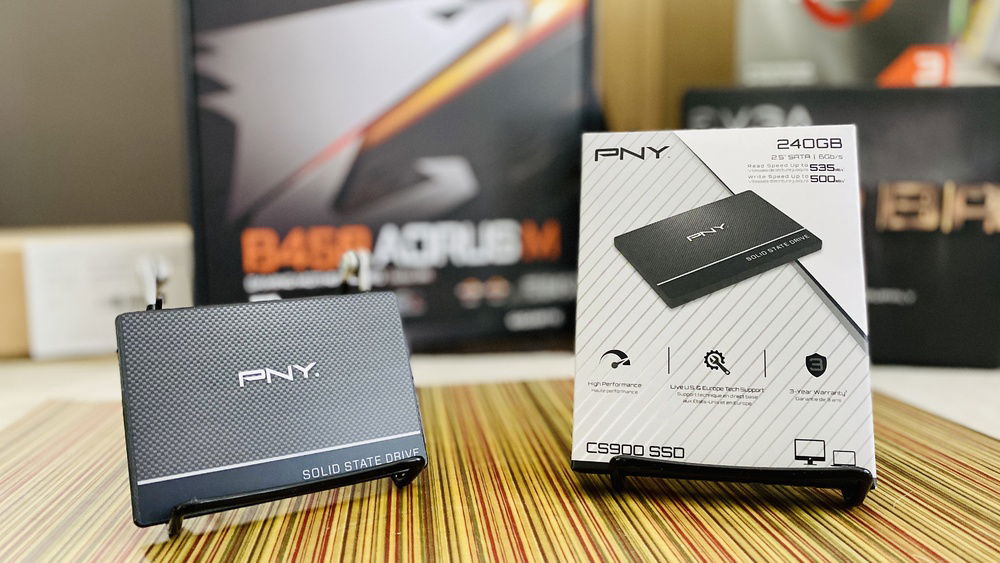
PNY SSD, it's definitely easy on the eyes. I like the look. It's understated and not gaudy at all like some SSDs.
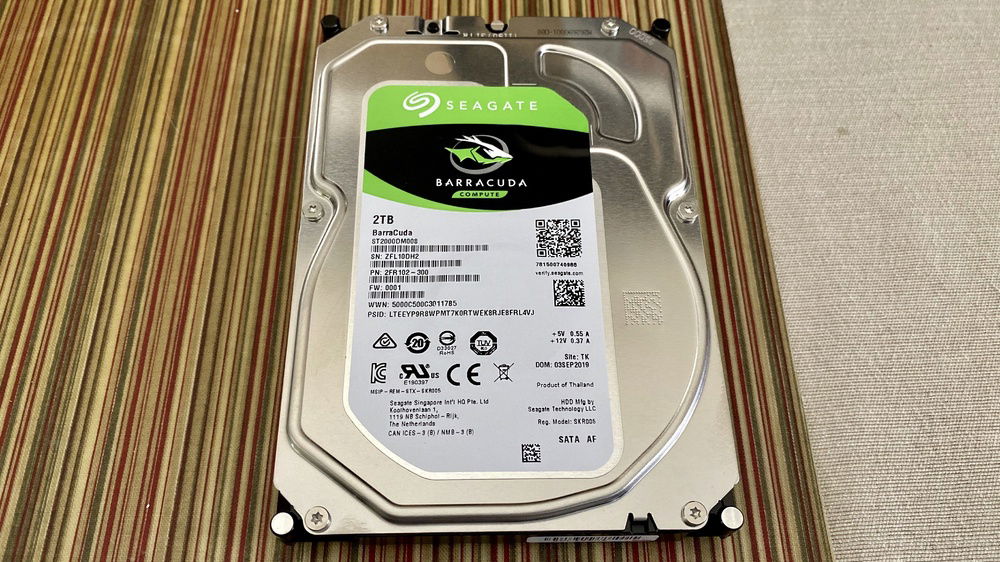
The 2TB platter drive. I'm surprised at how thin this is compared to my 8TB drives. It's about half the thickness.
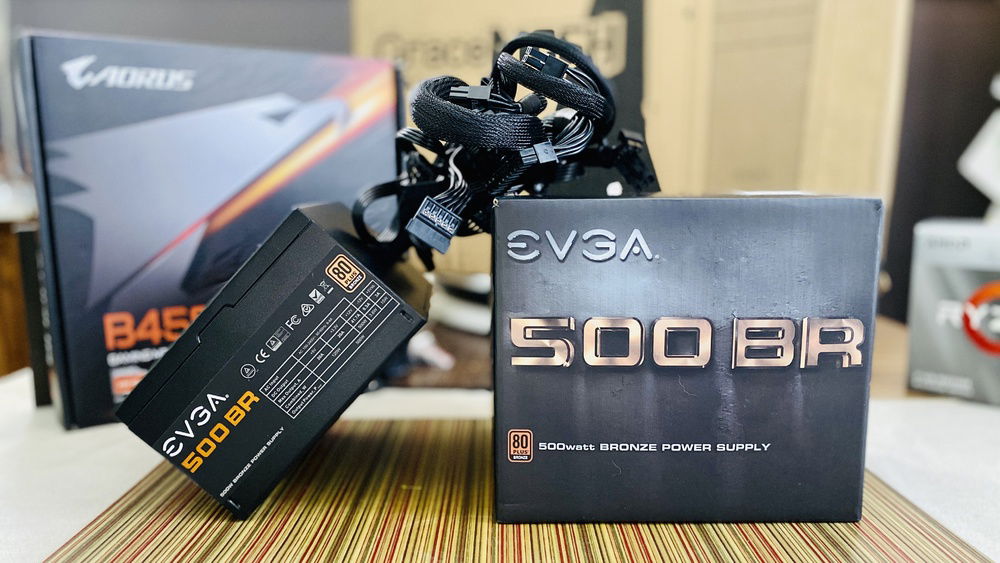
While I love Seasonic, EVGA PSUs tend to go on sale a lot. Got this for only $39.99, and while it's not modular, full or semi, it was too good of a deal to pass up.
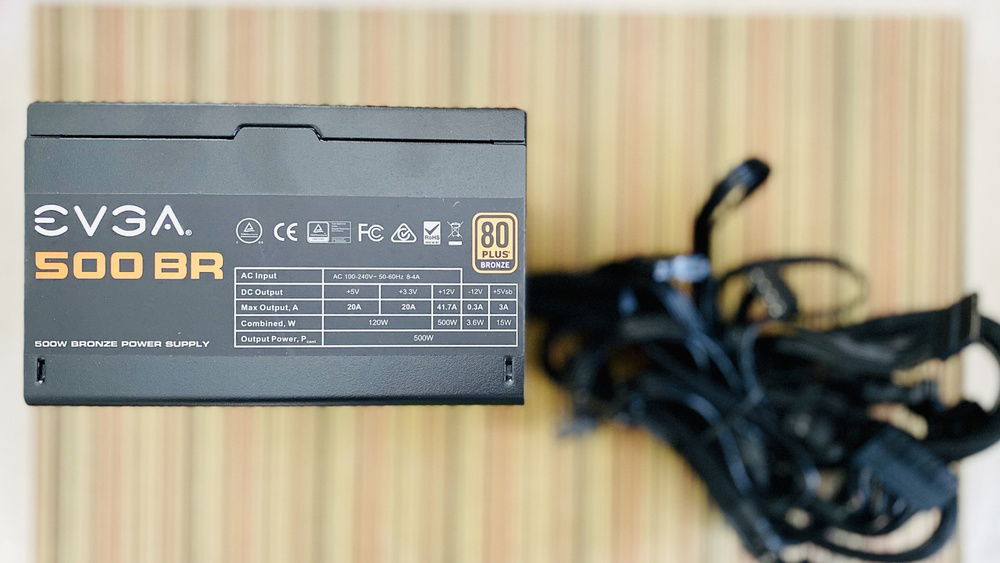
Just a closer shot of the PSU's stats.
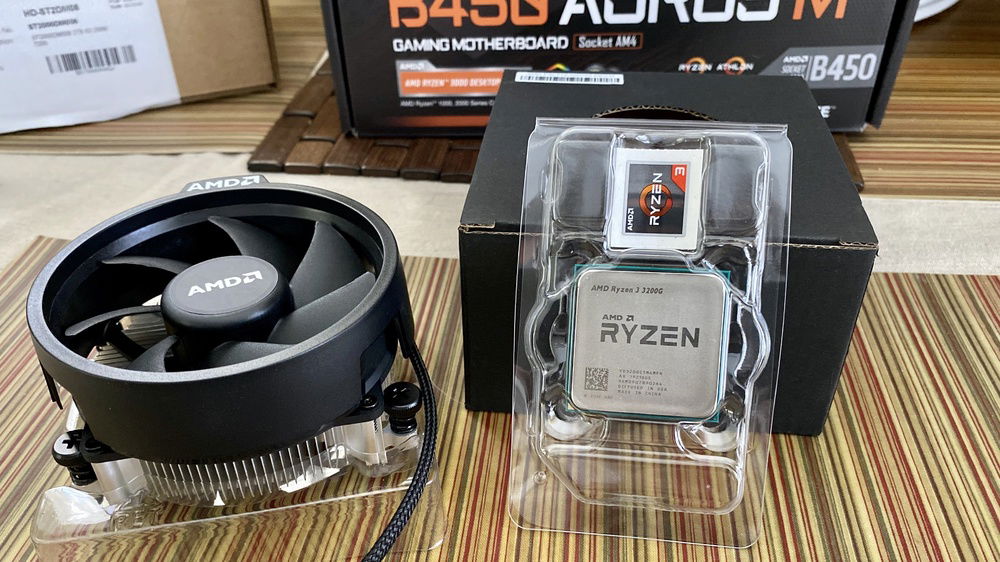
The brains of the bunch, the AMD Ryzen 3200G APU. This 4-core, 4-thread beasty with integrated Vega 8 graphics will power the machine.
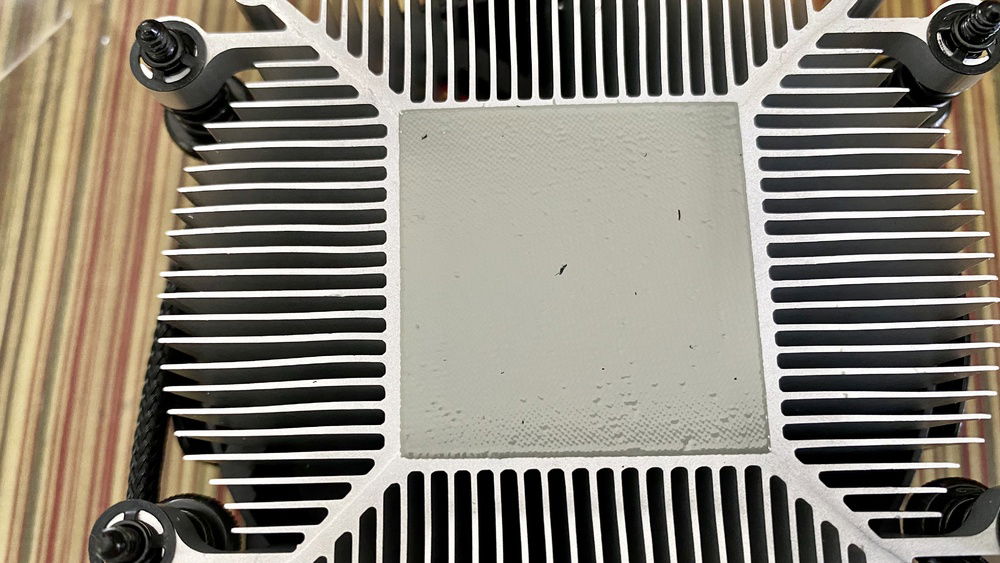
Gonna have to apply fresh thermal paste. I'm not a fan of those black particles that got stuck to the pre-applied paste. Kinda sucks as this is very evenly done.
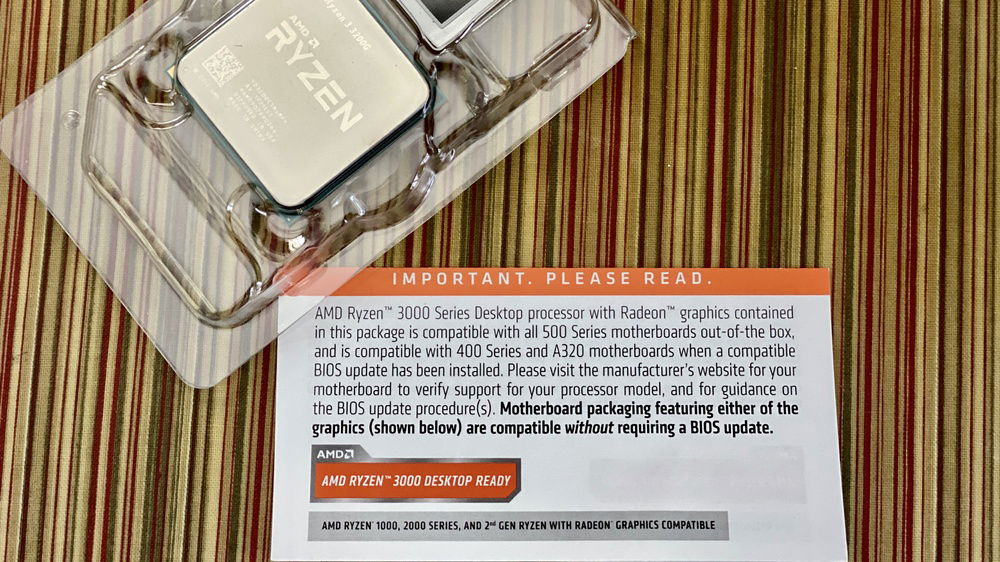
A note from AMD telling you to make sure your motherboard is Ryzen 3000 ready otherwise you'll have to take some steps to get the CPU to work in your motherboard.

The Entry Level
AD:
For more videos on the build--why I chose the parts, an overview of the motherboard, and a build log please go to my YouTube Channel: www.youtube.com/middleofknowhere
This PC build is an inexpensive entry level build aimed at light gaming and home use. It's powerful enough to run e-sports titles with the integrated GPU that sits inside the AMD Ryzen 3, 3200G at 1080p probably at low to medium settings (I'll do testing when I build the PC).
Right now, the build is at a good spot in terms of memory and storage with a 240GB SSD for the OS and some frequently used programs/games and a 2TB HDD for everything else. I went with 16 GB of RAM since the included VEGA iGPU can pull from the memory pool.
I didn't choose to go with 8GB of RAM for two reasons, one being what was mentioned above, and two because the 16GB RAM was so inexpensive.
Because the CPU comes with a cooler included, I didn't purchase one but this may be one of the upgrades to make for better cooling and better overclocking experience, especially if you plan on upgrading the CPU.
I chose the 3200G over the 3000G because of the added physical cores and better graphics capabilities. Based on some reviews with the 3000G, I just wasn't impressed since the reviewers had to go below 1080p to get any kind of decent performance, but they were also using 8GB of RAM. I also decided to save 40+ bucks by not going with the 3400G which does has hyper threading and a better iGPU.
Upgrade Path
So what would I upgrade first?
Firstly, I'd get a discrete GPU. For a build of this nature, I think I'd go with an Nvidia GTX 1650 super or 1660 Super or maybe an AMD equivalent. Alternatively you could always choose an RTX 2060 Super or AMD 5600XT if you wanted to go for a bit more performance, but seeing as this is an inexpensive build the $240 1660 super is probably the best way to go.
For the CPU I'd upgrade to a Ryzen 5 3600 or Ryzen 7 3700 or even 3800 class. Anything higher and you'll probably need a bigger PSU or better Motherboard.
CPU Cooler: Getting a beefier cooler will allow for better cooling overclocking. The great thing about Ryzen is all CPUs are unlocked, so squeezing out as much potential as you can to get better performance, if you're up to the task, is always a good thing.
RAM: This is probably on the bottom of the to do list, but if I were to upgrade RAM it would be with a fast kit, maybe with some blingy RGB. DDR4 3600 is more affordable now and if you're comfortable sticking with 16GB, DDR4 3600 kits can be found for $135 or less. Want more capacity over speed--a 32GB, 3200 speed kit can be had for around the same price. Just remember Ryzen loves speedy ram and the Ryzen 3000 sweet-spot is around 3600 MHz.
PSU: Your PSU is important, so choose carefully and think about longevity. I love SeasSonic as a brand and both Corsair and EVGA use their PSUs and just re-brand them and alter them a tad. If you're going to upgrade here, go for semi or full modular. Try to stick to Gold or higher efficiency as well, and as you add more parts or more power hungry parts keep in mind you'll need a higher wattage PSU.
Building the PC
I didn’t really run into any hiccups while building the PC. The only things I’d consider bumps mainly dealt with the CPU, specifically the cooler.
There were some rather larger particles in the pre-applied paste. I didn’t feel comfortable using the cooler as is, so I cleaned it off and applied some Arctic Silver 5 paste I’ve had.
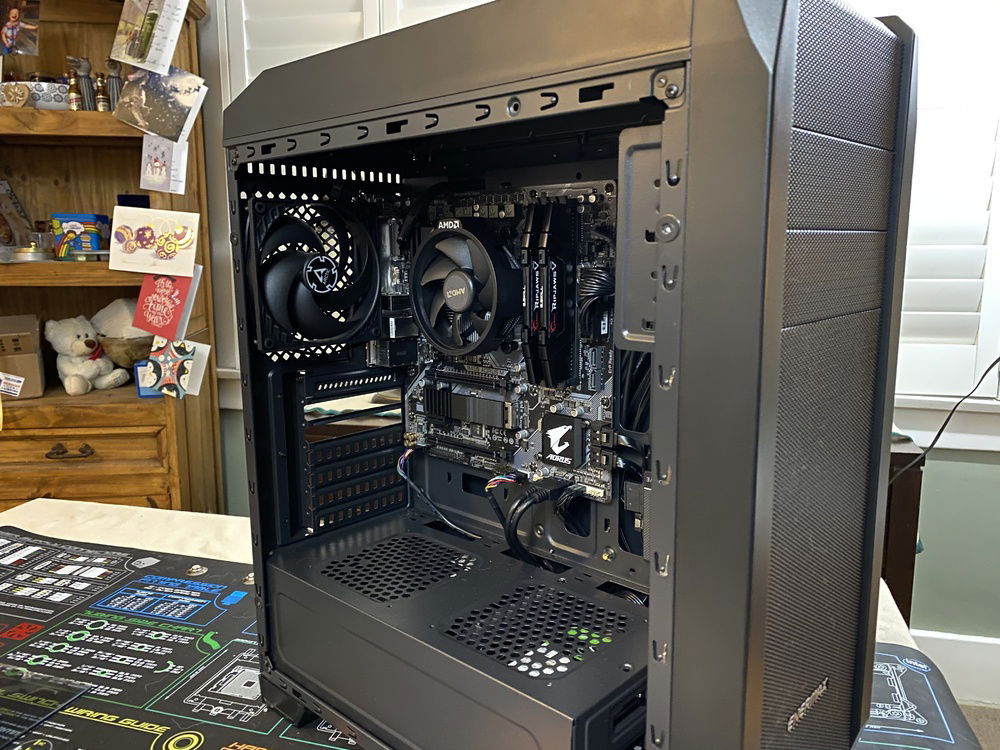
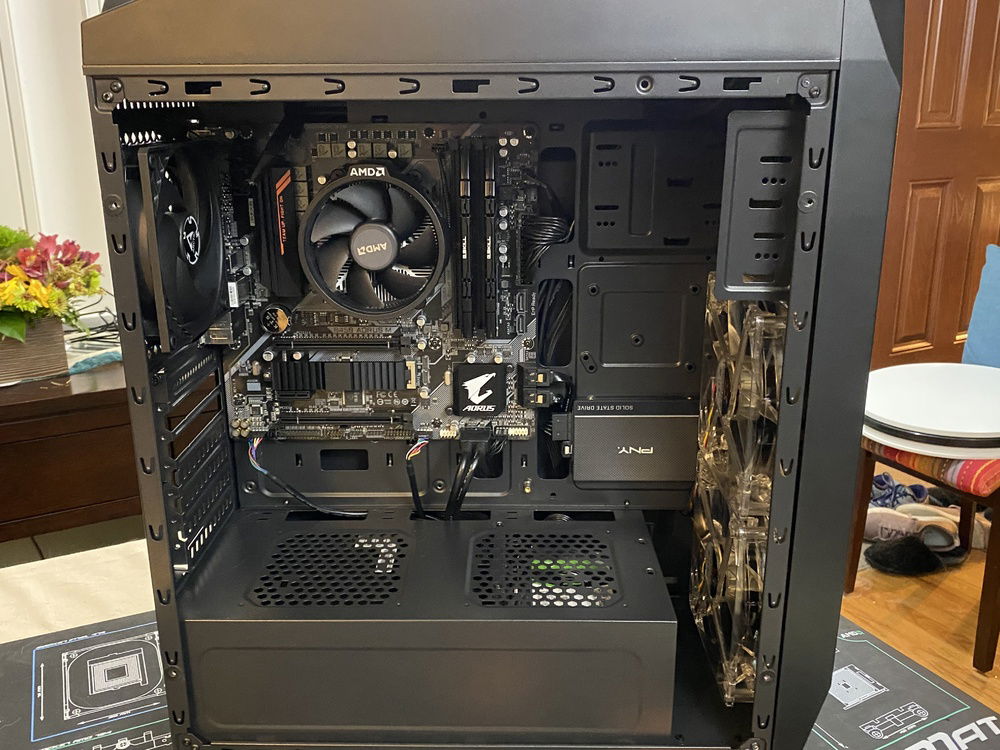
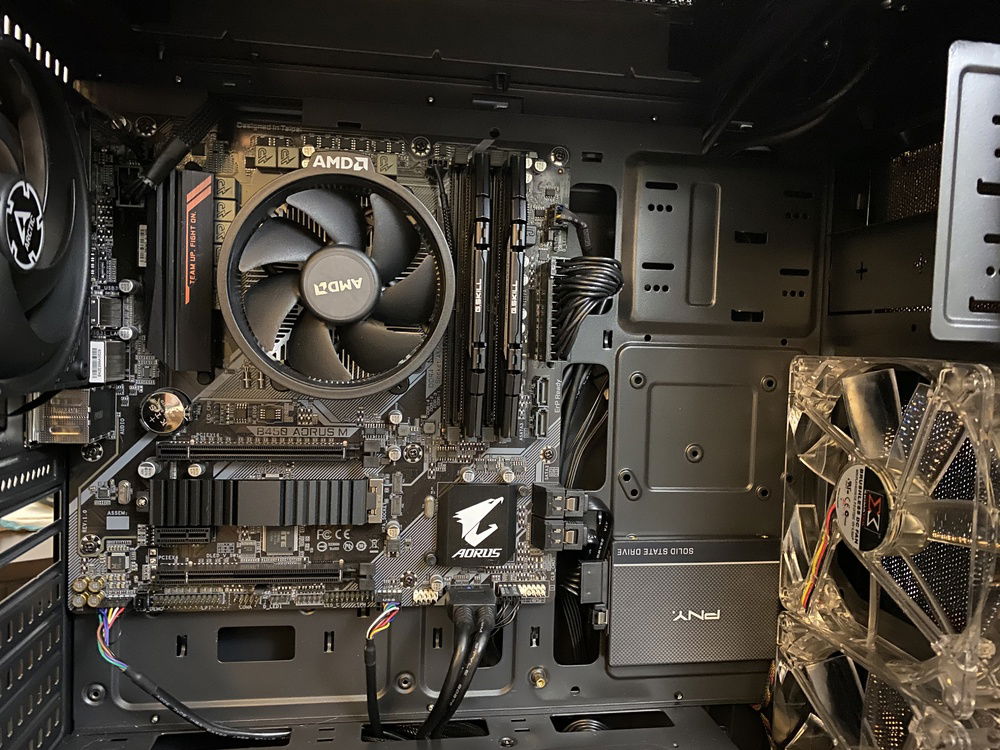
The second bump with the CPU cooler was the direction of the AMD logo on the fan shroud. Depending on how you insert the cooler, it will be next to your RAM or the left mosfets near the rear I/O. For a clean look, I wanted it to be at the top. Why it’s not there by default I can only guess and it’s probably due to mosfet heatsink interference. As the Aorus B450 M has no heatsink at the top, this wasn’t an issue. I was able to adjust the cooler so the AMD logo was at the top. It only took so long because instead of being able to simply lift the removable shroud and rotate it 90 degrees, I also had to unscrew the plastic part it snaps into and also rotate that. AMD Definitely needs to make this easier.
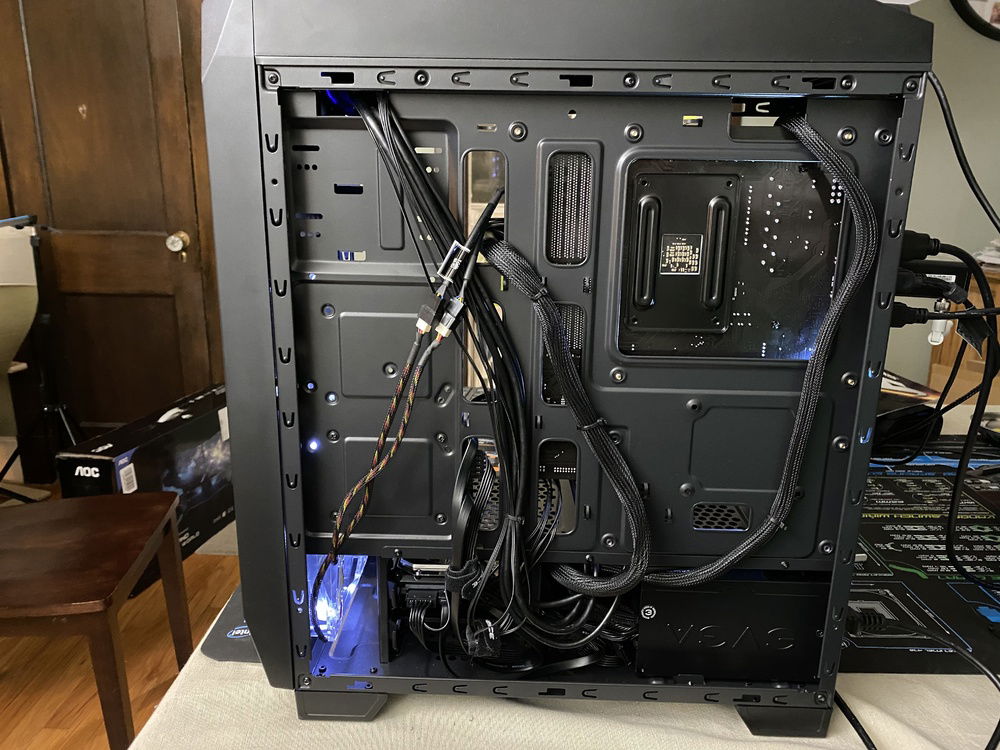
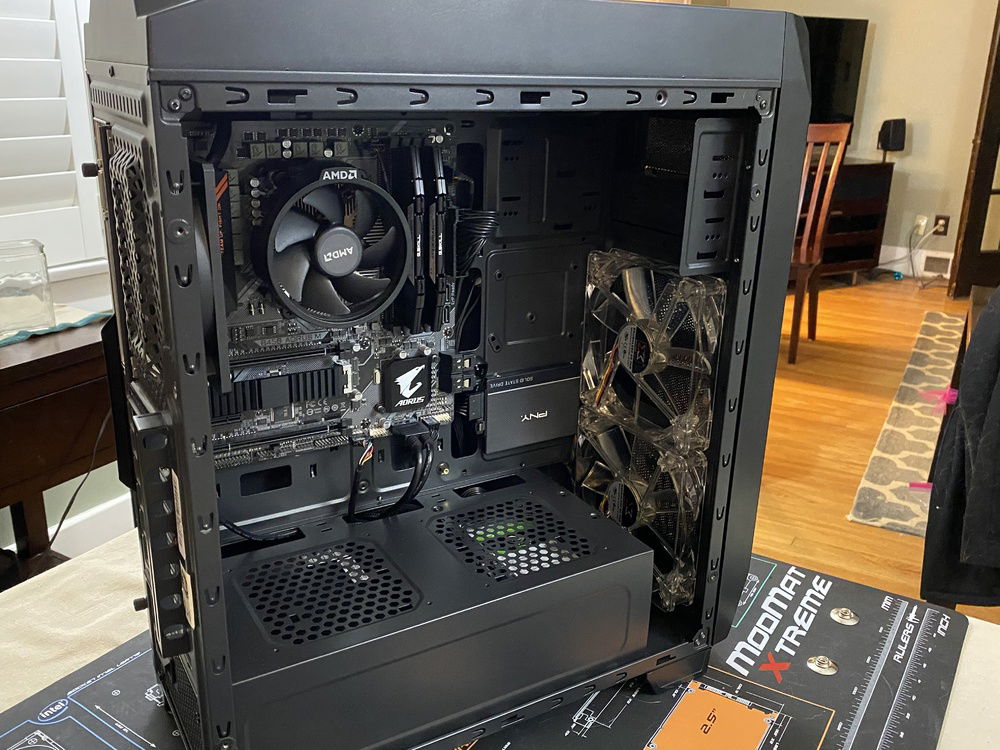
Because the motherboard is an M-ATX form factor, I did have to adjust some of the case stand-offs. Luckily the iFixit kit came with ample screwdriver heads and the stand-offs weren’t screwed in so tight that it was an issue.
When it came to the hard drives, I do have a couple of complaints, one of which could be remedied by me another by Enermax:
First the PNY SSD: I wanted to show it off by mounting it up front rather than in the HD cage below. Unfortunately, due to how the SSD is positioned, the label is upside down. If I wanted to, I could probably use a heat gun, remove the label and then re-position it so it’s right side up.
The second issue had to do with mounting the Seagate HDD. The Enermax Gracemesh case’s plastic drive cages have little nubbins allowing for truly tool free mounting. Unfortunately, these nubbins also make inserting the HDD a pain in the bum. After struggling for several minutes, I was able to mount the HDD. Also, I still opted to use screws to ensure it was securely mounted. After that, the drive try slipped nicely back into its caddy.
With regards to the fans, you saw me replace all 3 stock fans. It’s rare a case at the Gracemesh’s pricepoint has 3 fans. Most come with only one fan and few come with two. Unfortunately, all 3 fans that come with this case are also molex. I opted to replace the rear fan with a 4-pin PWM Arctic P12 PWM PST fan and the front two intakes I used some old Xigmatek 140mm 3-pin fans with white LEDs to add a tad of flare.
I can say that the 3 replacements are much quieter and nicer looking than the originals, but even then the Xigmatek fans, with their translucent bodies, look a bit dated. Also, as there are only 3 fan headers on the motherboard, I used a Noctua 4-pin fan splitters for the front two fans.
Other than that, building the PC was rather hassle free. Installing and updating Windows was a breeze and Gigabyte has software to update the BIOS within windows called @BIOS, so that is also up to date. Also using the XMP profile for the ram to set it to 3200 MHz was not a problem and the BIOS automatically used 2GB of RAM for the Vega 8 iGPU.
Overall, this is a decent entry level PC that will allow a first timer to get any office/home work done that is needed. For the person who wants to game at 1080p, this is doable, but not without setting the game to low (or very low) for most games. CS:GO got great frames, but it's an ancient engine. Fortnite required low settings, but was okay at medium. Rocket League peformed great, and the Shadow of the Tomb Raider and Metro Redux benchmarks I performed got 24-30 FPS but at all low settings.
This PC build is an inexpensive entry level build aimed at light gaming and home use. It's powerful enough to run e-sports titles with the integrated GPU that sits inside the AMD Ryzen 3, 3200G at 1080p probably at low to medium settings (I'll do testing when I build the PC).
Right now, the build is at a good spot in terms of memory and storage with a 240GB SSD for the OS and some frequently used programs/games and a 2TB HDD for everything else. I went with 16 GB of RAM since the included VEGA iGPU can pull from the memory pool.
I didn't choose to go with 8GB of RAM for two reasons, one being what was mentioned above, and two because the 16GB RAM was so inexpensive.
Because the CPU comes with a cooler included, I didn't purchase one but this may be one of the upgrades to make for better cooling and better overclocking experience, especially if you plan on upgrading the CPU.
I chose the 3200G over the 3000G because of the added physical cores and better graphics capabilities. Based on some reviews with the 3000G, I just wasn't impressed since the reviewers had to go below 1080p to get any kind of decent performance, but they were also using 8GB of RAM. I also decided to save 40+ bucks by not going with the 3400G which does has hyper threading and a better iGPU.
Upgrade Path
So what would I upgrade first?
Firstly, I'd get a discrete GPU. For a build of this nature, I think I'd go with an Nvidia GTX 1650 super or 1660 Super or maybe an AMD equivalent. Alternatively you could always choose an RTX 2060 Super or AMD 5600XT if you wanted to go for a bit more performance, but seeing as this is an inexpensive build the $240 1660 super is probably the best way to go.
For the CPU I'd upgrade to a Ryzen 5 3600 or Ryzen 7 3700 or even 3800 class. Anything higher and you'll probably need a bigger PSU or better Motherboard.
CPU Cooler: Getting a beefier cooler will allow for better cooling overclocking. The great thing about Ryzen is all CPUs are unlocked, so squeezing out as much potential as you can to get better performance, if you're up to the task, is always a good thing.
RAM: This is probably on the bottom of the to do list, but if I were to upgrade RAM it would be with a fast kit, maybe with some blingy RGB. DDR4 3600 is more affordable now and if you're comfortable sticking with 16GB, DDR4 3600 kits can be found for $135 or less. Want more capacity over speed--a 32GB, 3200 speed kit can be had for around the same price. Just remember Ryzen loves speedy ram and the Ryzen 3000 sweet-spot is around 3600 MHz.
PSU: Your PSU is important, so choose carefully and think about longevity. I love SeasSonic as a brand and both Corsair and EVGA use their PSUs and just re-brand them and alter them a tad. If you're going to upgrade here, go for semi or full modular. Try to stick to Gold or higher efficiency as well, and as you add more parts or more power hungry parts keep in mind you'll need a higher wattage PSU.
Building the PC
I didn’t really run into any hiccups while building the PC. The only things I’d consider bumps mainly dealt with the CPU, specifically the cooler.
There were some rather larger particles in the pre-applied paste. I didn’t feel comfortable using the cooler as is, so I cleaned it off and applied some Arctic Silver 5 paste I’ve had.
The second bump with the CPU cooler was the direction of the AMD logo on the fan shroud. Depending on how you insert the cooler, it will be next to your RAM or the left mosfets near the rear I/O. For a clean look, I wanted it to be at the top. Why it’s not there by default I can only guess and it’s probably due to mosfet heatsink interference. As the Aorus B450 M has no heatsink at the top, this wasn’t an issue. I was able to adjust the cooler so the AMD logo was at the top. It only took so long because instead of being able to simply lift the removable shroud and rotate it 90 degrees, I also had to unscrew the plastic part it snaps into and also rotate that. AMD Definitely needs to make this easier.
Because the motherboard is an M-ATX form factor, I did have to adjust some of the case stand-offs. Luckily the iFixit kit came with ample screwdriver heads and the stand-offs weren’t screwed in so tight that it was an issue.
When it came to the hard drives, I do have a couple of complaints, one of which could be remedied by me another by Enermax:
First the PNY SSD: I wanted to show it off by mounting it up front rather than in the HD cage below. Unfortunately, due to how the SSD is positioned, the label is upside down. If I wanted to, I could probably use a heat gun, remove the label and then re-position it so it’s right side up.
The second issue had to do with mounting the Seagate HDD. The Enermax Gracemesh case’s plastic drive cages have little nubbins allowing for truly tool free mounting. Unfortunately, these nubbins also make inserting the HDD a pain in the bum. After struggling for several minutes, I was able to mount the HDD. Also, I still opted to use screws to ensure it was securely mounted. After that, the drive try slipped nicely back into its caddy.
With regards to the fans, you saw me replace all 3 stock fans. It’s rare a case at the Gracemesh’s pricepoint has 3 fans. Most come with only one fan and few come with two. Unfortunately, all 3 fans that come with this case are also molex. I opted to replace the rear fan with a 4-pin PWM Arctic P12 PWM PST fan and the front two intakes I used some old Xigmatek 140mm 3-pin fans with white LEDs to add a tad of flare.
I can say that the 3 replacements are much quieter and nicer looking than the originals, but even then the Xigmatek fans, with their translucent bodies, look a bit dated. Also, as there are only 3 fan headers on the motherboard, I used a Noctua 4-pin fan splitters for the front two fans.
Other than that, building the PC was rather hassle free. Installing and updating Windows was a breeze and Gigabyte has software to update the BIOS within windows called @BIOS, so that is also up to date. Also using the XMP profile for the ram to set it to 3200 MHz was not a problem and the BIOS automatically used 2GB of RAM for the Vega 8 iGPU.
Overall, this is a decent entry level PC that will allow a first timer to get any office/home work done that is needed. For the person who wants to game at 1080p, this is doable, but not without setting the game to low (or very low) for most games. CS:GO got great frames, but it's an ancient engine. Fortnite required low settings, but was okay at medium. Rocket League peformed great, and the Shadow of the Tomb Raider and Metro Redux benchmarks I performed got 24-30 FPS but at all low settings.
Color(s): Black
RGB Lighting? No
Theme: none
Cooling: Air Cooling
Size: Micro-ATX
Type: General Build
Build Updates
Parts have arrived
Build complete!
Hardware
CPU
$ 64.40
Memory
$ 134.99
Storage
$ 96.61
PSU
$ 61.35
Approved by: