
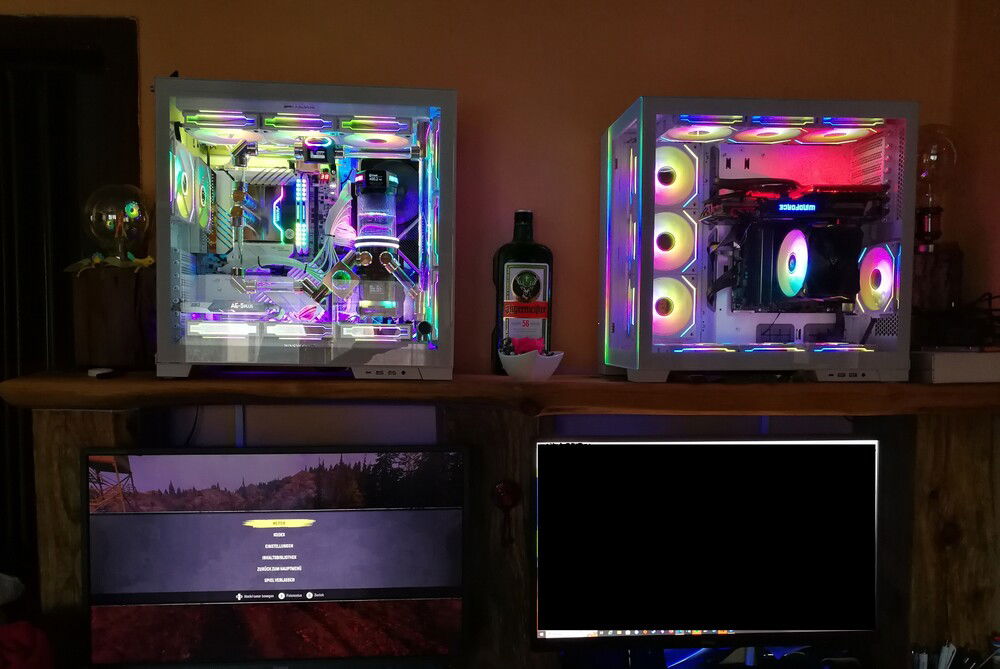
my first water cooling and immediately custom with borosilicate glass tubes and a hell of a lot of RGB - not yet changed to a special color profile.
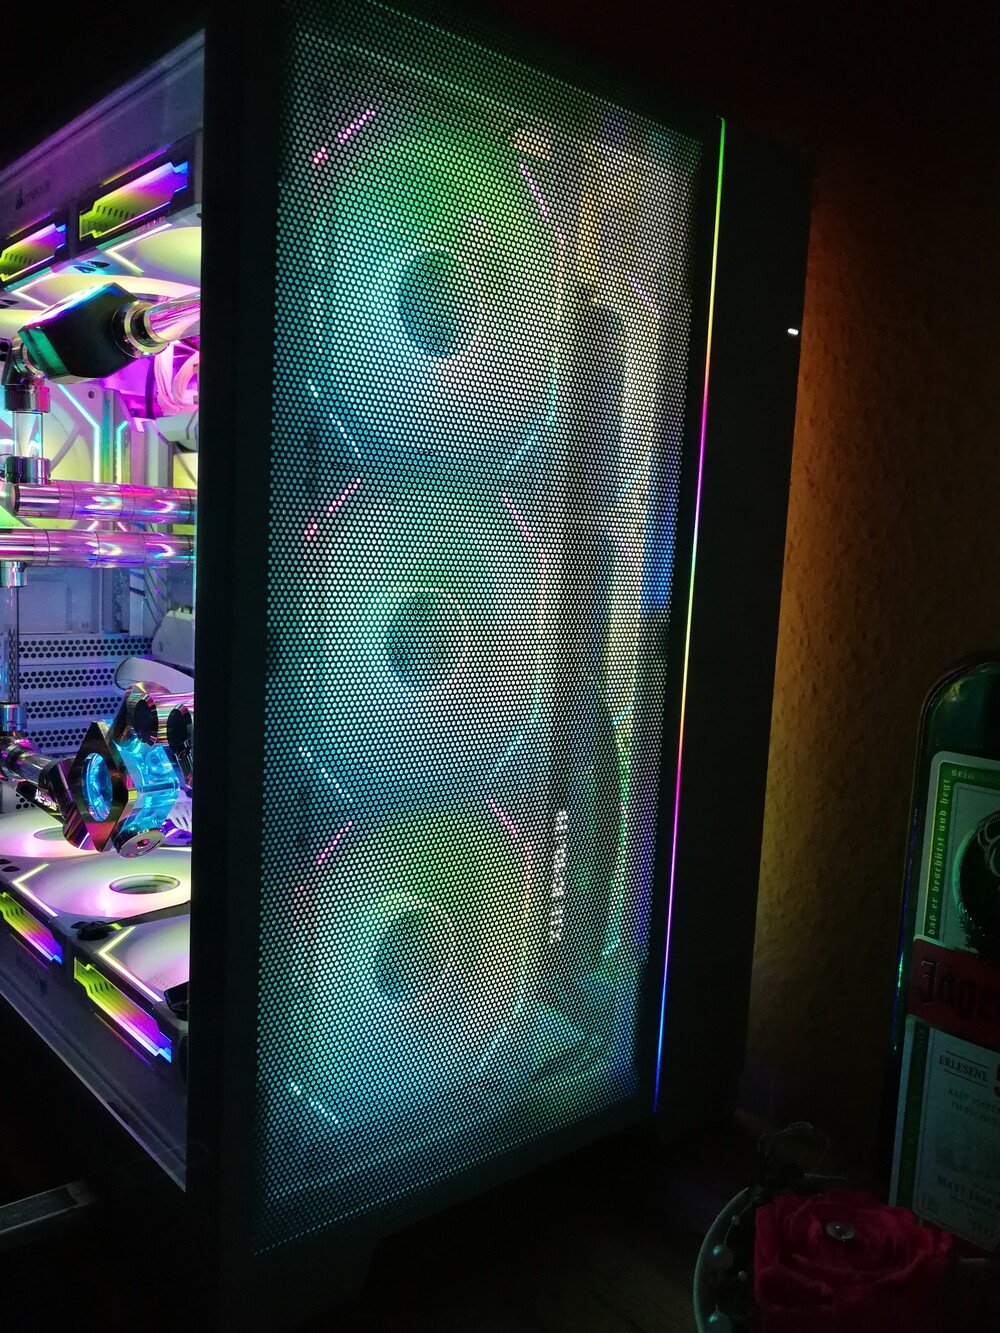
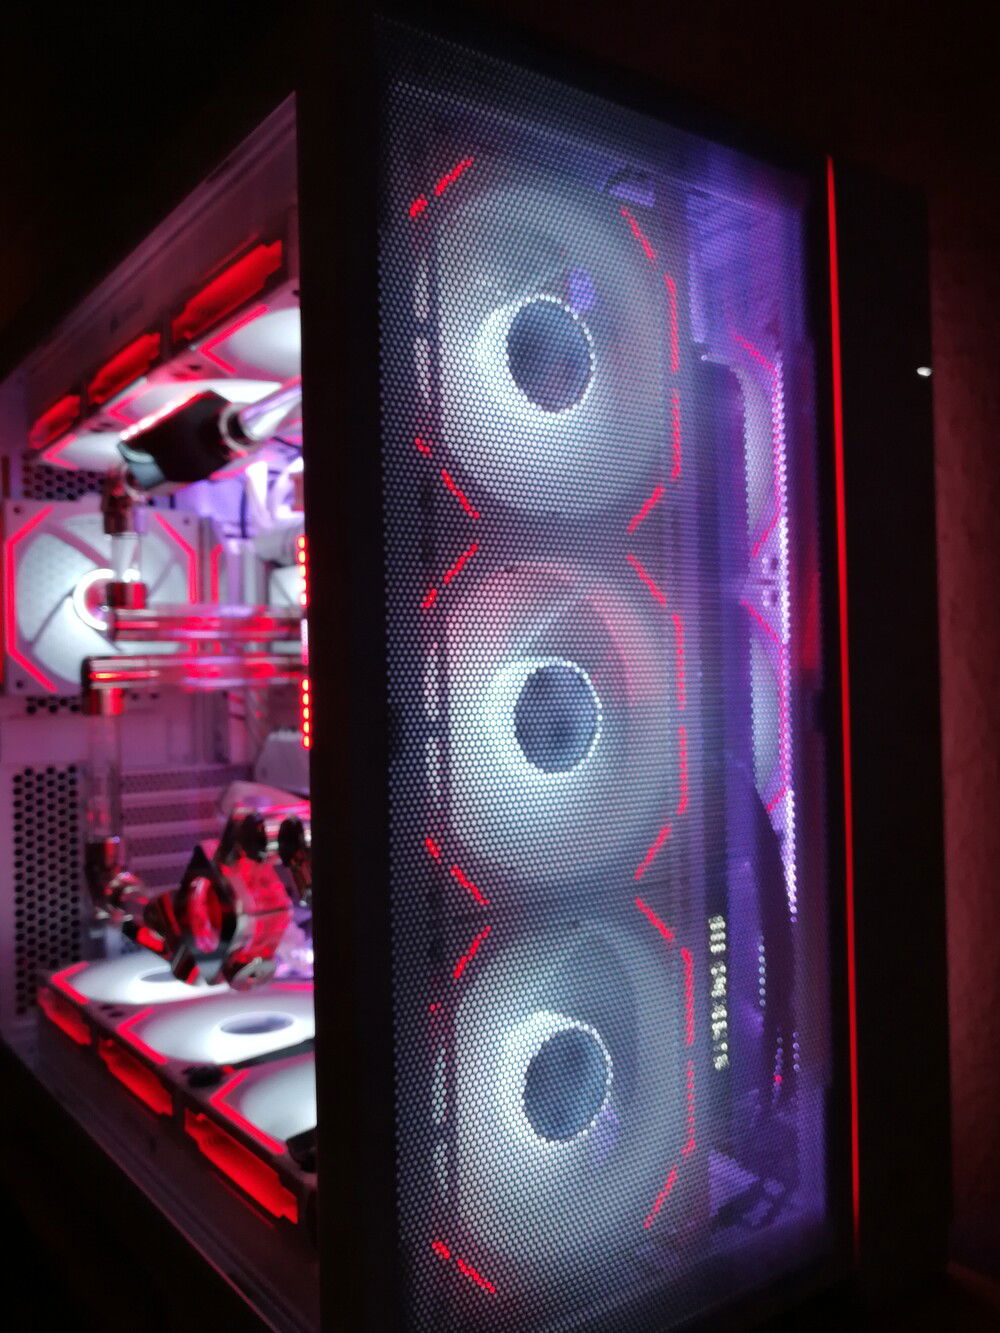
replacing the front glass pane with mesh for better GPU airflow
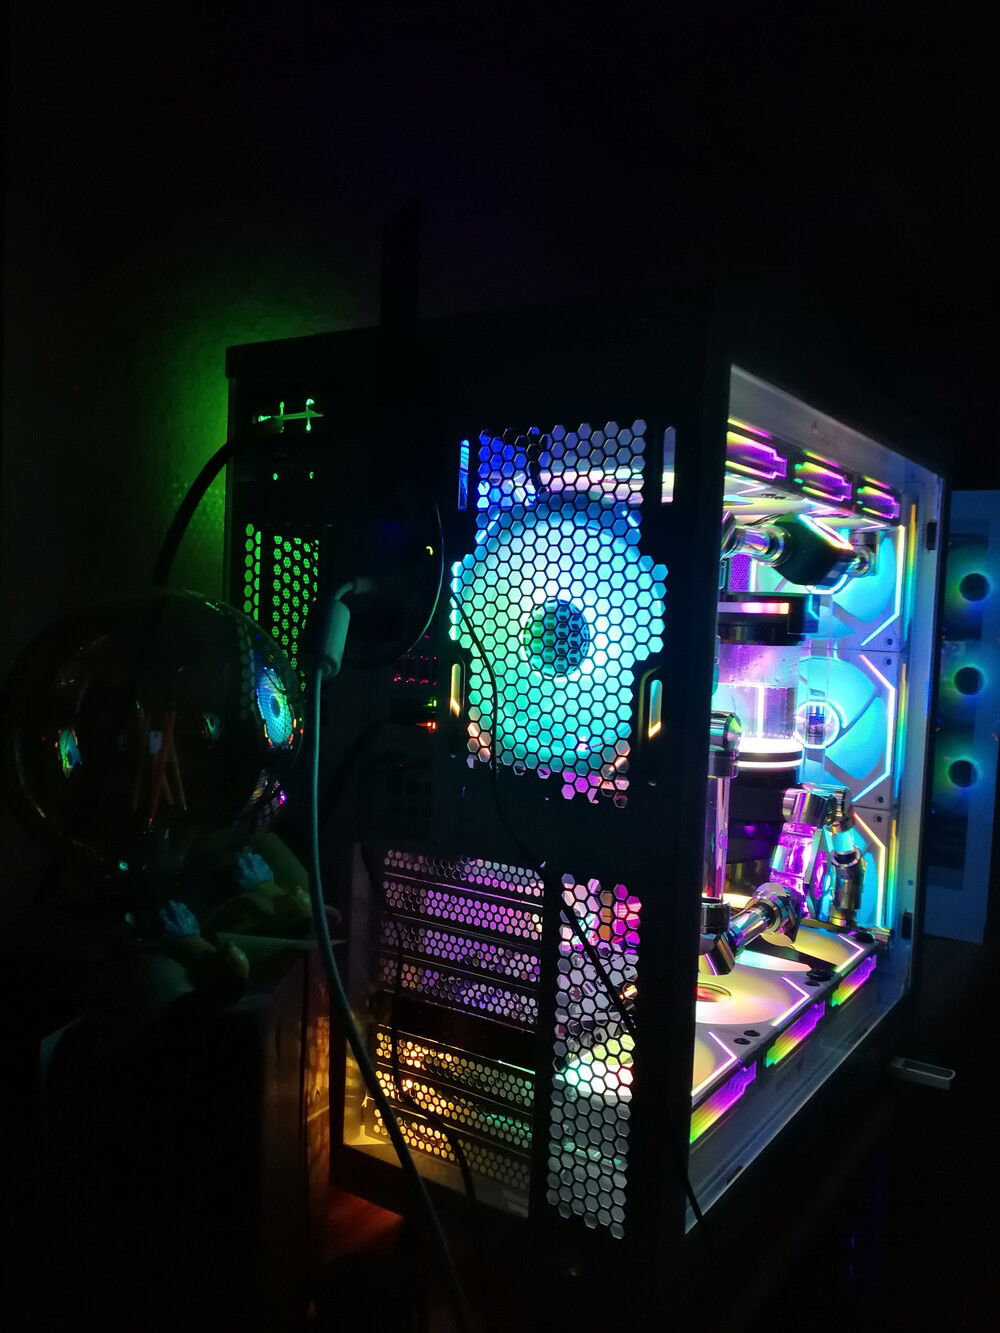
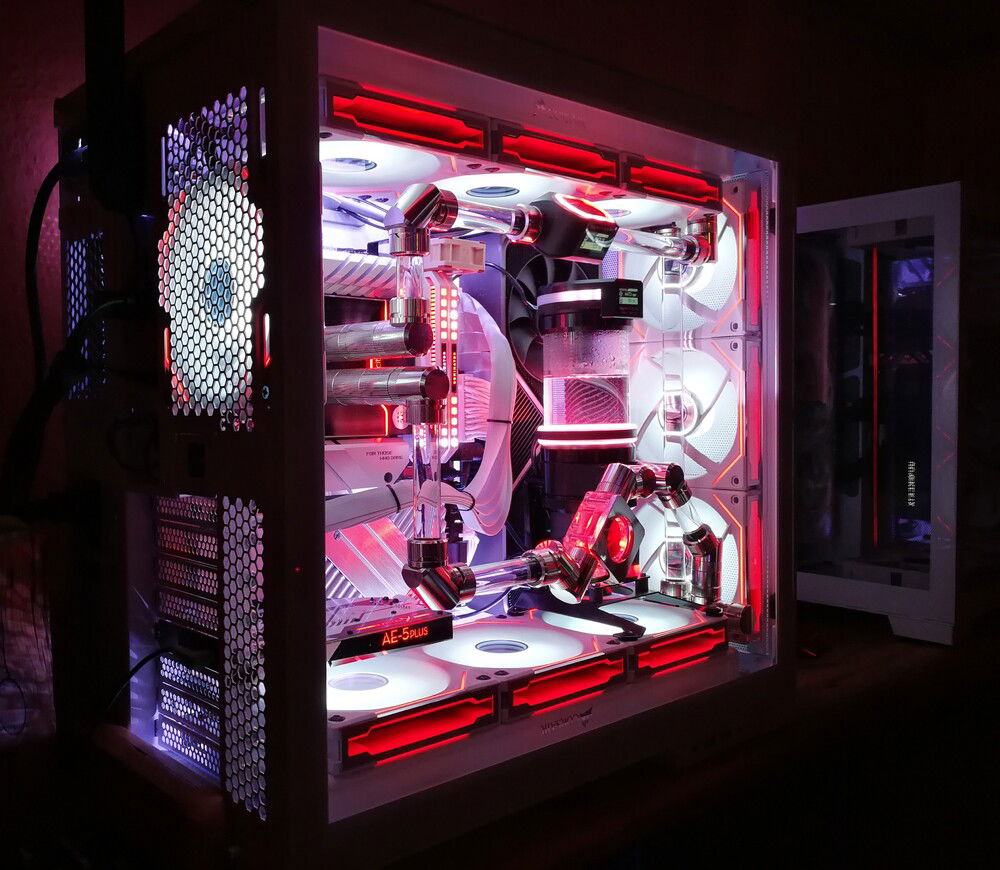
a look from behind into the case
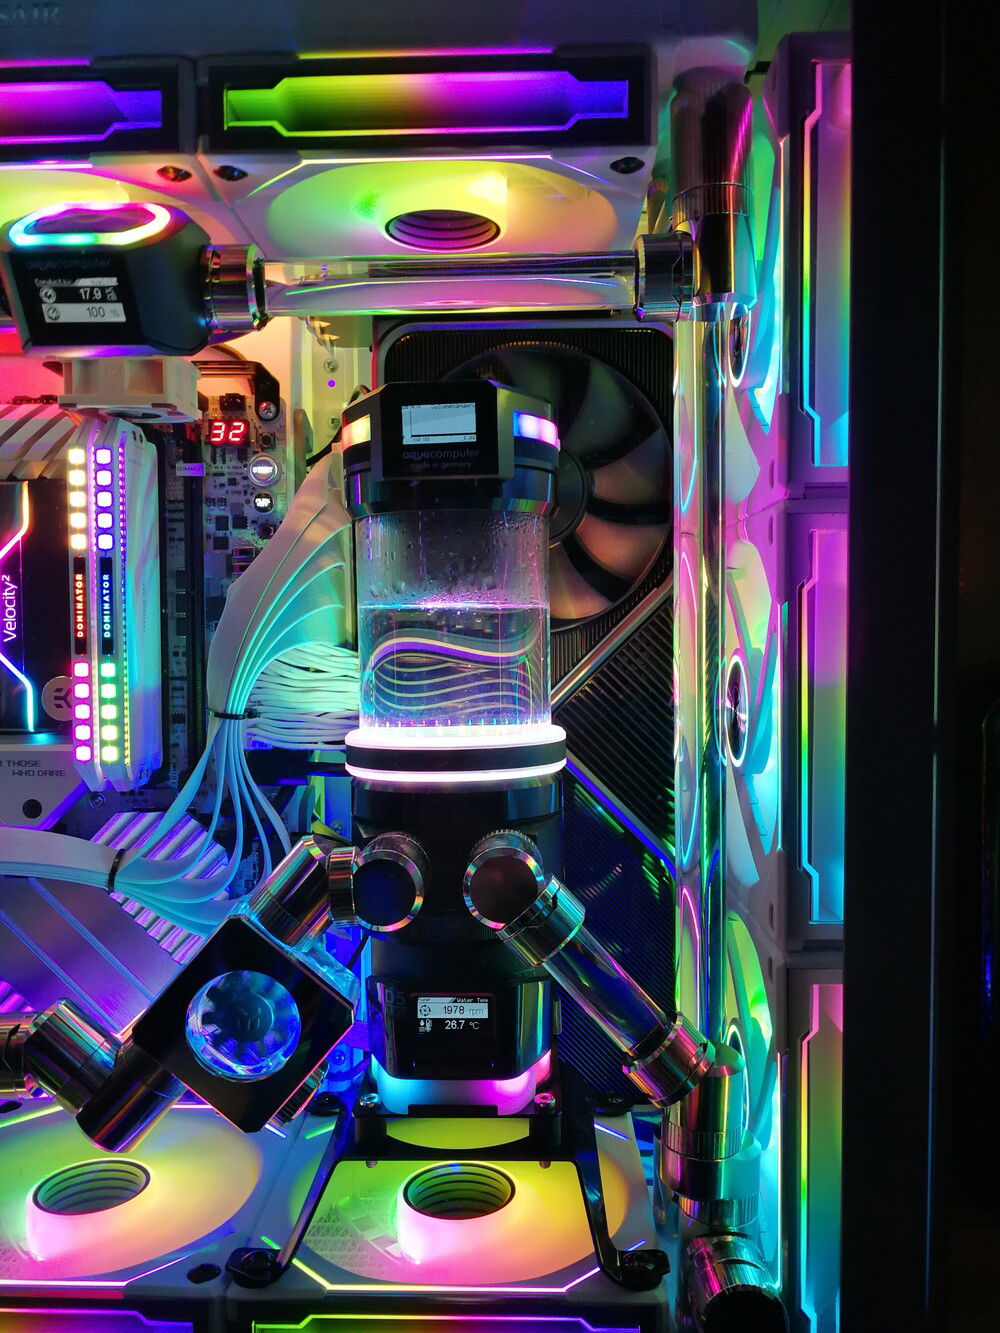
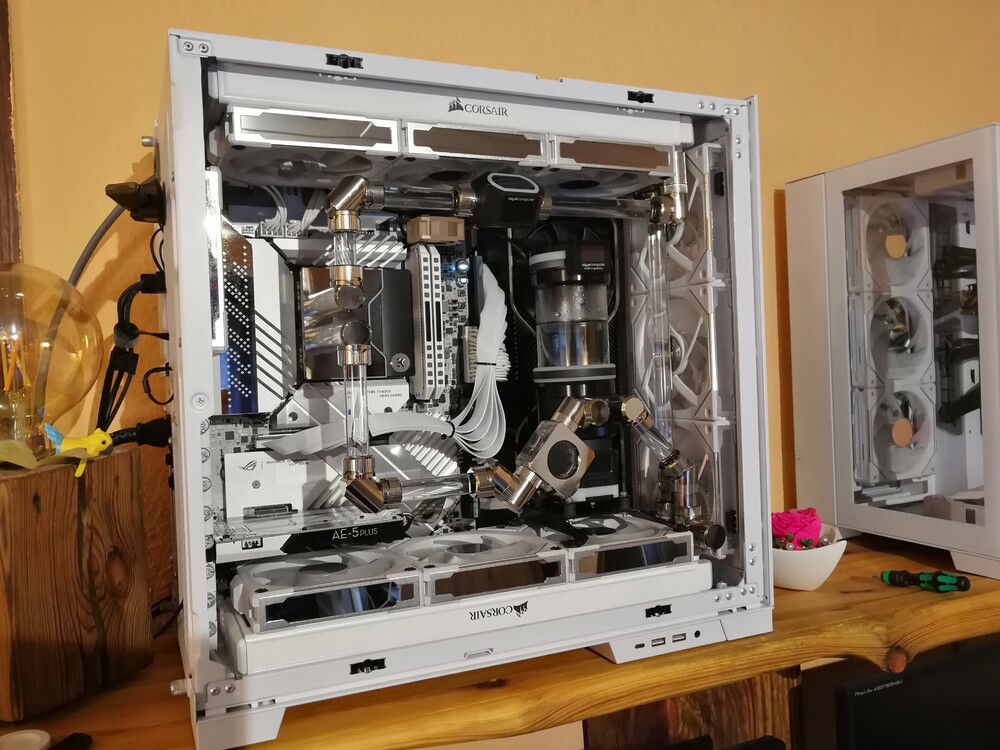
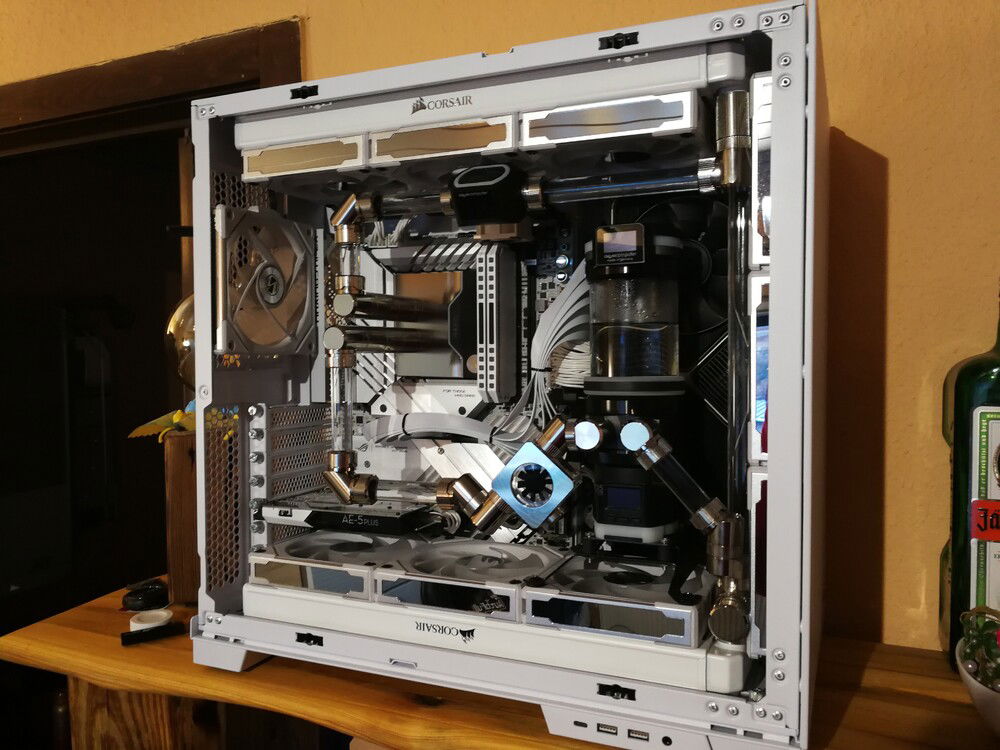
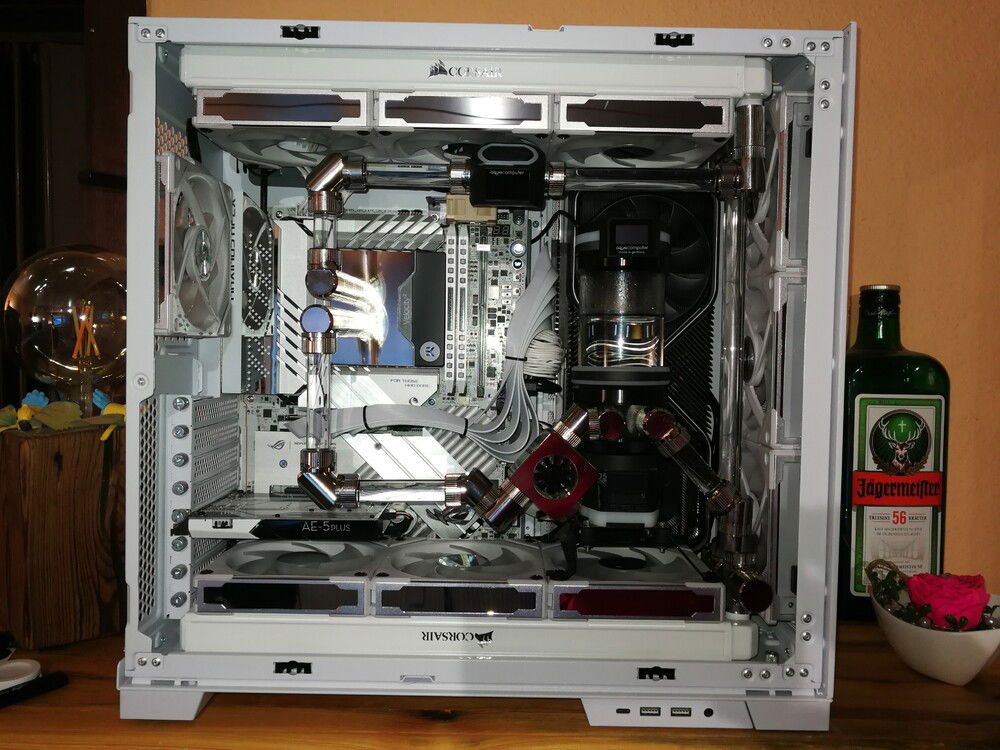
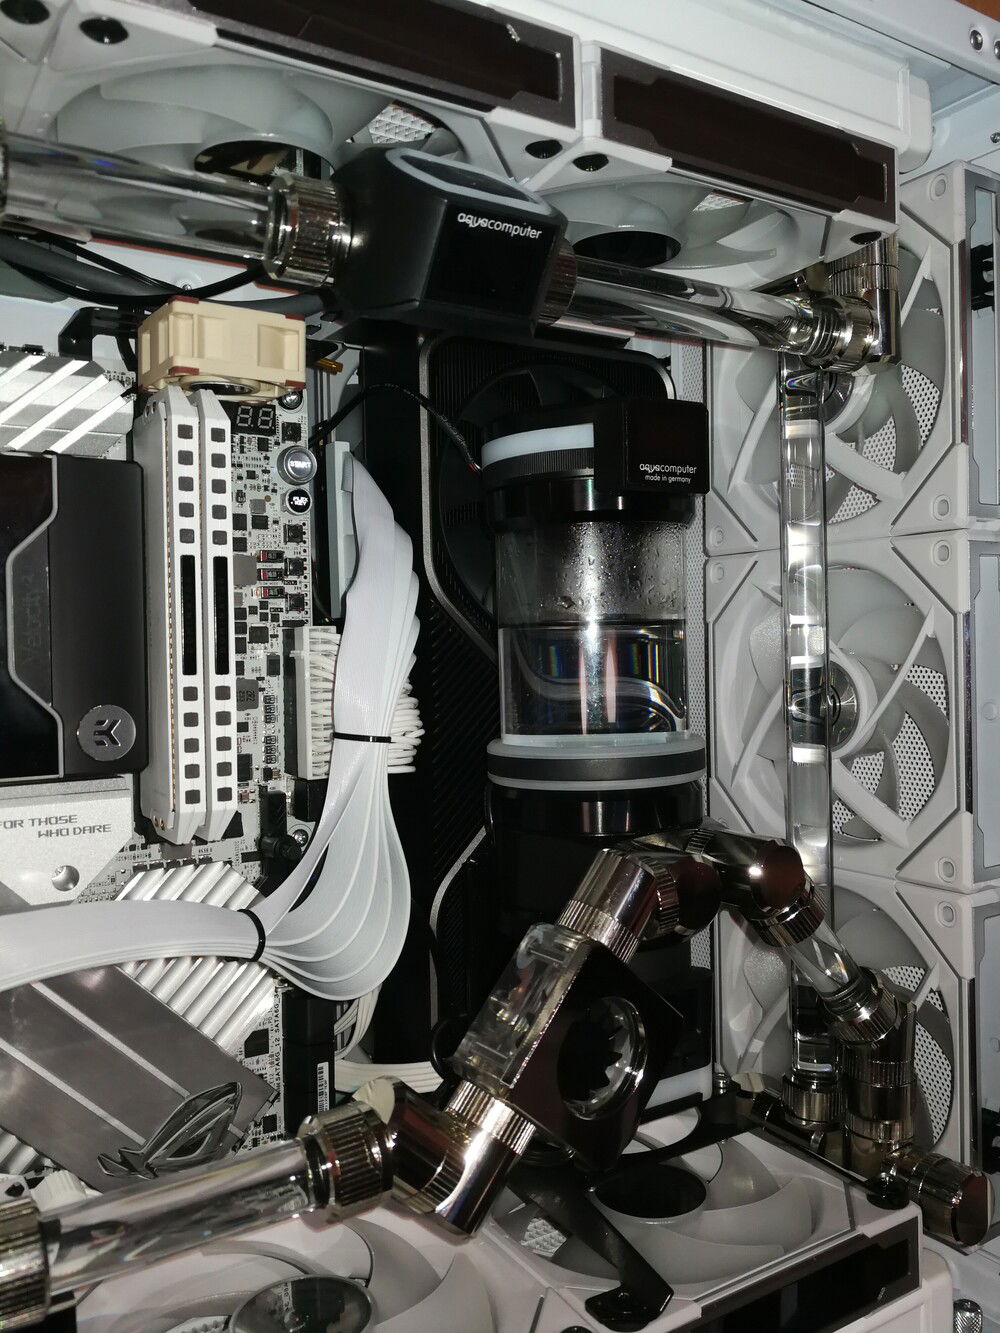
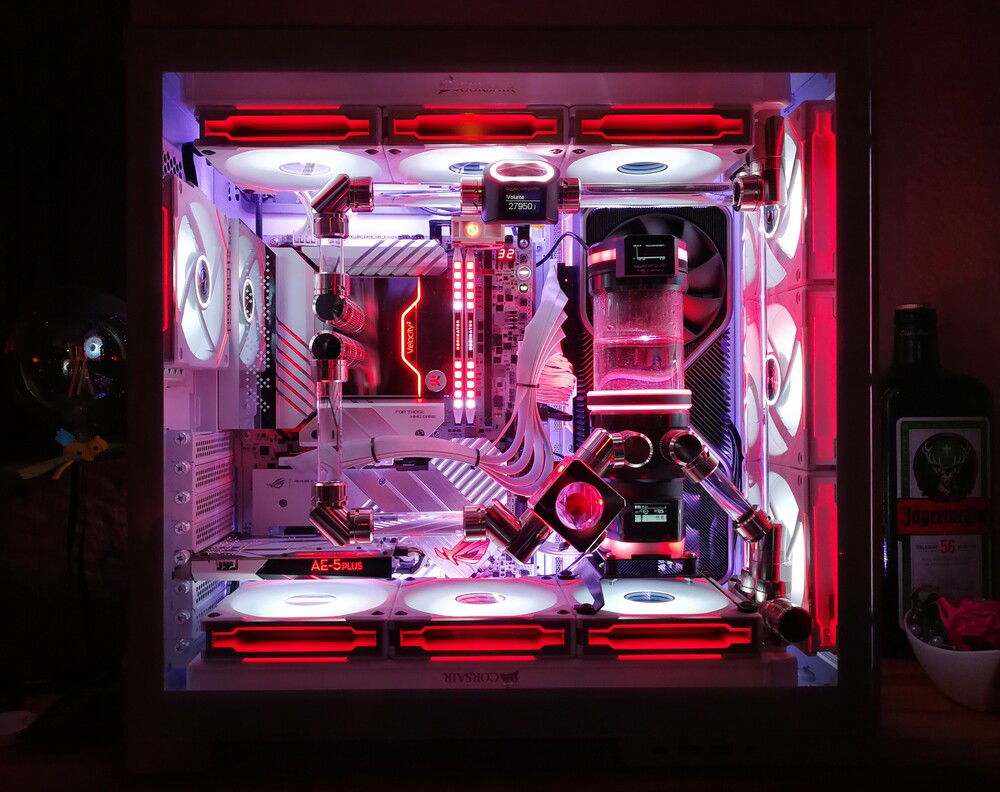
Aqua Computer Ultitube D5 150 Pro, D5 NEXT, Leakshield + high flow NEXT in a beautiful play of colors which shines through the borosilicate tubes and is reflected on the nickel-plated components
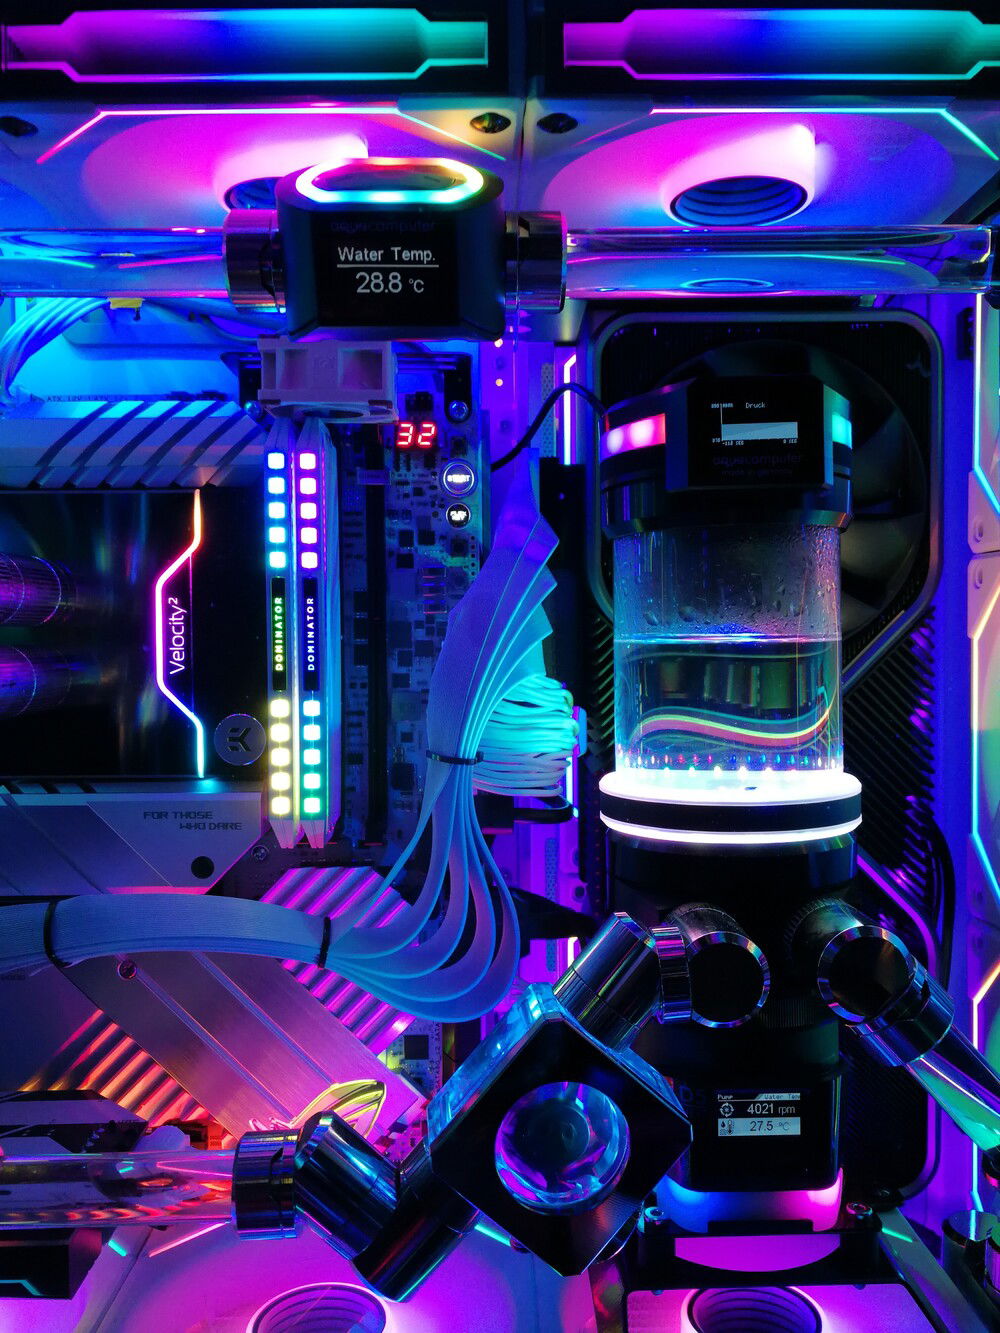
EK Velocity² with Corsair Dominator and Aqua Computer Parts with nice colours
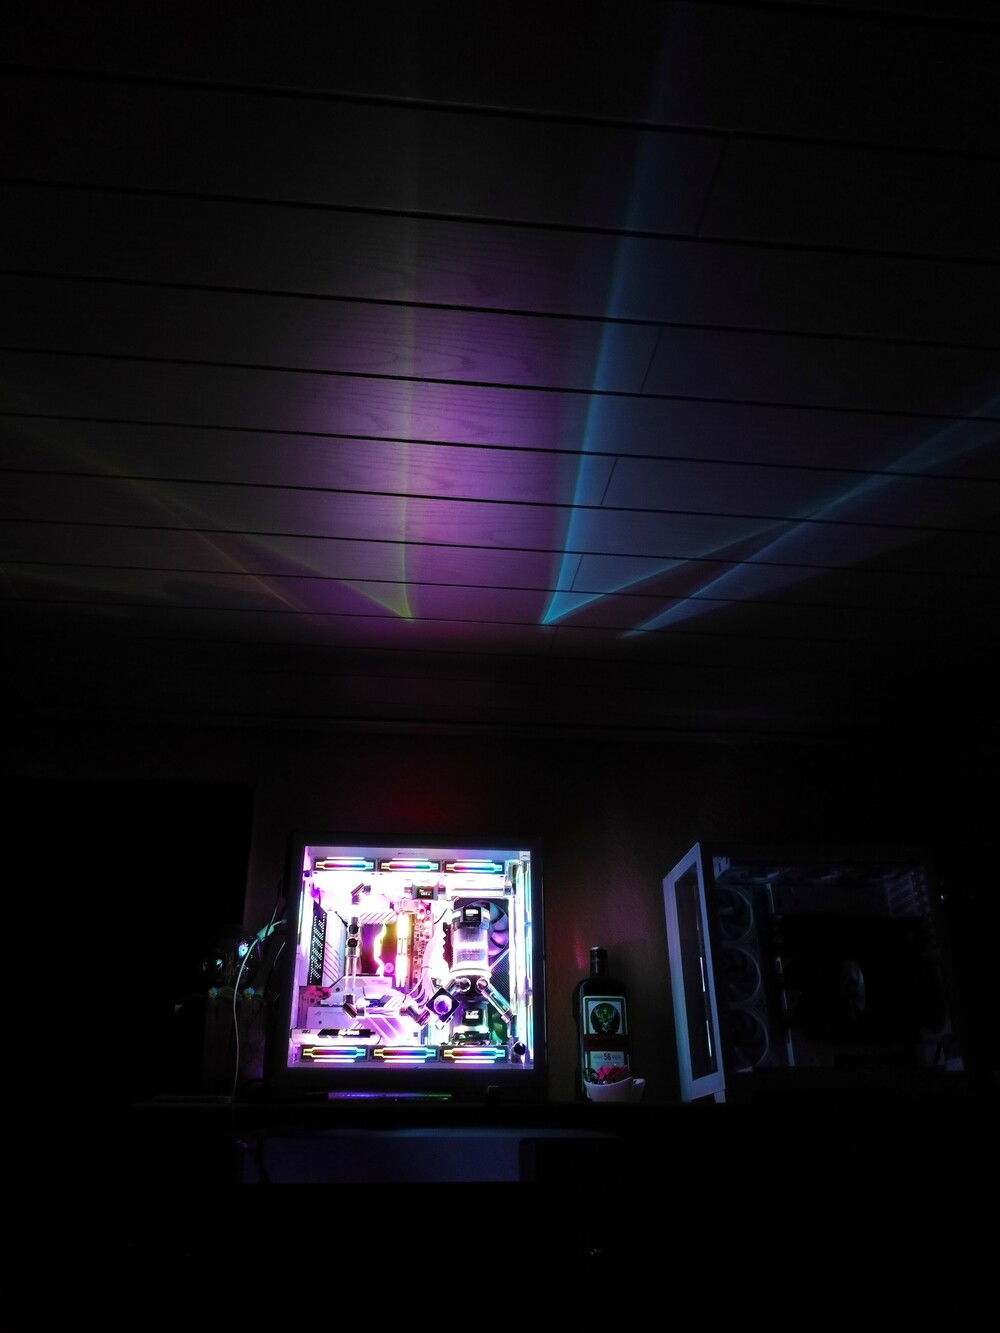
nice RGB effects in rainbow colours under the ceiling triggered by the RGB ring on the expansion tank
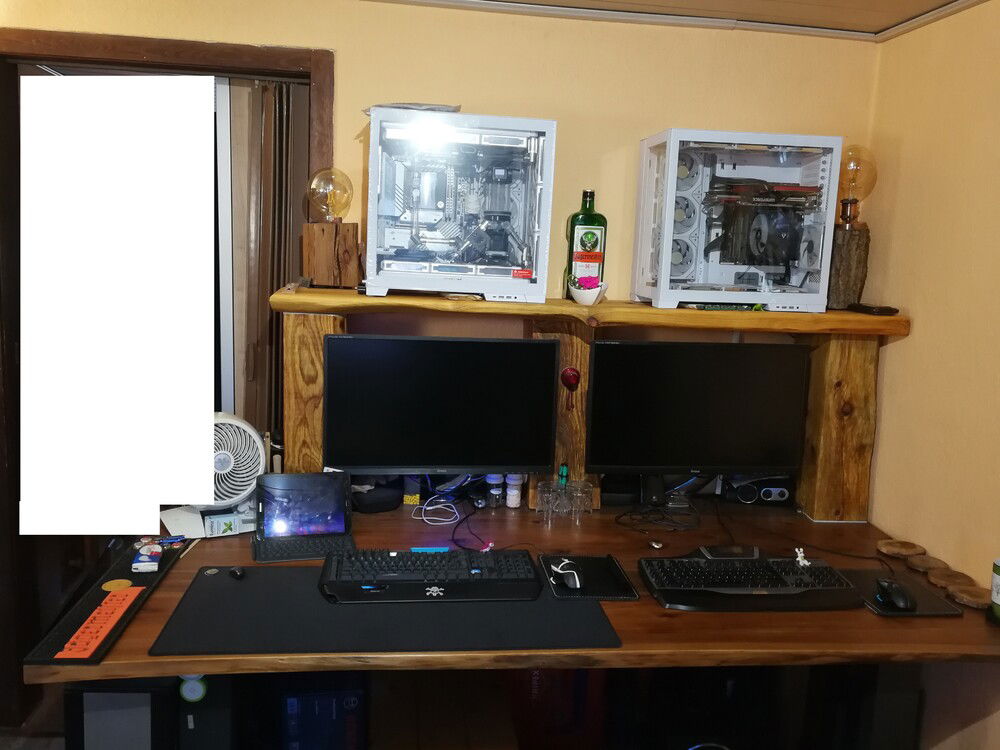
this is our "desk" for 2 people
so that the space is used optimally, I built a desk attachment that stands above the monitors. Then the computers. Something different than under the table and are nice "lights" in the dark room.
on the left the new finished system with water cooling and on the right a new case in "reverse mode", 10x fans and CPU cooler for an old I5-6500 & GTX980 G1 Gaming. It's supposed to be rebuilt this year or next.
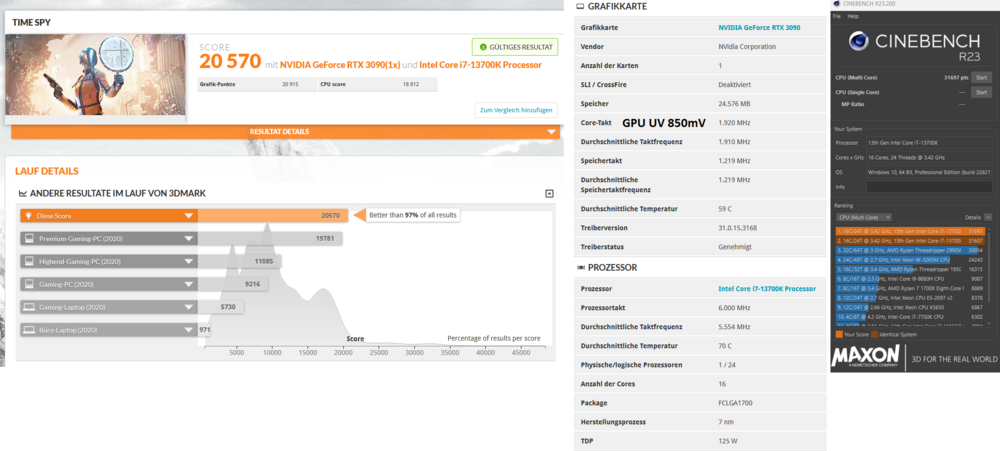
Little Benchmarking to check my cooling :D
much nicer in pictures than real...
in real, the white fans look slightly dirty grey-green and not so bright white
and "pink" is nothing but red :D - but i loved it like this here
First attempts with water cooling - until now still an RGB sea of rainbow colors
AD:
Hello everyone
after just over 10 years, it was finally time to offer a newer platform for the RTX 3090 FE, which was bought at a high price in February 2022. The existing CPU slowed down too much and it wasn't fun.
After more than 10 years, it should be something special again. In 2006/2007 there was the first computer for me with a complete lighting (Sharkoon Plexiglas Showcase + Sharkoon fan with neon tubes, neon tubes, black light, illuminated cables, UV light reacting plugs, cables, etc.) and then all optical highlights were omitted from the follow-up system.
Now I wanted to have something "special" with lighting again and nowadays it is much easier to get something there compared to the past.
In addition, I have never had anything to do with water cooling, but the topic appealed to me very much.
I watched a lot of posts and videos on the net and thought that I could do it too - even if I thought a little too much about whether it would work in the end or look smart.
In addition, after so many years - with one exception - I only ever had gray and black housings. The components in the system are all black... black, black, black... There has to be another way.
How about white?
Build a PC that has as many white components as possible. It's just stupid if the RTX 3090 FE in black was already here.
I took almost half a year to put it together.
Either an I9-13900k or at least an I7-13700K should be installed and so I had already decided on the further path for the choice of components.
At that time there was no Raptor Lake and no Z790 boards.
So a lot of time to think about the new case. There I became aware of the Lian Li O11 Dynamic EVO at some point and was really impressed by the "upright GPU" feature. Something completely different. Not like the fat huge card on the motherboard or how many do it vertically in front of it... Something completely different. This case in white - I couldn't find any alternatives - so that was my choice on which everything else has to be based.
Then I also ordered the components for "upright GPU" and the front mesh kit.
As a fan, I liked Lian Li's concept with the Daisy Chain System. Plug all the fans together and have fewer cables. Less cable is always good. In addition, the new ones with Infinity mirrors were announced. A nice additional effect that you like to take with you. 3 fans per radiator, 3 fans behind the GPU, 3 fans for the front and 1 fan for the back... 430€ ?!? WTF![Emoji]()
I've never paid so much money for a case fan in my life in the past. Most of the time one cost a maximum of 15 € and that was already a lot but 30 € ...
well, I wanted it - I have to go through it.
The bad thing is that right next to my build there is another computer that will be rebuilt this year or next year and also there I took the identical Lian Li O11 Dynamic EVO. Mine built normally and the other reverse. Identical fans should also be included. 10 pieces...
So I placed an order for 7x set of 3 and 2x 1 fans and transferred 760 € for a total of 23 fans.
I don't think you should think about something like that, you just have to do it.
It wasn't easy to choose the motherboard either. Again, I wanted to have a white board with a white board. In the beginning there was only the NZXT with white fairing, which doesn't look bad but was still black in the background until I read the announcement at ASUS...
ASUS ROG MAXIMUS Z790 APEX... an OC record breaker with many new world records... which somehow didn't interest me at all because I wanted the board ONLY for the optics and not for OC or records and I already suspected that this would not be cheap but if I have a goal and plan - then I have to go through it!
When it came to RAM, the choice was not so easy for me. It is imperative that there are white memory sticks, they may have ARGB and should provide 64GB so that the system is also equipped for the next planned 10 years of use.
This has significantly limited the choice at the time of purchase of the RAM. At some point, the choice fell on Corsair. At the time of purchase, the "Corsair DOMINATOR PLATINUM RGB 64GB (2x32GB) DDR5 DRAM 5600MHz C40" in white was the fastest they offered. If I had wanted a faster one, I would have had to switch to black and I didn't want that. I have a goal... As much white as possible![Emoji]()
Then I started looking for components for the new project - water cooling.
What do I need? I had absolutely no idea what I had finally gotten myself into and what costs I would incur, but I knew = I want this and it has to be implemented. No matter what the cost.
The choice of radiators was relatively simple. 2x 360mm white... the first thing that haunted Googel was Corsair XR5 for me... bought.
The specifications I set for myself were not hard tubes made of PMMA or PETG and there is no "transparent garden hose" in the case!
Either it should be hard tubes made of borosilicate glass, of metal tubes or deep black hoses made of EPDM.
Each of the variants has its advantages and disadvantages.
With the hoses I could have significantly reduced the cost of the build. However, hoses would also not allow straight lines, no right-angled branches... it would always be sagging direct connections with larger bending radii, but very easy and quick to implement even for someone without experience with water cooling.
The alternative with hard tubes, on the other hand, is quite high - a challenge for an absolute beginner when it comes to real glass. On the other hand, if you do it right, you also have a perfect result. You can work in a very structured way, install everything at the same angle... difficult... = that's what I want.
So the choice had fallen on hard tubes, but not yet conclusively whether borosilicate glass or chrome-plated tubes.
While looking for a suitable cooling block for the CPU, I came across EKWB at some point. I liked how the Velocity² block fit exactly perfectly in the area between the cooling blocks of the CPU. Like a glove. There was also a variant in full nickel. No plexiglass... bought. Exactly what I imagined. It would have been even better in white, but you can continue to build on that.
When it comes to connections and fittings, I also liked the Quantum Torque best of all in terms of appearance. There may certainly be better alternatives and also cheaper ones, but if you can get the components in the same color as the radiator - all in nickel, well, why not.
and at that time I had no idea what I was doing to myself. How many angles do I need? I have no idea. How many 90°, how many 45°, do I need extenders, how long do they have to be, how many, offset... absolutely haphazard.
I had some beginner's mistakes in the following planning and test setups and was allowed to reorder parts directly from EKWB 1x. For the EKWB CPU cooling block alone, Flow Indicator and all the connections and a few parts for future maintenance/cleaning, more than 650€ have just wandered over the table.
But I wanted it that way :hilarious
The next step was the selection of a pump with an expansion tank. Many users who asked me for advice in various forums told me that I should buy a normal pump without an expansion tank and that I could hide it in the invisible part of the housing. You can also hide a small pump-expansion tank combination in the rear chamber of the case.
But that was out of the question for me. For me, the technology is new and if I spend so much money on it, then I want to see it and be able to demonstrate and explain the whole thing to my family and friends who have nothing to do with it. If so, then everything must also be in the foreground.
The choice then fell very quickly on Aqua Computer. On the pump there is a nice display which provides me with information, plus the matching flow meter which also had a display and - as a "candy" for me - they have in all seriousness a kind of "insurance" in the form of the leakshield in the Sortimeht which fit the other two components still offer a display.
so I sat down trying to find as much information as possible about this leakshield. I read a lot in forums and also interviewed many forum users.
Fact is = if you build cleanly and decently, you don't need it.
If you work uncleanly, you bring more incidents, problems and other negative aspects into the house.
Difficult decision. I see the Leakshield as what it's being advertised for. As an insurance policy. Do you need them?
If it doesn't happen, but if something happens, then you would have been happy if you had had it and at the current prices on the hardware market, the costs for such a leakshield are manageable. At a price of about 4500 € without having included the GPU, the acquisition costs of a leakshield are no longer noticeable - and you also have another technical treat and I hope I will never need the insurance because of a claim.
So and now it got exciting...
how do I lay the tubes? Where do you want to go? How do I manage to get beautiful, right-angled and horizontal paths? What does gravity allow and what does it not? If I mount something on rotatable contra-angle handpieces, it's too heavy, then they turn away. All such things that an absolute beginner does not think of.
Before I cut a bunch of borosilicate tubes - where I had never cut glass tubes before - and destroy tons of money - I looked for a cheap option to learn the whole thing first.
In the hardware store there are often cable ducts or plumbing pipes in white, in gray... in diameter of 16mm and a length of 3 meters. Price per piece less than 1,50€
You can already guess what's coming, right?![Emoji]()
so I went to the hardware store and got 3 pipes and had 9 meters of material in one fell swoop to let off steam to my heart's content.
Simply cut the tube into several different lengths - pieces of which are partly double, triple +- 1CM steps so that you can really build up the complete cycle and test as many different ways as possible until you like the end result and then you can let everything work on you for a few days or weeks and, if necessary, exchange one or the other pipe for longer or shorter ones.
The next good thing is = with the tube pieces you immediately have a pattern to cut the right tubes afterwards! So the danger of missing and cutting the end product is no longer present at all. As a beginner, you approach the matter in a much more relaxed way.
When everything was ready and I presented it in a forum, someone wrote to me and told me that there are also smaller dealers who specialize in craft materials for glasswork. Among other things, you can also buy borosilicate tubes from Simax there for only a fraction of the price that the PC manufacturers call for their borosilicate tubes and they certainly order their products from wholesalers who order from Simax. So in the end identical product only much cheaper.
At the dealer where I ordered my tubes, they are billed according to the price per kilo of 19€ per kilo.
For a tube with an outer diameter of 16mm and a wall thickness of 2.5mm (weight approx. 118 grams) you pay just €2.24 per piece.
Unfortunately, these had been sold out for months - currently still but I just took a wall thickness thicker. Instead of 2.5mm, it has become 3.5mm. The advantage of this = less susceptible to breakage.
I paid just about €2.90 for a tube with a diameter of 16mm, wall thickness 3.5mm, 50cm length. 4 pipes ordered, 1.5 pipes used without waste - rest is for future projects or conversion work. So it's perfectly priced!!!!
They never discolor, never scratch, are brilliant in appearance, the light reflects really great, crystal clear and, above all, they will remain as they are now for decades. What more could you ask for?
The only catch is that there are only straight pieces and no pre-angled 90° pieces.
But that wasn't a problem in my eyes. I wanted to put my tubes in the limelight like a kind of "picture frame". Actually, it was supposed to be a square visually, but I didn't really like that during the test setup. Somehow, that special something was missing in it. Everything at right angles... It must not be horizontal and vertical. At the bottom right, the place from the transition of the radiator to the pump inlet was a good choice. I chose it at a 45° angle and because I wanted everything to be relatively symmetrical and didn't want to do without the playfulness of the FlowIndicator, I tried to install the Flow Indicator on the side of the pump input in 45° optics as well.
If you look closely, you will see that the left fitting of the flow indicator is at the same height as in the upper tube where the AC high flow is installed. Also the two tubes that come out on the left are the same length both at the top and at the bottom to get symmetry in here again. For this reason, this also resulted in the 90° contra-angle handpieces. In all 4 corners of the piping there is "metal"
what was missing was something absolutely "pointless" in my system. At least if you were to ask many other users.
Since 486 times I have installed a Soundblaster from Creative Labs and in every system I built was a Soundblaster installed. ALWAYS. Even when it started to have sound cards, network cards and onboard graphics on the motherboards, I really wanted to have my Soundblaster. Without Soundblaster, my computer is not complete for me personally - even if I know that this is "nonsense" because the onboard solutions today are more than good enough if you don't use expensive high-end headphones or expensive high-end speakers.
My "old" Soundblaster Z in red with red LEDs didn't fit into my system at all. It's like a fist on the eye...
Fortunately, there is a limited edition of Soundblaster which still has a small share of the color white. Unfortunately, you can't see most of this white on the bottom of the card, as it hangs just above the lower fans. There were also some LED stripes... Hmm.. What you have is also installed. This will certainly make it possible to create a great lighting design later on. I just couldn't understand why the plug for the external strips had to be mounted on the visible side of the card and not attached to the back of the power plug. Didn't anyone think about it during development? Who wants to have a cable coming out of the side of the sound card?
So disassemble the card, plug in the cable and lay the cable on the inside towards the motherboard and reassemble it. Visually not so ugly anymore. You just have to be careful if you want to plug or unplug the card, that the stripes hang on it.
since the pump with the expansion tank is in the foreground of my build, my RTX 3090 FE has no visual treats except - in my opinion - the successful design of a piece of briquette [coal], this fits optically - in my opinion - perfectly behind the pump and expansion tank.
So I have a lot of white on the left side of the case, silver with a bit of black and on the right side of the GPU and pump a lot of black with silver.
The only thing I don't really like are the power cables or the riser cable.
Originally, I wanted to take the 60cm long cable, but I read in many reports that riser cables are not always easy in operation. It can happen that other electrical components can cause malfunctions and loss of performance - not have to. In addition, the susceptibility to faults increases due to the length. Considering that there are special standards and guidelines for PCIE and that you exceed them with a brake racket, I didn't want to take any risks and lay the 60cm cable behind the sound card past the opening behind a power supply squeezed past a load of power cable to the GPU. It would certainly have looked much better than with the shorter 30 centimeter riser cable, but that's how it works for now. Theoretically, PCIE 4.0 x16 should have a net data rate of 31.5 GByte/s and I get just under 23 GByte/s.
Currently I could not find out whether it is due to a setting in the driver or whether it is due to the riser cable.
Unfortunately I don't have any other PCIE 4.0 board here where I could test the card or I don't have another SMALLER PCIE 4.0 graphics card here that I could test directly on the slot and I don't have any other riser cables here.
But since that's how it works for now, I'll leave it that way for now. If necessary, you can still rebuild it next year during the maintenance/cleaning of the water cooling system.
I get the built-in I7-13700k well cooled despite the slight OC via ASUS AI-OC and without limitations in the bios due to the built-in water cooling. In the beginning there were times here and there due to incorrectly adjusted flow etc. a core for a few seconds once in the thermal limit when you had run through Cinebench R23 to 80%, but I was able to optimize that with the help of Aquasuit.
I think I will have to spend a lot of time testing, optimizing and, above all, learning in order to get the most out of my water cooling.
Here in Germany we always say: Hier ist noch kein Meister vom Himmel gefallen "No master has fallen from the sky yet" And means something like - you start small and acquire your knowledge and no one was born with the knowledge right away.
what I still have to work on is adjusting my lighting. Sometimes here and there "rainbow" lighting - or as I like to call it "unicorn puke" - is sometimes nice but in the long run also boring.
The problem I'm facing now is the multitude of different tools needed to adjust the lighting in the first place.
ASUS can be used to adjust the board and all components connected to it. In my case this would be the board itself, EK-Velocity², EK-FlowIndicator just the ASUS software and I will definitely NOT be friends. I don't get to grips with the program.
Then Lian Li has his own concept through which all lights are controlled. If you consider that 16 fans can run over a controller, each fan thinks has 20 LEDs, you also pack the lighting from the Lian Li Case, you get 320 LEDs in a string that just want to be adjusted. This is the big disadvantage if you only have a single cable for PWM and ARGB for a pair of 4 fans and not a cable for each fan.
Then you need your own tool for the Soundblaster to adjust the lighting. Asus won't find them otherwise - Lian Li won't anyway...
Corsair ICUe is needed to adjust and change the colors of the RAM. You can still pass on the control to ASUS via Applett, but ASUS is so bad. ICUe, on the other hand, recognizes ASUS components including the EKWB parts connected to them.
And finally, we have Aqua computers in the game, which also offer their own system and which are not found by the other programs.
Now I have to find something that can handle everyone in one program. That you can distribute all colors at the same time via one setting and not experiment from program to program whether the color also matches the other or is not too light, too dark or wrong shade.
For this reason, the "unicorn" is currently still on the road in my case.
I hope I was able to give you a little pleasure while watching my setting.
Otherwise, don't be too strict with me if I have misdesigned or implemented something wrong in terms of water cooling. These are my first steps with water cooling. Until now, I have only ever been on the road with air cooling in the traditional way.
Well then.. until the next build sometime
Greetings from Germany
________________________________________________________________________
complete hardware list:
Case - Fans - Case Addon:
Water cooling parts:
Hardware parts:
after just over 10 years, it was finally time to offer a newer platform for the RTX 3090 FE, which was bought at a high price in February 2022. The existing CPU slowed down too much and it wasn't fun.
After more than 10 years, it should be something special again. In 2006/2007 there was the first computer for me with a complete lighting (Sharkoon Plexiglas Showcase + Sharkoon fan with neon tubes, neon tubes, black light, illuminated cables, UV light reacting plugs, cables, etc.) and then all optical highlights were omitted from the follow-up system.
Now I wanted to have something "special" with lighting again and nowadays it is much easier to get something there compared to the past.
In addition, I have never had anything to do with water cooling, but the topic appealed to me very much.
I watched a lot of posts and videos on the net and thought that I could do it too - even if I thought a little too much about whether it would work in the end or look smart.
In addition, after so many years - with one exception - I only ever had gray and black housings. The components in the system are all black... black, black, black... There has to be another way.
How about white?
Build a PC that has as many white components as possible. It's just stupid if the RTX 3090 FE in black was already here.
I took almost half a year to put it together.
Either an I9-13900k or at least an I7-13700K should be installed and so I had already decided on the further path for the choice of components.
At that time there was no Raptor Lake and no Z790 boards.
So a lot of time to think about the new case. There I became aware of the Lian Li O11 Dynamic EVO at some point and was really impressed by the "upright GPU" feature. Something completely different. Not like the fat huge card on the motherboard or how many do it vertically in front of it... Something completely different. This case in white - I couldn't find any alternatives - so that was my choice on which everything else has to be based.
Then I also ordered the components for "upright GPU" and the front mesh kit.
As a fan, I liked Lian Li's concept with the Daisy Chain System. Plug all the fans together and have fewer cables. Less cable is always good. In addition, the new ones with Infinity mirrors were announced. A nice additional effect that you like to take with you. 3 fans per radiator, 3 fans behind the GPU, 3 fans for the front and 1 fan for the back... 430€ ?!? WTF

I've never paid so much money for a case fan in my life in the past. Most of the time one cost a maximum of 15 € and that was already a lot but 30 € ...
well, I wanted it - I have to go through it.
The bad thing is that right next to my build there is another computer that will be rebuilt this year or next year and also there I took the identical Lian Li O11 Dynamic EVO. Mine built normally and the other reverse. Identical fans should also be included. 10 pieces...
So I placed an order for 7x set of 3 and 2x 1 fans and transferred 760 € for a total of 23 fans.
I don't think you should think about something like that, you just have to do it.
It wasn't easy to choose the motherboard either. Again, I wanted to have a white board with a white board. In the beginning there was only the NZXT with white fairing, which doesn't look bad but was still black in the background until I read the announcement at ASUS...
ASUS ROG MAXIMUS Z790 APEX... an OC record breaker with many new world records... which somehow didn't interest me at all because I wanted the board ONLY for the optics and not for OC or records and I already suspected that this would not be cheap but if I have a goal and plan - then I have to go through it!
When it came to RAM, the choice was not so easy for me. It is imperative that there are white memory sticks, they may have ARGB and should provide 64GB so that the system is also equipped for the next planned 10 years of use.
This has significantly limited the choice at the time of purchase of the RAM. At some point, the choice fell on Corsair. At the time of purchase, the "Corsair DOMINATOR PLATINUM RGB 64GB (2x32GB) DDR5 DRAM 5600MHz C40" in white was the fastest they offered. If I had wanted a faster one, I would have had to switch to black and I didn't want that. I have a goal... As much white as possible

Then I started looking for components for the new project - water cooling.
What do I need? I had absolutely no idea what I had finally gotten myself into and what costs I would incur, but I knew = I want this and it has to be implemented. No matter what the cost.
The choice of radiators was relatively simple. 2x 360mm white... the first thing that haunted Googel was Corsair XR5 for me... bought.
The specifications I set for myself were not hard tubes made of PMMA or PETG and there is no "transparent garden hose" in the case!
Either it should be hard tubes made of borosilicate glass, of metal tubes or deep black hoses made of EPDM.
Each of the variants has its advantages and disadvantages.
With the hoses I could have significantly reduced the cost of the build. However, hoses would also not allow straight lines, no right-angled branches... it would always be sagging direct connections with larger bending radii, but very easy and quick to implement even for someone without experience with water cooling.
The alternative with hard tubes, on the other hand, is quite high - a challenge for an absolute beginner when it comes to real glass. On the other hand, if you do it right, you also have a perfect result. You can work in a very structured way, install everything at the same angle... difficult... = that's what I want.
So the choice had fallen on hard tubes, but not yet conclusively whether borosilicate glass or chrome-plated tubes.
While looking for a suitable cooling block for the CPU, I came across EKWB at some point. I liked how the Velocity² block fit exactly perfectly in the area between the cooling blocks of the CPU. Like a glove. There was also a variant in full nickel. No plexiglass... bought. Exactly what I imagined. It would have been even better in white, but you can continue to build on that.
When it comes to connections and fittings, I also liked the Quantum Torque best of all in terms of appearance. There may certainly be better alternatives and also cheaper ones, but if you can get the components in the same color as the radiator - all in nickel, well, why not.
and at that time I had no idea what I was doing to myself. How many angles do I need? I have no idea. How many 90°, how many 45°, do I need extenders, how long do they have to be, how many, offset... absolutely haphazard.
I had some beginner's mistakes in the following planning and test setups and was allowed to reorder parts directly from EKWB 1x. For the EKWB CPU cooling block alone, Flow Indicator and all the connections and a few parts for future maintenance/cleaning, more than 650€ have just wandered over the table.
But I wanted it that way :hilarious
The next step was the selection of a pump with an expansion tank. Many users who asked me for advice in various forums told me that I should buy a normal pump without an expansion tank and that I could hide it in the invisible part of the housing. You can also hide a small pump-expansion tank combination in the rear chamber of the case.
But that was out of the question for me. For me, the technology is new and if I spend so much money on it, then I want to see it and be able to demonstrate and explain the whole thing to my family and friends who have nothing to do with it. If so, then everything must also be in the foreground.
The choice then fell very quickly on Aqua Computer. On the pump there is a nice display which provides me with information, plus the matching flow meter which also had a display and - as a "candy" for me - they have in all seriousness a kind of "insurance" in the form of the leakshield in the Sortimeht which fit the other two components still offer a display.
so I sat down trying to find as much information as possible about this leakshield. I read a lot in forums and also interviewed many forum users.
Fact is = if you build cleanly and decently, you don't need it.
If you work uncleanly, you bring more incidents, problems and other negative aspects into the house.
Difficult decision. I see the Leakshield as what it's being advertised for. As an insurance policy. Do you need them?
If it doesn't happen, but if something happens, then you would have been happy if you had had it and at the current prices on the hardware market, the costs for such a leakshield are manageable. At a price of about 4500 € without having included the GPU, the acquisition costs of a leakshield are no longer noticeable - and you also have another technical treat and I hope I will never need the insurance because of a claim.
So and now it got exciting...
how do I lay the tubes? Where do you want to go? How do I manage to get beautiful, right-angled and horizontal paths? What does gravity allow and what does it not? If I mount something on rotatable contra-angle handpieces, it's too heavy, then they turn away. All such things that an absolute beginner does not think of.
Before I cut a bunch of borosilicate tubes - where I had never cut glass tubes before - and destroy tons of money - I looked for a cheap option to learn the whole thing first.
In the hardware store there are often cable ducts or plumbing pipes in white, in gray... in diameter of 16mm and a length of 3 meters. Price per piece less than 1,50€
You can already guess what's coming, right?
so I went to the hardware store and got 3 pipes and had 9 meters of material in one fell swoop to let off steam to my heart's content.
Simply cut the tube into several different lengths - pieces of which are partly double, triple +- 1CM steps so that you can really build up the complete cycle and test as many different ways as possible until you like the end result and then you can let everything work on you for a few days or weeks and, if necessary, exchange one or the other pipe for longer or shorter ones.
The next good thing is = with the tube pieces you immediately have a pattern to cut the right tubes afterwards! So the danger of missing and cutting the end product is no longer present at all. As a beginner, you approach the matter in a much more relaxed way.
When everything was ready and I presented it in a forum, someone wrote to me and told me that there are also smaller dealers who specialize in craft materials for glasswork. Among other things, you can also buy borosilicate tubes from Simax there for only a fraction of the price that the PC manufacturers call for their borosilicate tubes and they certainly order their products from wholesalers who order from Simax. So in the end identical product only much cheaper.
At the dealer where I ordered my tubes, they are billed according to the price per kilo of 19€ per kilo.
For a tube with an outer diameter of 16mm and a wall thickness of 2.5mm (weight approx. 118 grams) you pay just €2.24 per piece.
Unfortunately, these had been sold out for months - currently still but I just took a wall thickness thicker. Instead of 2.5mm, it has become 3.5mm. The advantage of this = less susceptible to breakage.
I paid just about €2.90 for a tube with a diameter of 16mm, wall thickness 3.5mm, 50cm length. 4 pipes ordered, 1.5 pipes used without waste - rest is for future projects or conversion work. So it's perfectly priced!!!!
They never discolor, never scratch, are brilliant in appearance, the light reflects really great, crystal clear and, above all, they will remain as they are now for decades. What more could you ask for?
The only catch is that there are only straight pieces and no pre-angled 90° pieces.
But that wasn't a problem in my eyes. I wanted to put my tubes in the limelight like a kind of "picture frame". Actually, it was supposed to be a square visually, but I didn't really like that during the test setup. Somehow, that special something was missing in it. Everything at right angles... It must not be horizontal and vertical. At the bottom right, the place from the transition of the radiator to the pump inlet was a good choice. I chose it at a 45° angle and because I wanted everything to be relatively symmetrical and didn't want to do without the playfulness of the FlowIndicator, I tried to install the Flow Indicator on the side of the pump input in 45° optics as well.
If you look closely, you will see that the left fitting of the flow indicator is at the same height as in the upper tube where the AC high flow is installed. Also the two tubes that come out on the left are the same length both at the top and at the bottom to get symmetry in here again. For this reason, this also resulted in the 90° contra-angle handpieces. In all 4 corners of the piping there is "metal"
what was missing was something absolutely "pointless" in my system. At least if you were to ask many other users.
Since 486 times I have installed a Soundblaster from Creative Labs and in every system I built was a Soundblaster installed. ALWAYS. Even when it started to have sound cards, network cards and onboard graphics on the motherboards, I really wanted to have my Soundblaster. Without Soundblaster, my computer is not complete for me personally - even if I know that this is "nonsense" because the onboard solutions today are more than good enough if you don't use expensive high-end headphones or expensive high-end speakers.
My "old" Soundblaster Z in red with red LEDs didn't fit into my system at all. It's like a fist on the eye...
Fortunately, there is a limited edition of Soundblaster which still has a small share of the color white. Unfortunately, you can't see most of this white on the bottom of the card, as it hangs just above the lower fans. There were also some LED stripes... Hmm.. What you have is also installed. This will certainly make it possible to create a great lighting design later on. I just couldn't understand why the plug for the external strips had to be mounted on the visible side of the card and not attached to the back of the power plug. Didn't anyone think about it during development? Who wants to have a cable coming out of the side of the sound card?
So disassemble the card, plug in the cable and lay the cable on the inside towards the motherboard and reassemble it. Visually not so ugly anymore. You just have to be careful if you want to plug or unplug the card, that the stripes hang on it.
since the pump with the expansion tank is in the foreground of my build, my RTX 3090 FE has no visual treats except - in my opinion - the successful design of a piece of briquette [coal], this fits optically - in my opinion - perfectly behind the pump and expansion tank.
So I have a lot of white on the left side of the case, silver with a bit of black and on the right side of the GPU and pump a lot of black with silver.
The only thing I don't really like are the power cables or the riser cable.
Originally, I wanted to take the 60cm long cable, but I read in many reports that riser cables are not always easy in operation. It can happen that other electrical components can cause malfunctions and loss of performance - not have to. In addition, the susceptibility to faults increases due to the length. Considering that there are special standards and guidelines for PCIE and that you exceed them with a brake racket, I didn't want to take any risks and lay the 60cm cable behind the sound card past the opening behind a power supply squeezed past a load of power cable to the GPU. It would certainly have looked much better than with the shorter 30 centimeter riser cable, but that's how it works for now. Theoretically, PCIE 4.0 x16 should have a net data rate of 31.5 GByte/s and I get just under 23 GByte/s.
Currently I could not find out whether it is due to a setting in the driver or whether it is due to the riser cable.
Unfortunately I don't have any other PCIE 4.0 board here where I could test the card or I don't have another SMALLER PCIE 4.0 graphics card here that I could test directly on the slot and I don't have any other riser cables here.
But since that's how it works for now, I'll leave it that way for now. If necessary, you can still rebuild it next year during the maintenance/cleaning of the water cooling system.
I get the built-in I7-13700k well cooled despite the slight OC via ASUS AI-OC and without limitations in the bios due to the built-in water cooling. In the beginning there were times here and there due to incorrectly adjusted flow etc. a core for a few seconds once in the thermal limit when you had run through Cinebench R23 to 80%, but I was able to optimize that with the help of Aquasuit.
I think I will have to spend a lot of time testing, optimizing and, above all, learning in order to get the most out of my water cooling.
Here in Germany we always say: Hier ist noch kein Meister vom Himmel gefallen "No master has fallen from the sky yet" And means something like - you start small and acquire your knowledge and no one was born with the knowledge right away.
what I still have to work on is adjusting my lighting. Sometimes here and there "rainbow" lighting - or as I like to call it "unicorn puke" - is sometimes nice but in the long run also boring.
The problem I'm facing now is the multitude of different tools needed to adjust the lighting in the first place.
ASUS can be used to adjust the board and all components connected to it. In my case this would be the board itself, EK-Velocity², EK-FlowIndicator just the ASUS software and I will definitely NOT be friends. I don't get to grips with the program.
Then Lian Li has his own concept through which all lights are controlled. If you consider that 16 fans can run over a controller, each fan thinks has 20 LEDs, you also pack the lighting from the Lian Li Case, you get 320 LEDs in a string that just want to be adjusted. This is the big disadvantage if you only have a single cable for PWM and ARGB for a pair of 4 fans and not a cable for each fan.
Then you need your own tool for the Soundblaster to adjust the lighting. Asus won't find them otherwise - Lian Li won't anyway...
Corsair ICUe is needed to adjust and change the colors of the RAM. You can still pass on the control to ASUS via Applett, but ASUS is so bad. ICUe, on the other hand, recognizes ASUS components including the EKWB parts connected to them.
And finally, we have Aqua computers in the game, which also offer their own system and which are not found by the other programs.
Now I have to find something that can handle everyone in one program. That you can distribute all colors at the same time via one setting and not experiment from program to program whether the color also matches the other or is not too light, too dark or wrong shade.
For this reason, the "unicorn" is currently still on the road in my case.
I hope I was able to give you a little pleasure while watching my setting.
Otherwise, don't be too strict with me if I have misdesigned or implemented something wrong in terms of water cooling. These are my first steps with water cooling. Until now, I have only ever been on the road with air cooling in the traditional way.
Well then.. until the next build sometime
Greetings from Germany
________________________________________________________________________
complete hardware list:
Case - Fans - Case Addon:
- Lian Li O11 Dynamic EVO weiß
- Lian Li O11DE-6W weiß
- Lian Li O11D EVO Front Mesh Kit weiß
- Lian Li Riser Card Kabel O11DE-2W weiß
- 3x Lian Li UNI FAN SL Infinity weiß, 120mm, 3er-Pack
- Lian Li UNI FAN SL Infinity weiß, 120mm
- Noctua NF-A4x20 PWM, Leiser Premium-Lüfter, 4-Pin (40x20mm, Braun) - Memory / Dimm.2 Slot
- Noctua NF-A6x25 PWM, Leiser Premium-Lüfter, 4-Pin (60mm, Braun) - HDD Käfig
- LINDY 37873 3m High Speed HDMI Kabel, Cromo Line, anthrazit
- 2x Nzxt Interner USB-Hub 3 – AC-IUSBH-M3 – 4 interne USB 2.0 Ports
- Thermal Grizzly Kryonaut Waermeleitpaste 1g
Water cooling parts:
- Borosilikatglas Tubes 16mm Durchmesser mit einer Wandstärke von 3mm
- 2x Corsair Hydro X Series XR5 360mm weiß
- Aqua Computer Ultitube D5 100 Pro, D5 NEXT, 230ml, mit Pumpe - Boroslikatglas
- Lüfterhalterung 120 mm für ULTITUBE D5 Ausgleichsbehälter
- Aqua Computer Leakshield
- Aqua Computer Durchflusssensor high flow NEXT
- Aqua Computer QUADRO Lüftersteuerung für PWM-Lüfter
- Double Protect Ultra 5l Kanister
- EK-Quantum Velocity² D-RGB - 1700 Full Nickel
- EK-Quantum Flow Indicator D-RGB – Nickel
- EK-Quantum Torque Plug w/Badge - Nickel
- 6x EK-Quantum Torque Extender Static MF 28 - Nickel
- 2x EK-Quantum Torque Extender Static MF 7 - Nickel
- 10x EK-Quantum Torque Rotary 90° - Nickel ----[+6 Stück zu viel bestellt]
- 3x EK-Quantum Torque Rotary 45° - Nickel ----[+1 Stück zu viel bestellt]
- 2x EK-Quantum Torque Static FF 90° - Nickel
- 3x EK-Quantum Torque 6-Pack HDC 16 - Nickel ----[4 Fittinge übrig]
- EK-Quantum Torque Rotary Offset 7 - Nickel
- 2x EK-Quantum Torque Extender Static MM 7 - Nickel
- EK-Quantum Torque Splitter 3F T - Nickel
- EK-Quantum Torque Drain Valve - Nickel
- EK-Quantum Torque STC-12/16 - Nickel --- für Service Arbeiten / Reinigung
- EK-Quantum Torque Plug w/Cover 10-Pack - Black --- für Service Arbeiten / Reinigung
- EK Water Blocks EK-Loop Multi Allen Key, 6mm, 8mm, 9mm
- EK Water Blocks Netzteilüberbrückungsadapter
- EK-Tube ZMT Matte Black 16,1/11,1mm (3m RETAIL) --- für Service Arbeiten / Reinigung
- EK-Loop Foldable Filling Bottle - FREE
- EK-MYSTERY BAG (big) [Wert 100€ gratis] - [Mousepad L 34,90€, Leak Tester 36,99€, Microfaser Tuch, Bandana, Stoffbeutel]
Hardware parts:
- 1000 Watt Phanteks AMP 80 PLUS Gold Netzteil, modular weiss
- ASUS ROG MAXIMUS Z790 APEX
- Intel Core I7-13700K
- Corsair DOMINATOR® PLATINUM RGB 64GB (2x32GB) DDR5 DRAM 5600MHz C40 Memory Kit — White - CMT64GX5M2B5600C40W
- 4x WD_Black SN850X 2 TB
- Creative Labs Sound BlasterX AE-5 Plus Pure Edition [weiß/schwarz]
- Nvidia RTX 4090 Founders Edition
Investment for new parts in the amount of 5035.32€ gross without deduction of cashback or other discounts.
if I add the purchase price of the RTX 3090 FE from Feb. 2022, I get a total price of 6785.32€ for this complete system.
With a little luck, cashback and discounts, I was able to save round about 500€ on the complete system and ended up staying just 6300€.
Speaker Logitech Z-3, keyboard Logitech G910 Orion, mouse Logitech G502 SE, monitor IIYAMA ProLite X2783HSU-B3 were also carried over from the old system.
-------------------------------------------------------
Upgrade from Nvidia RTX 3090 Founders Edition to Nvidia RTX 4090 Founders Edition
Color(s): Silver White
RGB Lighting? Yes
Theme: none
Cooling: Custom Liquid Cooling
Size: ATX
Type: General Build
Hardware
CPU
$ 447.79
Motherboard
$ 1,399.00
Memory
$ 399.98
Graphics
$ 3,329.95
Storage
$ 789.62
Case
$ 242.96
Case Fan
$ 218.19
Case Fan
$ 218.19
Cooling
Cooling
$ 141.00
Cooling
$ 159.25
Cooling
$ 159.98
Cooling
Cooling
$ 251.97
Cooling
$ 31.99
Cooling
$ 81.66
Cooling
$ 22.98
Cooling
$ 19.76
Cooling
$ 10.49
Cooling
Cooling
Cooling
$ 20.78
Cooling
Cooling
$ 29.98
Cooling
$ 182.92
Accessories
Accessories
Accessories
$ 49.98
Monitor
$ 214.50
Approved by: