


Most Recent Build
Best Build
AD:


Mighty, Mighty AMD OR RGZebra
AD:
INTRODUCTION
2021 was the year things should have gotten better for computers. I mean 2020 was a major crap show am I right? 2021 just ended up being a continuation on so many levels. With regards to computer building, unless you were lucky, well-timed, or had connections, getting a GPU and even a CPU at times was a near impossible feat. Prices for components constantly bounced up and down--more up--especially after February. Luckily over the year I was able to take advantage of many deals, and things calmed down for the most part . . . except when it came to GPUs.
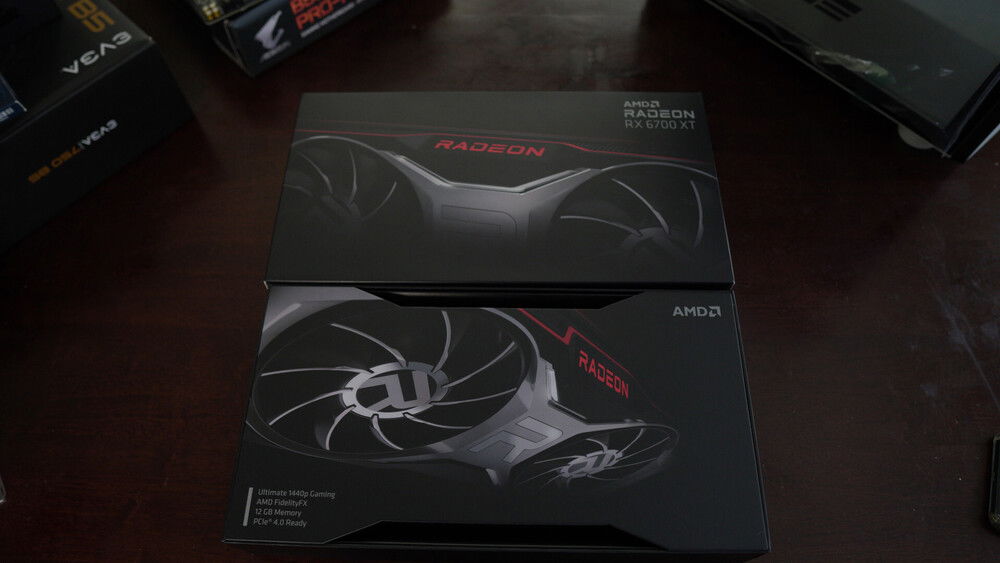
The struggle was real to find even a budget builder GPU in a GTX 1650 or 1660 and even then sellers wanted $150-$200 more than MSRP for a USED GPU. One day while I was scouring eBay I came upon a listing for an AMD RX 6700XT new in box. The rub? The seller had 0 reviews. Screw it I said, and went YOLO on the bid. Buyer protection would be my Superman should the seller turn out to be some nefarious ne'er-do-well. I put in my max bid not even thinking I'd win the auction considering my bid was $689 and the GPU was going for well over $800 and $900 bucks on other listings. Shutting the browser tab, I went to sleep thinking that in 8 hours when the auction was over, I would be outbid. However, fate it seemed, was on my side . . .
Upon waking up, I checked my phone and there was an eBay notification . . . "You won the auction pay now . . ." or something to that effect. Since this was an eBay transaction, I felt confident enough that if I was screwed by the seller, I'd get my money back, so I paid; and then the waiting commenced. A week went buy and the package arrived. I opened the shipping box and was greeted to a pristine, factory sealed, RX 6700XT. I immediately removed the shrink wrap, opened the box, and checked the GPU for cosmetic issues or anything else that might lead me to think it was a fake, there were none. I then plugged it into my test bench, powered up the PC and loaded GPU-Z where I was greeted with the specs for a working Big Navi card for less than the 200% asking price of most other RX 6700XT listings . . . sure it was still $289 over MSRP, but it's the small things am I right?
And that is the story of how I procured the last part for the all AMD system.
The goal for this build was to make an upper-mid tier PC that could game, stream, and do content creation all for under $1600. Since component prices and availability have been all over the place in 2021, I bought items as they became available or were on sale. Believe it or not, even with the graphics card I’m using in this build, I was able to stick to my budget.
I made a couple of videos for this build if you want to check them out, click the following links:
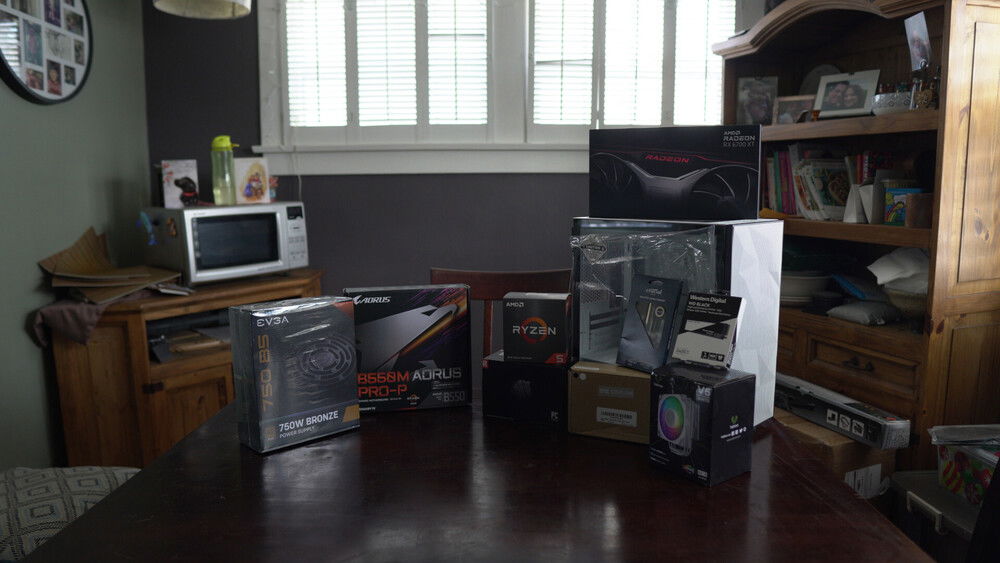
THE PARTS
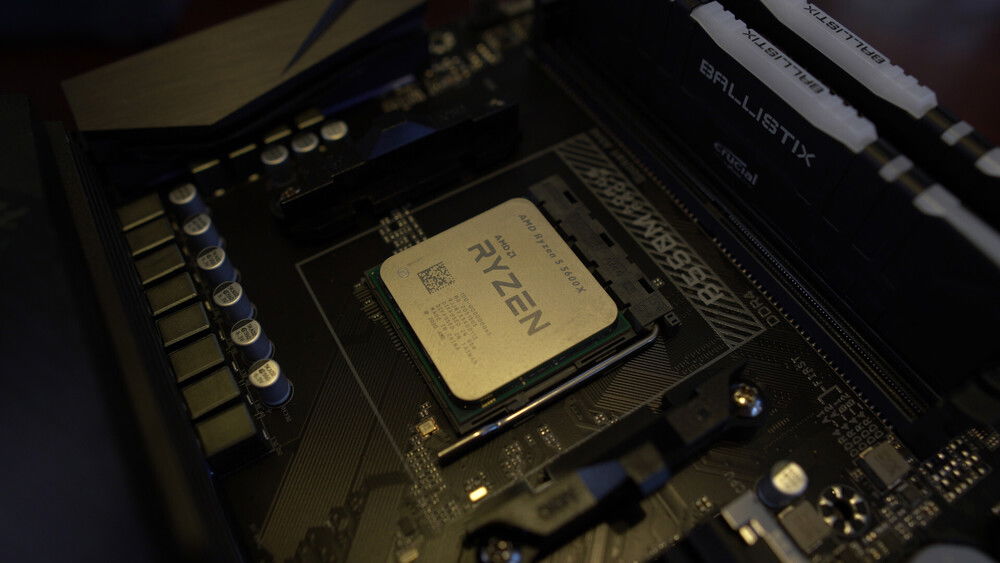
CPU
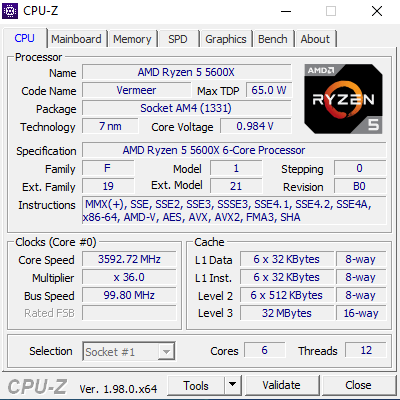
Starting with the CPU, because Ryzen 3600s have become harder to find at MSRP, I decided to go with a 5600X for this build. I know this can be controversial part since the price to performance isn’t all there, but if you keep a look out, you’ll find this CPU on sale making it an even better proposition. Having said that if you save a little, you can find a 5800X on sale too, which makes going with a 5600X very hard to swallow. The 5600X has 6 cores and 12 threads, which is enough to drive many a demanding game. You’ll also have no problem streaming at the same time, and it’s also a good workhorse for content creation.
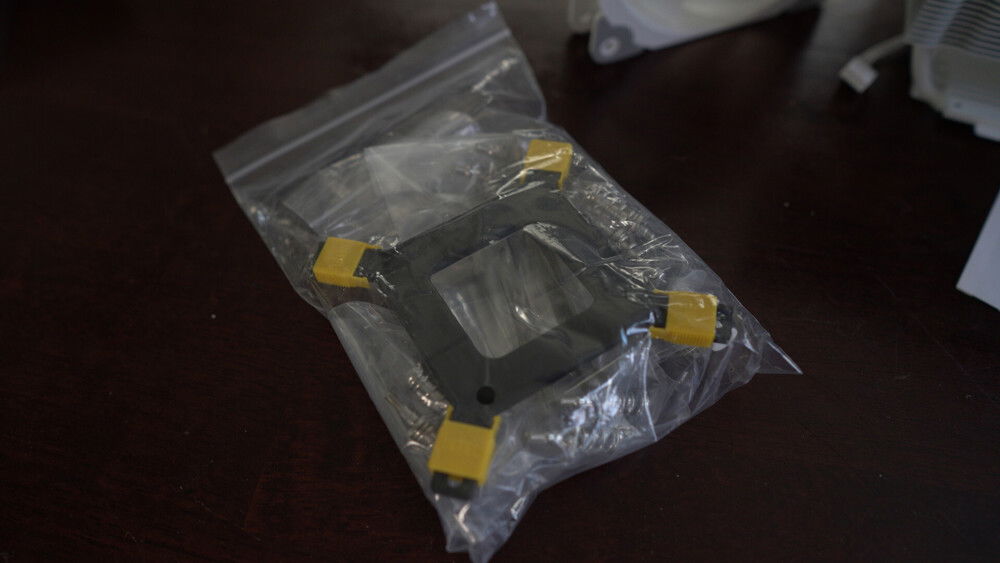
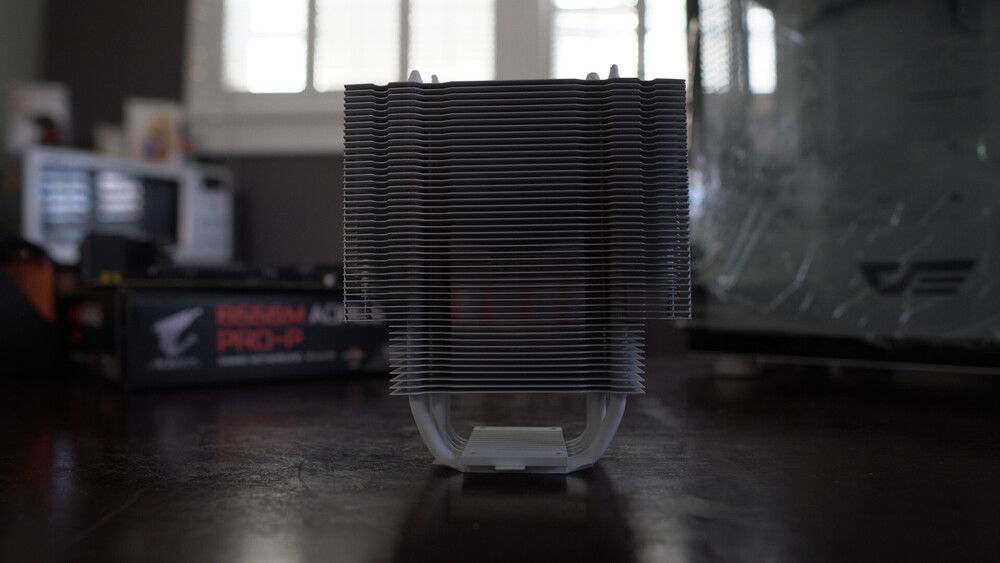
CPU COOLER
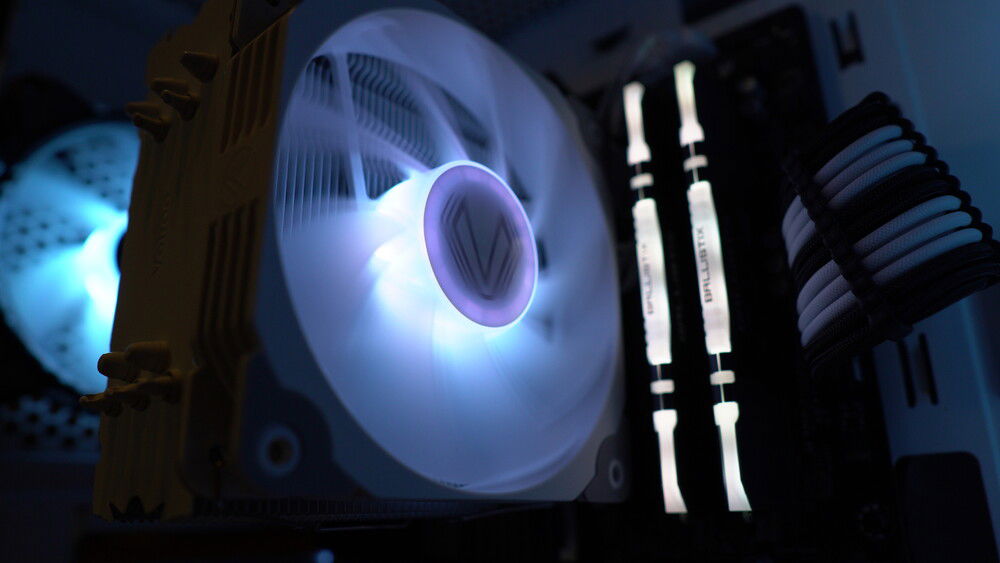
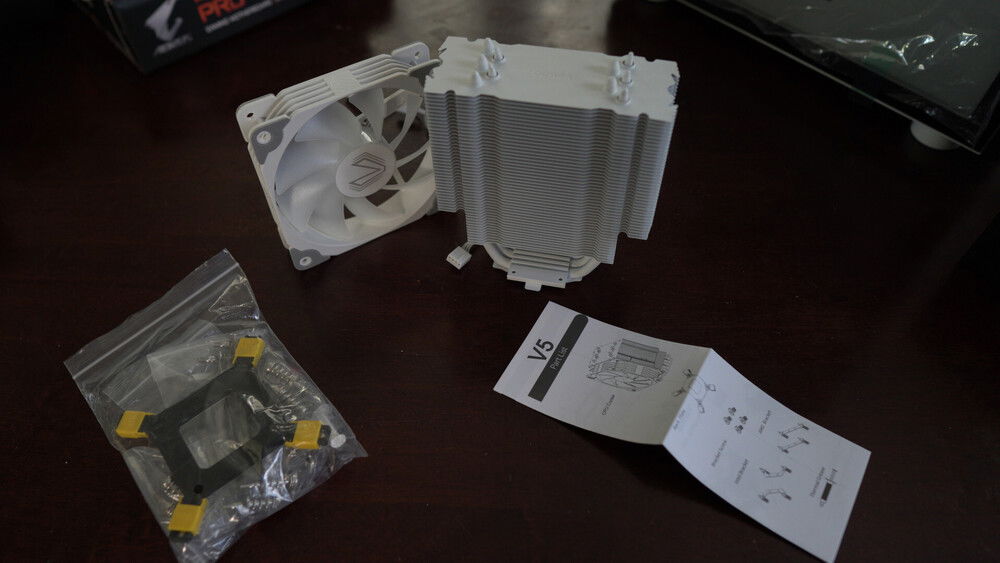
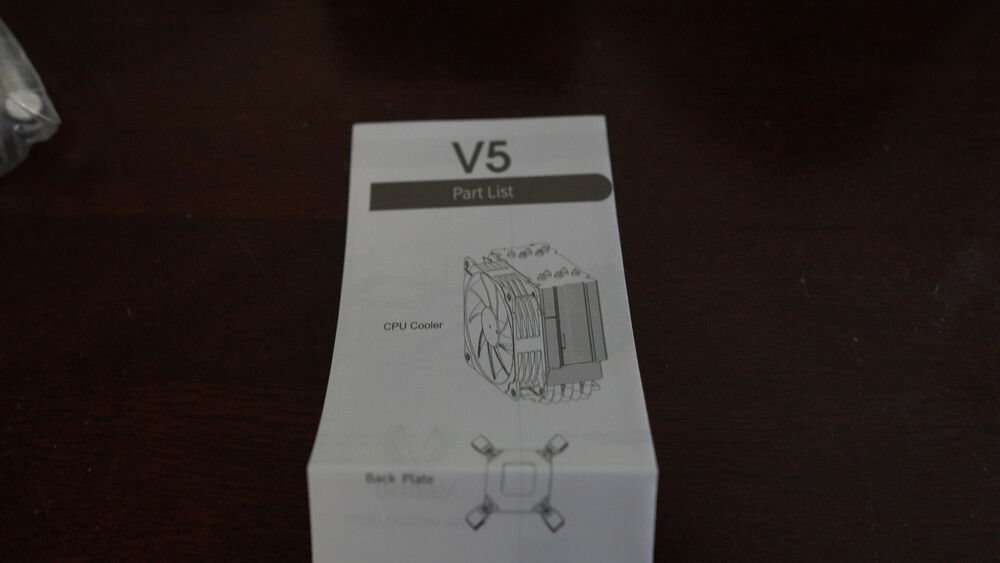
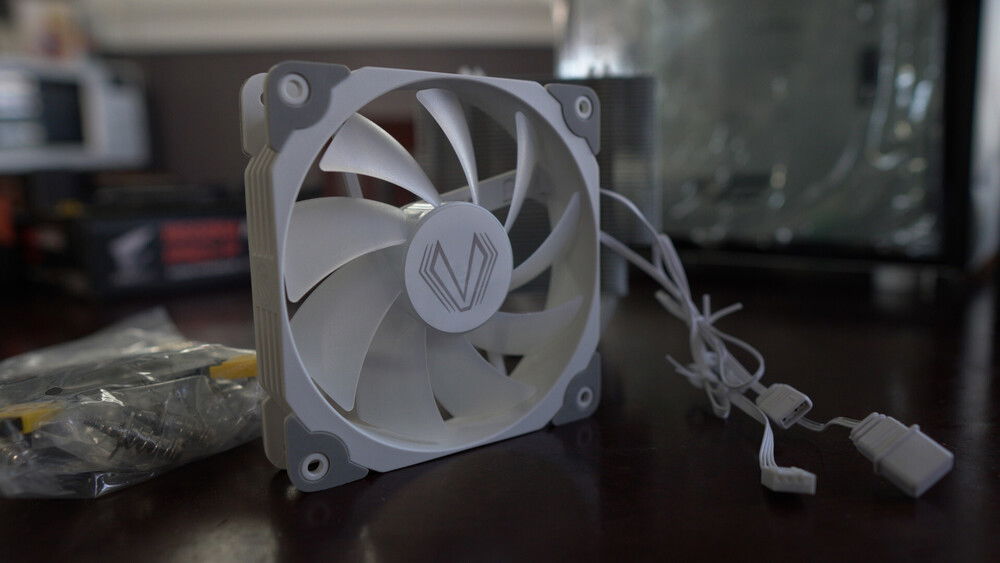
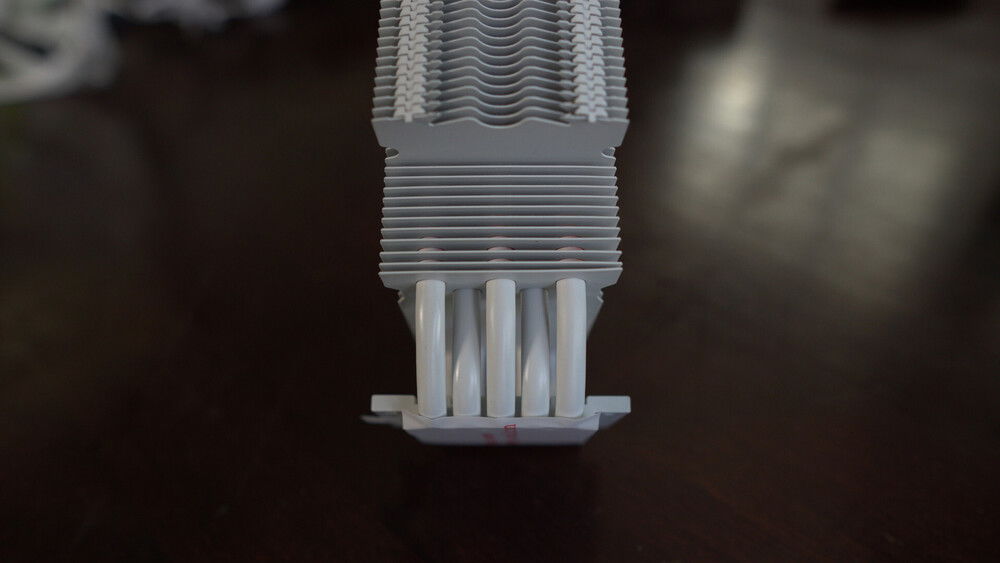
Instead of relying on the 5600X’s stock CPU cooler, I thought I’d give the Vetroo CPU cooler a try. It’s well-regarded by users and known techtubers alike. It’s inexpensive, performs well, and it also tends to go on sale a lot—so keep an eye out for it if you’re looking to replace your stock CPU cooler. It comes in black or white and I used the white version.
If you want to same some cash, stick to the stock cooler that comes with the 5600X. Your temps will be a bit higher and the noise a bit louder, but you can put that money saved into other components.
The Vetroo definitely keeps the CPU temps down as well. During idle the CPU was 34C and during gameplay testing, the CPU never went above 64C.
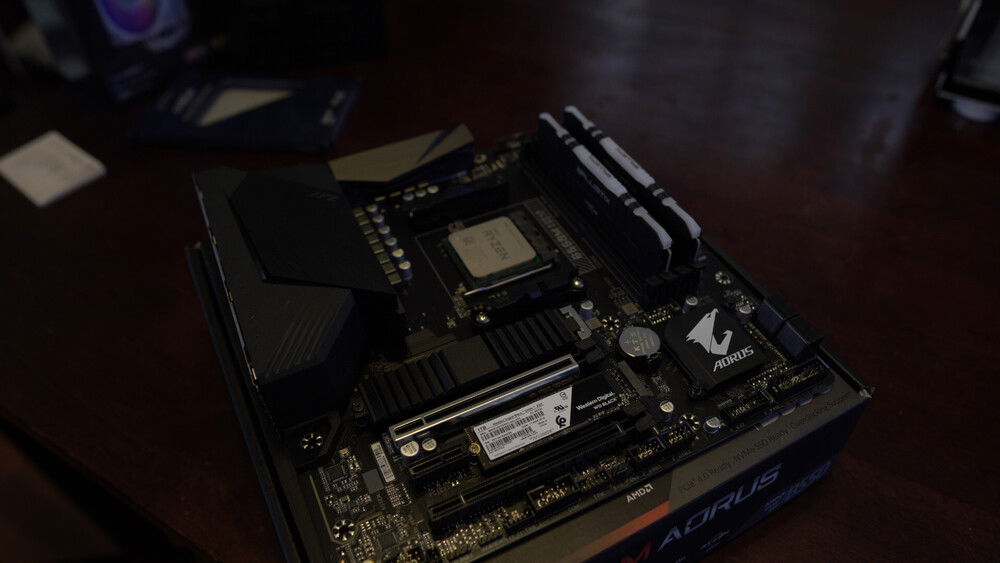
MOTHERBOARD
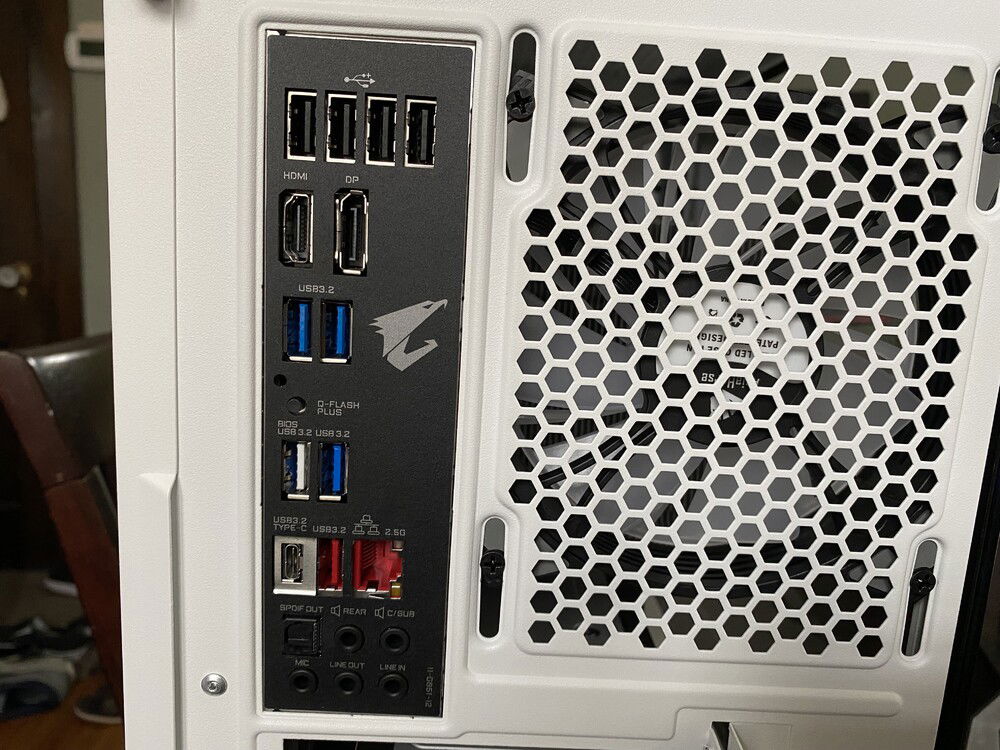
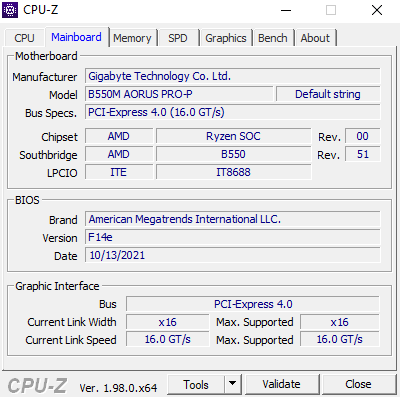
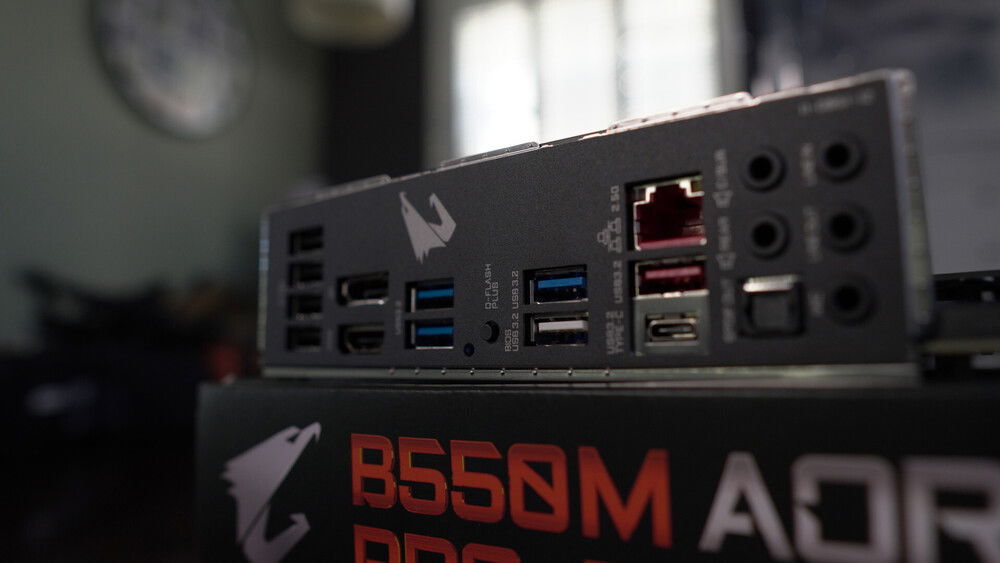
If the CPU is the brains, then the motherboard is the nervous system and driving that for this PC is the Gigabyte B550M Aorus Pro-P. It’s an mATX motherboard with quite a lot of features for not a lot of money. It has a robust rear I/O with plenty of USB ports, loads of internal connectivity, a 2.5Gb/s LAN port and USB Type-C on the back as well as PCIe 4.0 capabilities for your GPU and one of the two NVMe slots. The only things missing are an internal Type-C header for cases and troubleshooting LEDs. Other than that, it’s a nifty little board with a 10+2 phase power delivery.
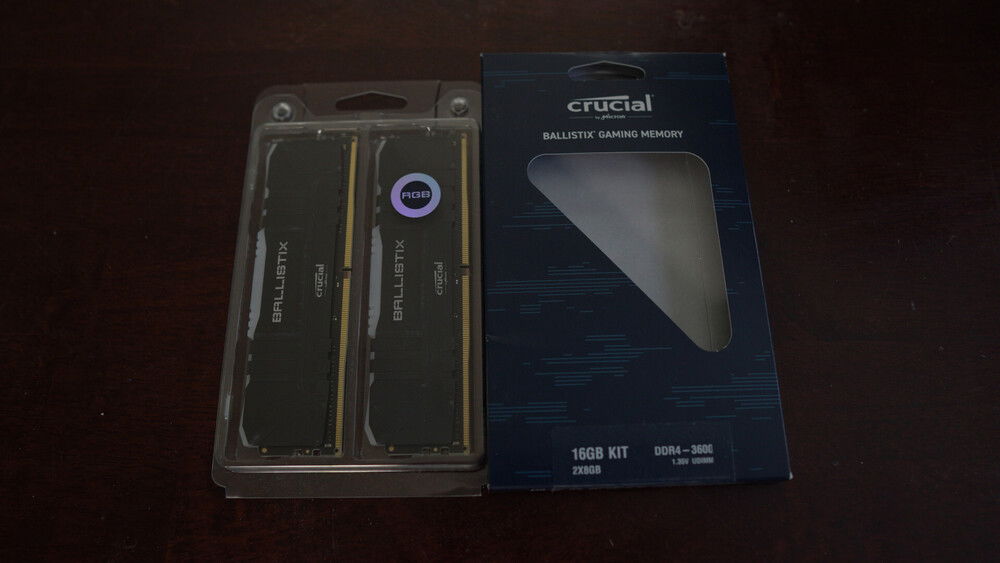
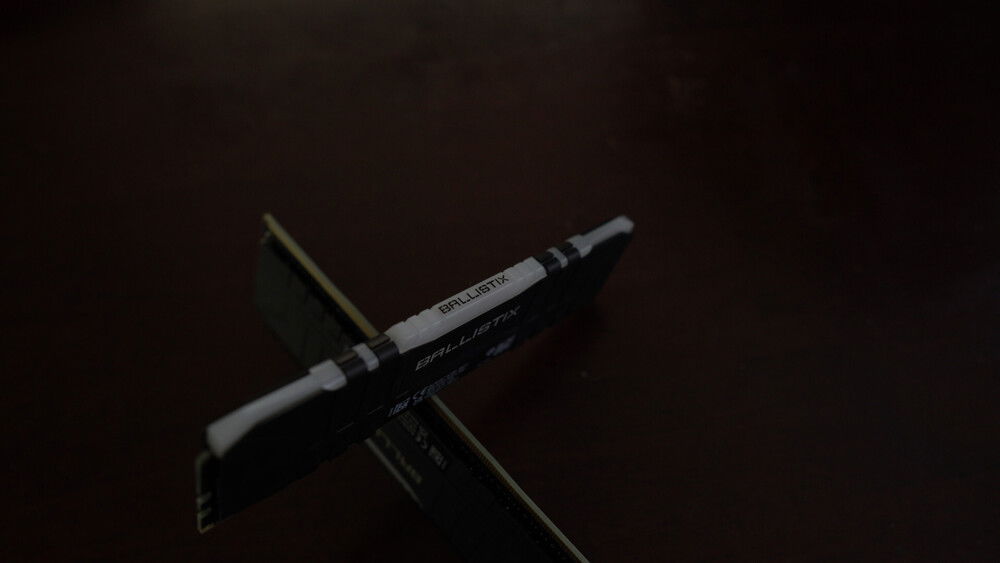
RAM
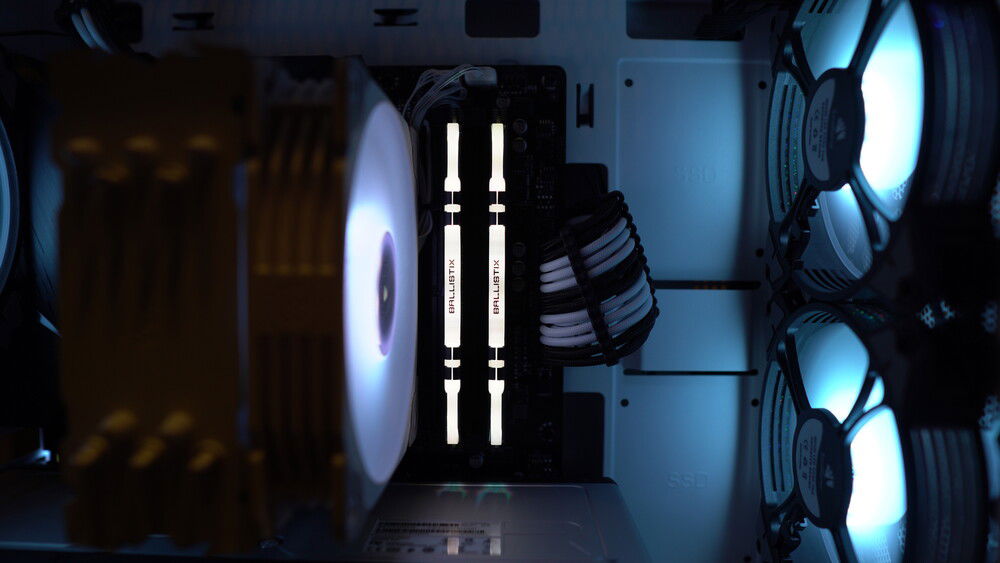
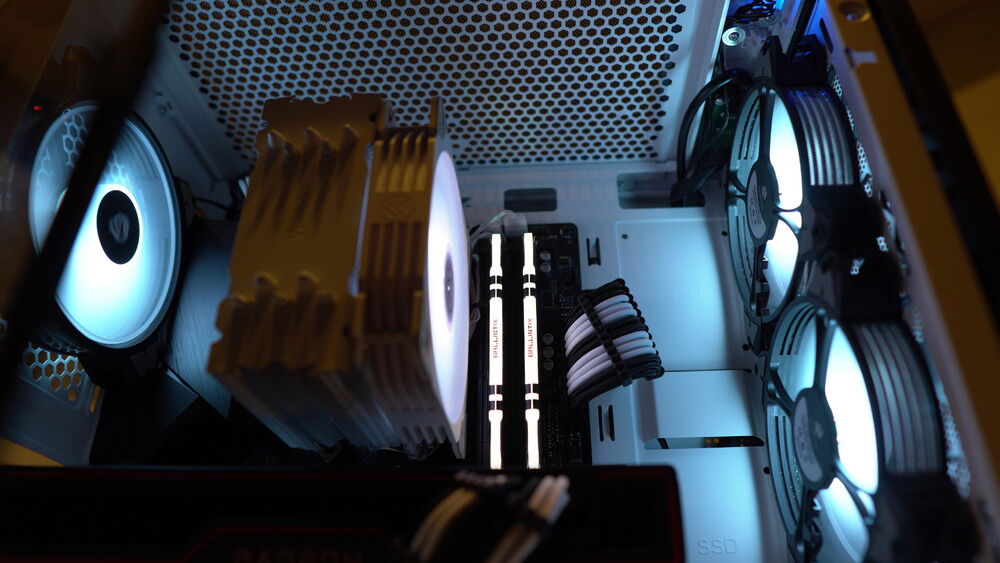
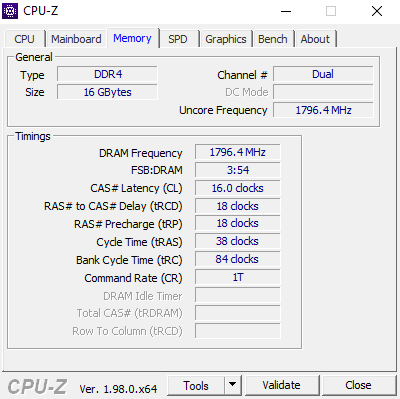
For the RAM, I’m sticking to the tried and true 16 GB capacity of DDR 4 3600 CL 16. This is an affordable speed, but this time I’m going RGB. I went with a Crucial Ballistix kit and was able to find this particular kit on sale for around 84 bucks which is fantastic considering most RGB RAM kits start at 90 or more.
RAM prices tend to fluctuate a lot, so keep an eye out as a sale can happen at any time.
I will say, if you are dabbling in content creation you may want to consider going with 32GB of RAM at a minimum.
STORAGE
Storage for this build is going to be very simple. I’m using a 1TB NVMe PCIe 3.0 SSD. It’s the WD Black NMVe. This is WD’s first NVMe drive that came out before the SN750. While it is an older model, it still performs very well. If you want to be current, I recommend going with WD’s newer SN750, or if you can afford the PCIe 4.0 option the SN850. Crucial’s P5 Plus is also a very good and affordable PCIe 4.0 option. Of course, if you have all the monies, look at SamSung’s 980 Pro.
While 1TB of storage isn’t a lot in the grand scheme of things, it’s enough to get this rig off the ground with the OS, some games, and key programs. You'd definitely want to expand the storage eventually, and as an affordable option, I would recommend either the Crucial MX500 1TB SATA SSD, which usually hovers around the 90 to $100 mark; or if you’re fine with a platter hard drive, I recommend the 2TB Seagate Barracuda which you can find for around $50.00
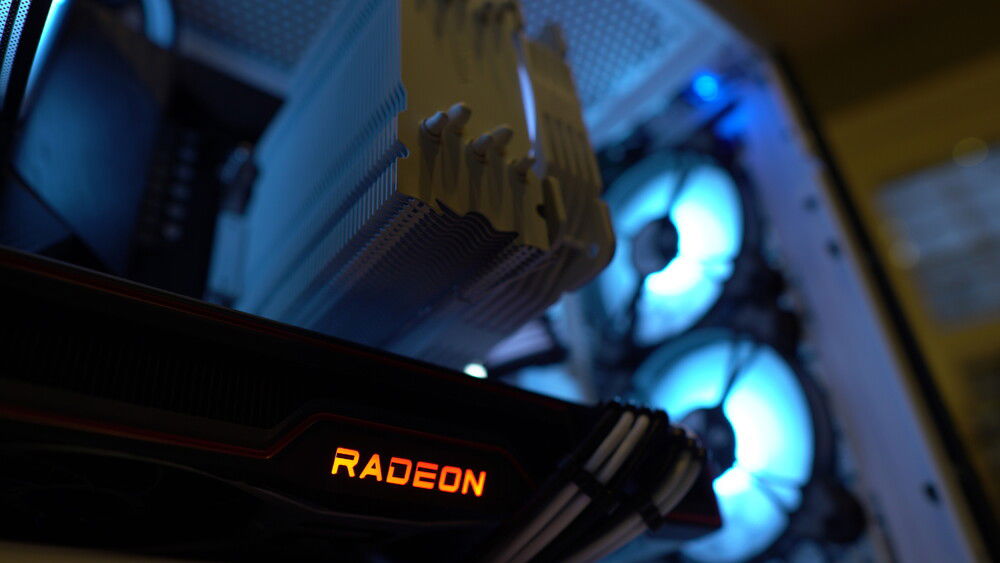
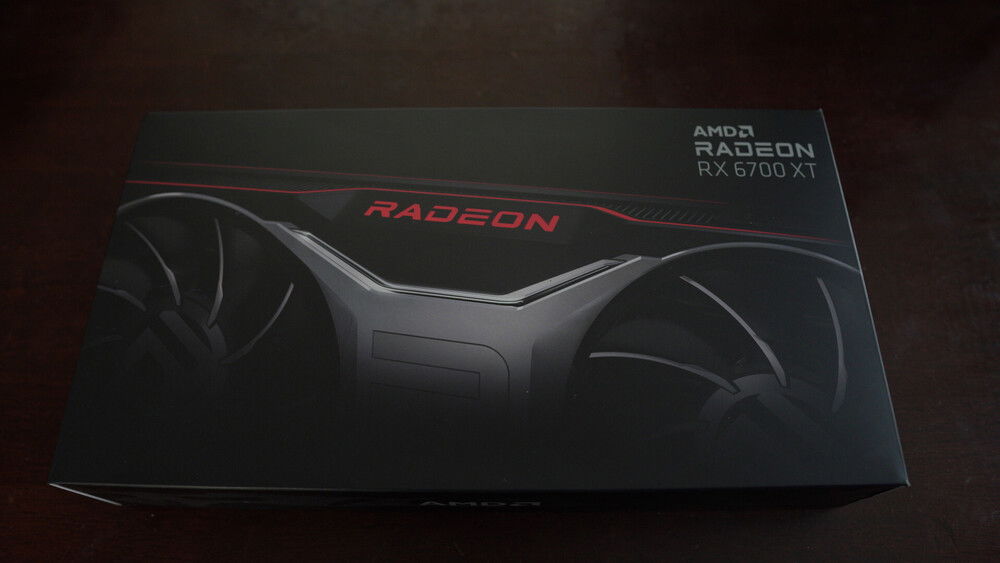
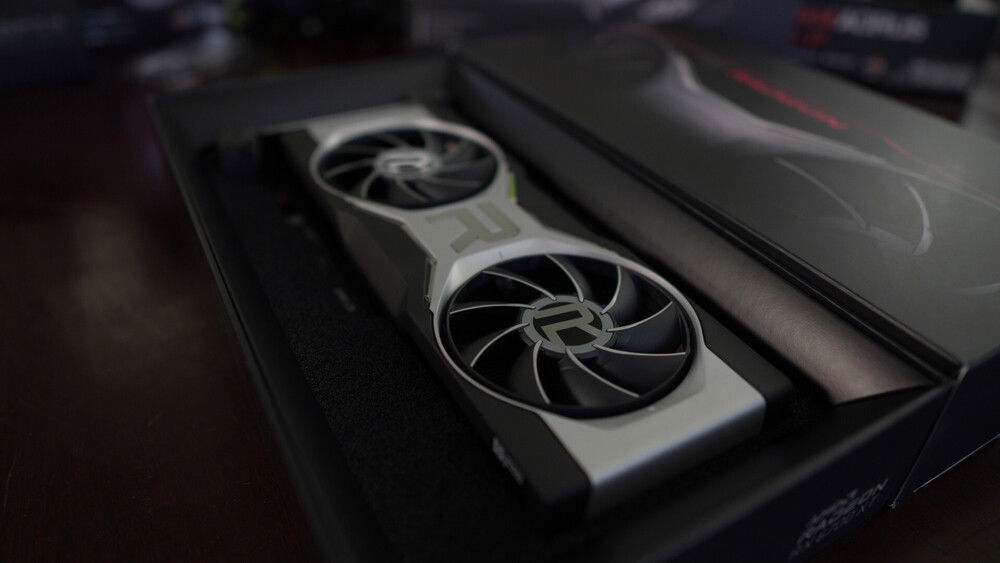
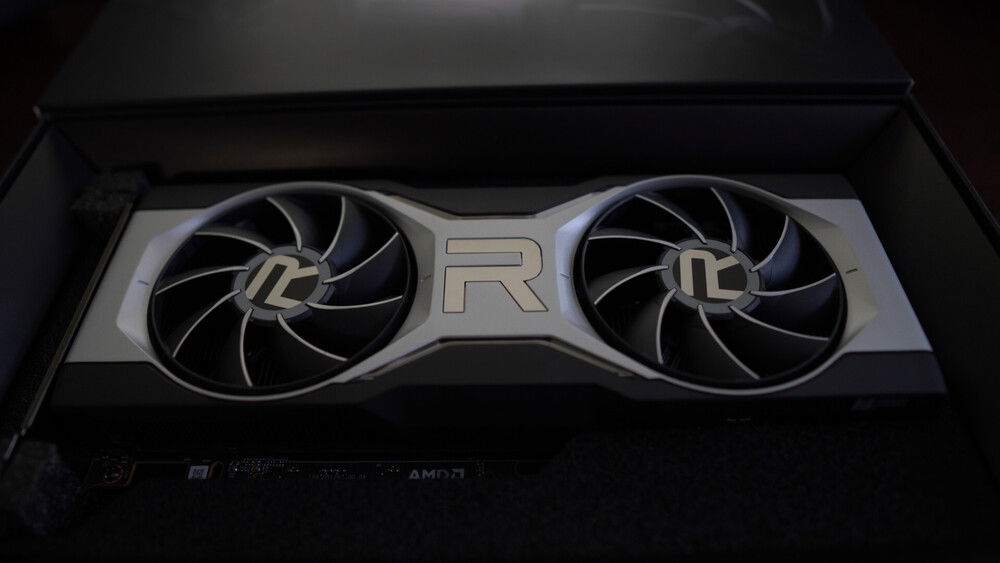
GPU
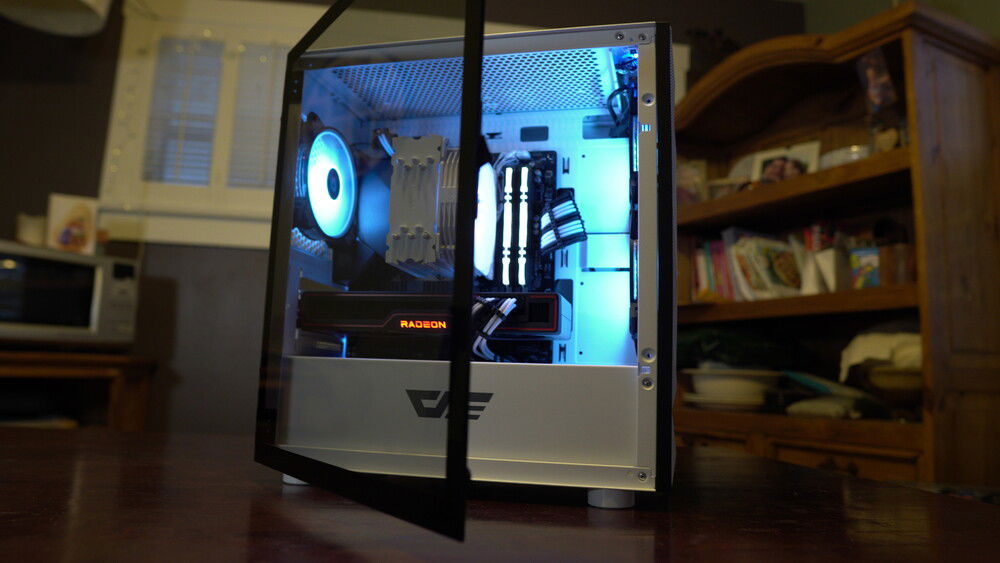
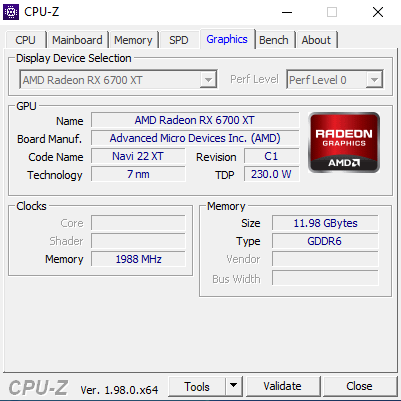
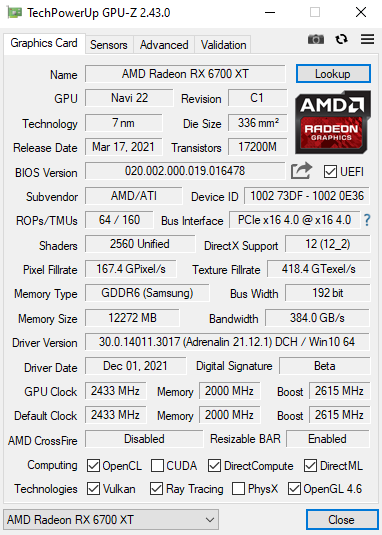
I've already retold the remarkable story about how I bought this GPU, so let's talk performance. The RX 6700 XT sits somewhere in between an RTX 3060 and RTX 3070. It's a very capable GPU that can play games at 1080p at max settings OR 1440p near max settings. I had zero problems installing and updating drivers or setting the fan curve to keep temperatures down. The GPU could get loud if you wanted it to, but the default fan curve is rather low meaning it will stay quiet but your temps, especially the "hot spot" will get a bit toasty. Definitely fiddle with the fan curve to find that right temp to noise ratio.
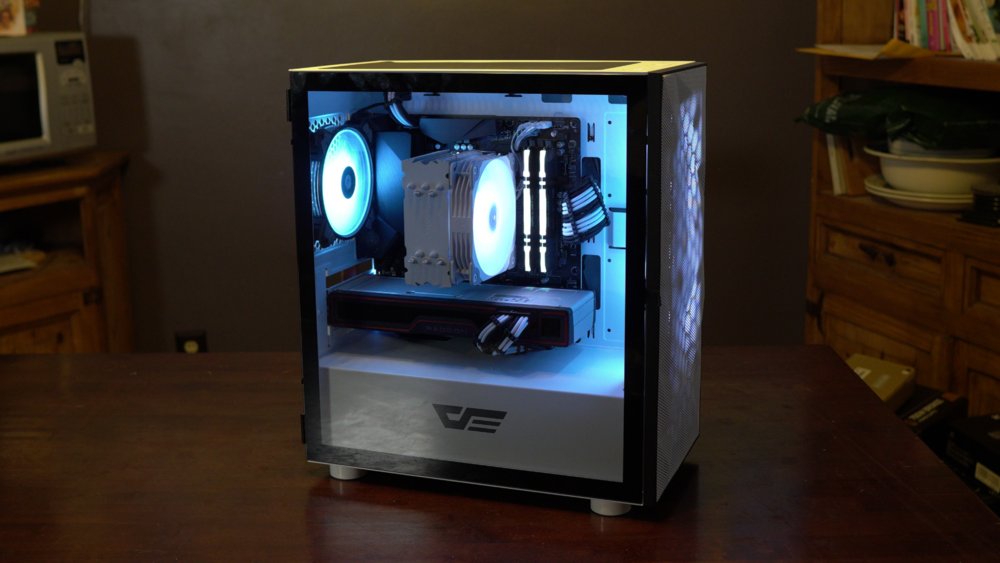
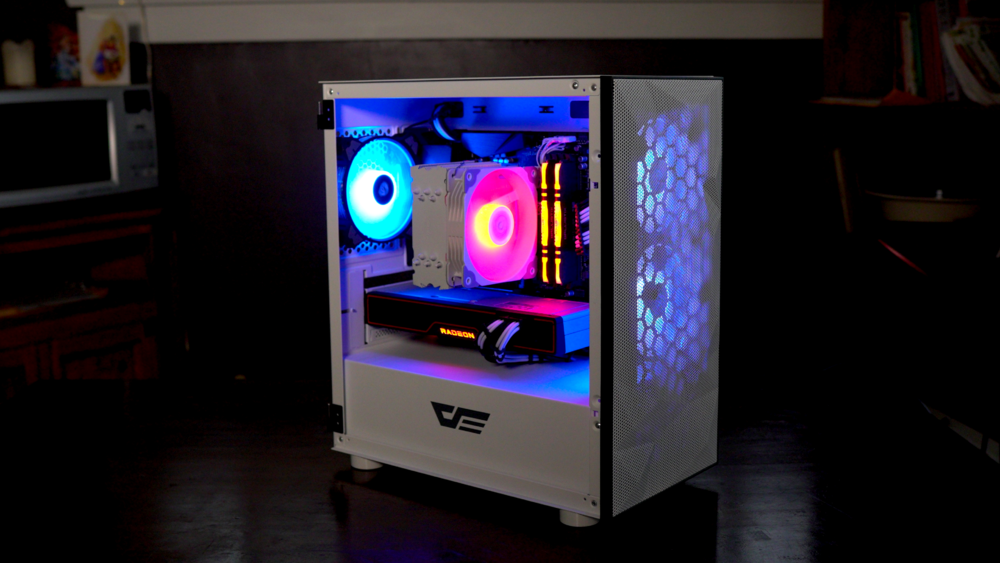
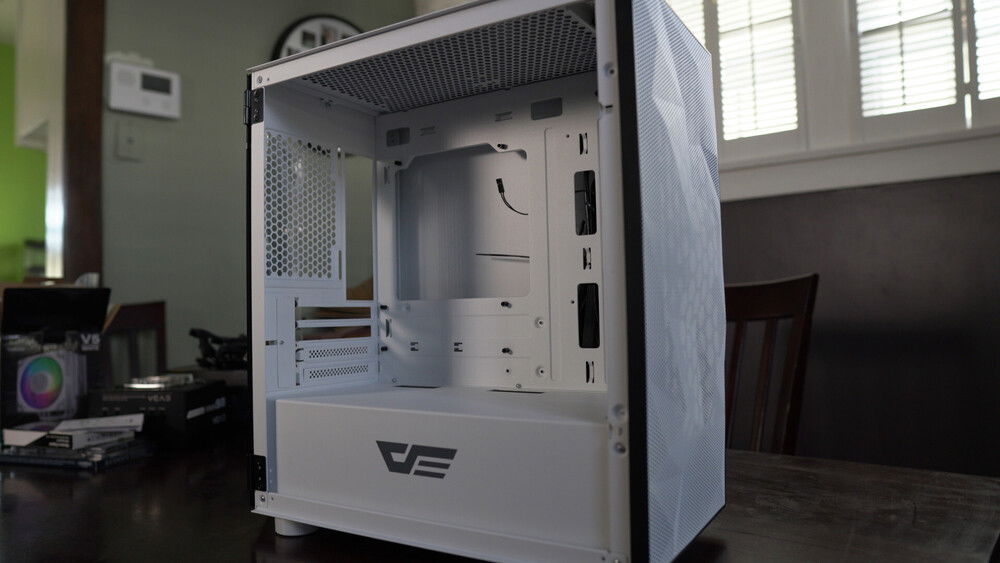
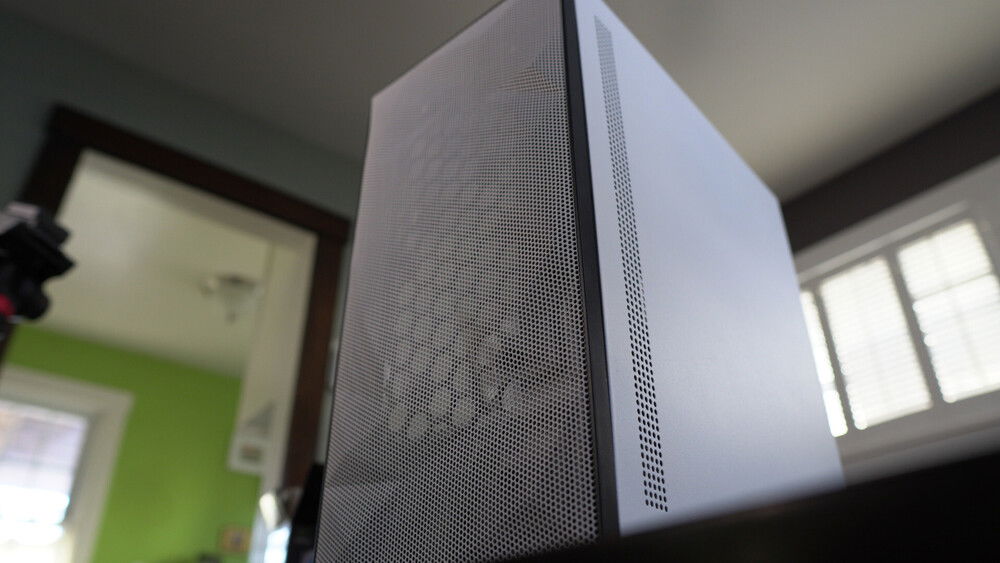
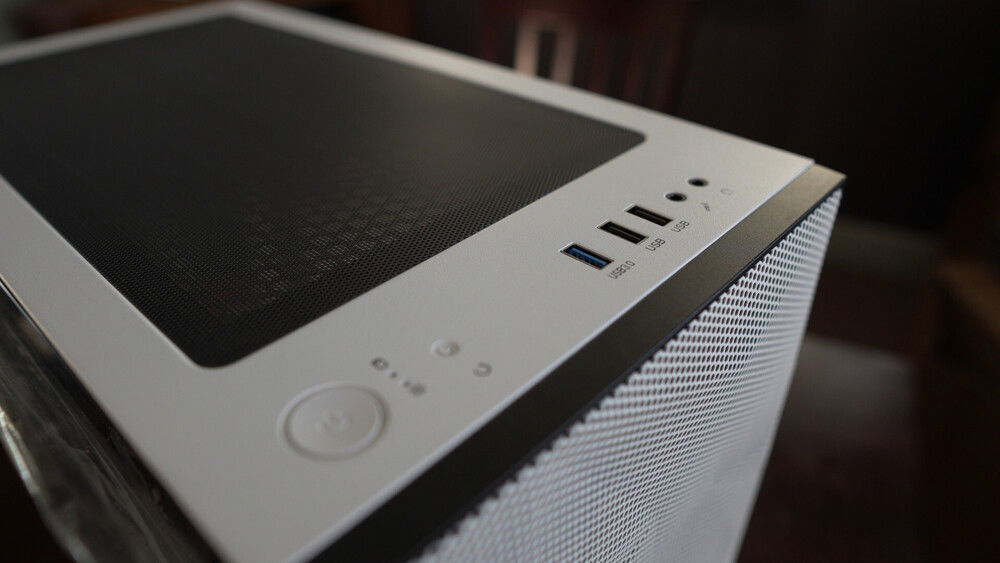
CASE
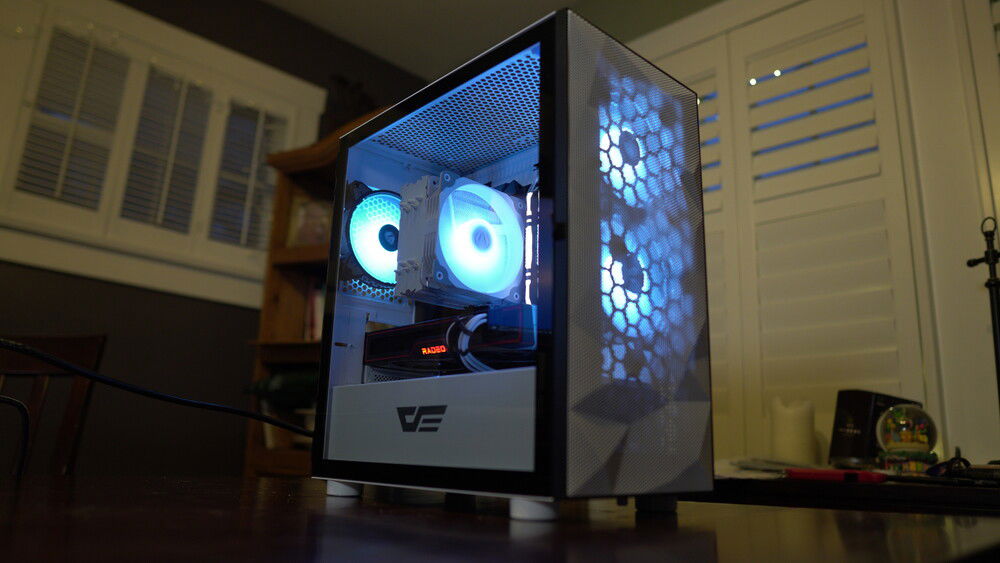
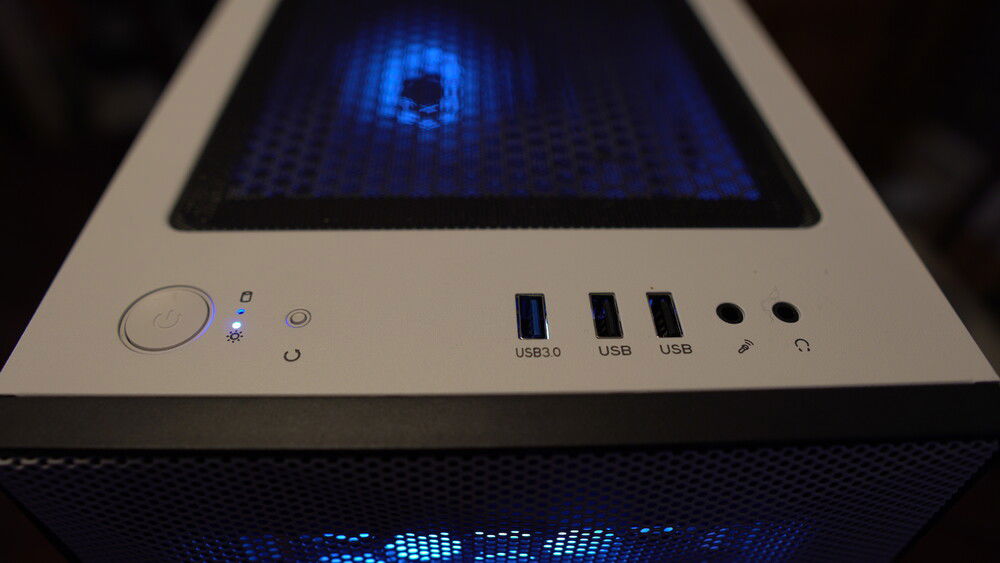
Ever since I saw the DarkFlash DLM 21 Micro-ATX case, I wanted to get it to have a look at it. Unfortunately, everywhere I have looked it’s been sold out. Fortunately, I found one on eBay through the DarkFlash store there. It is a refurbished version, but that’s okay. I wanted this mesh model because it’s very reminiscent of Fractal Design’s Meshify case series but it costs much less. Of course, this decreased price also comes with less features. For one, it’s an mATX case, so only mATX or smaller motherboards will fit in it. It also comes with no fans, has no grommets for cable management, and the PCI slot covers are not re-usable—in fact I’m missing two. The front I/O also doesn’t have a Type-C header but does have two USB 2.0 ports and one USB 3.2 Gen 1 port. The power and reset buttons are nice and clicky at least.
What the DLM 21 Mesh does have going for it is a nifty hinge mechanism for the glass side panel, so no fiddling with thumb screws, speaking of the back side panel thumbscrews are not captive, which is a shame. There is room for 4 hard drives: You can install two 2.5” drives on the side and 2 3.5” drives in the removable cage behind the PSU shroud—that’s right removable. Additionally, the feet are also removable making this a highly customizable little case should you want to mod it. Finally, the DLM 21 Mesh supports 330mm length GPUs and 165mm tall CPU coolers. It’s mostly white with some black, which is great as I’m going for a Black and White + RGB look with this build.
Because the DLM 21 Mesh is pretty costly and comes with 0 fans, I can't really recommend it at the price I paid for it--$72. I can, however, definitely recommend the Phanteks P360A (especially in white with a black interior) as this case will easily support all the components in this build, costs about the same, BUT comes with 2 ARGB fans and the PCI slot covers are re-usable. I've also done a review on it, which you can watch here: https://youtu.be/zqY1Q2LenwI
POWER SUPPLY
Powering this computer is the EVGA B5 750W 80+ Bronze PSU. It’s fully modular, and reasonably priced at around the $65-70 mark. If you want to go with an 80+ Gold PSU, which I wouldn’t blame you if you did, expect to pay around $40-55 more.
750W is plenty to power this PC as the current estimated power draw is around 389W. I personally like to have a PSU that’s nearly double what the draw is so the PSU can maintain its efficiency. Of course, you’d be fine going with a 650 or 700W PSU which could also save you some money.
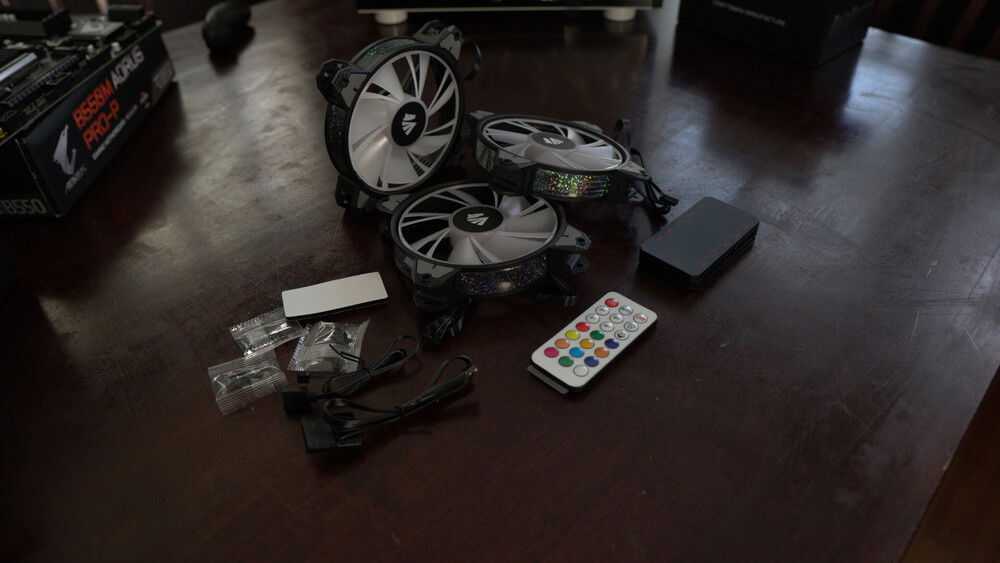
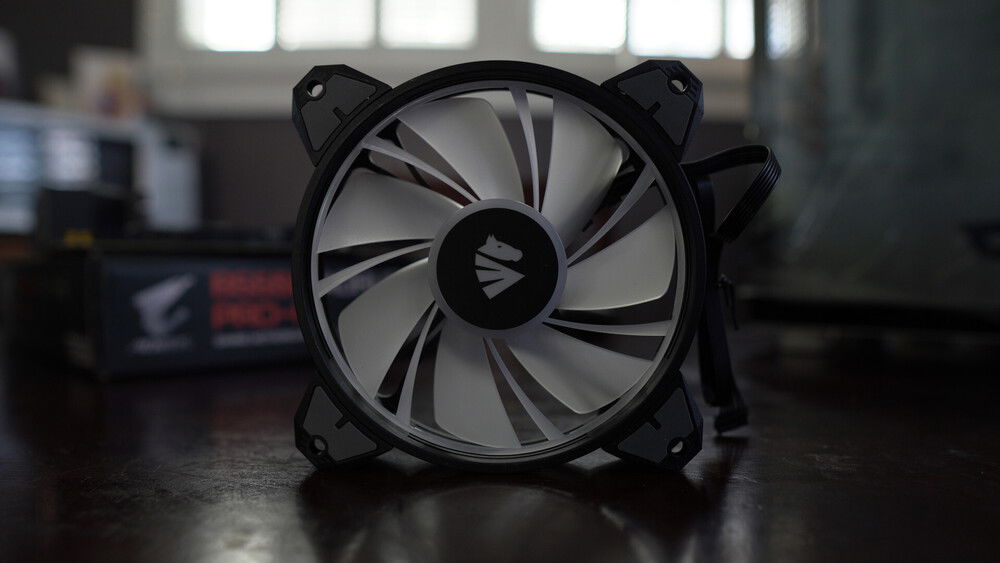
FANS
Because no fans come with the darkFlash DLM21 Mesh, I am using a 3-pack of Asia Horse’s Magic N’ ARGB fans. I’ve used Asia Horse in the past, so when these went on sale for $25.00, I figure I’d try them. After opening them up to get a look, I will say they look cool, but they don’t necessarily feel good. They’re a bit flimsy compared to the other Asia Horse fans I used which were the FS9001-ARGB. These Magic N’ ARGB fans come with a controller and hub which is good as the non-standard connectors they use means I can’t directly plug them into the 3-pin ARGB headers on the motherboard or control them via Gigabyte’s Fusion software.
With regards to performance and noise, the fans perform well. They move a lot of air for without being too loud at the lowest speed.
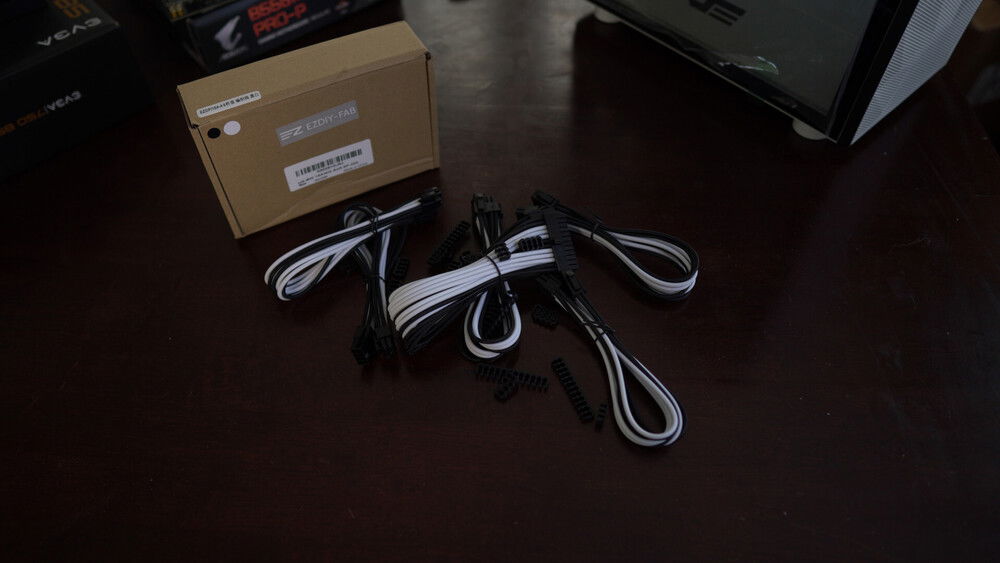
CABLE EXTENSIONS
To keep things looking fresh and in line with the black and white theme, I used EZDIY-FAB PSU cable extensions. They’re very affordable and also have received good customer reviews. Included in its unassuming box are a 24-pin extension, 3 PCIe 8 to 6+2 pin extensions, and two 8 to 4+4 pin extensions. They’re all 300mm long, use 18AWG wires, have cable combs, and use braided nylon sleeving.
I found using these cable to be quite nice. They train well and the cable combs were not brittle at all.
CONCLUSION
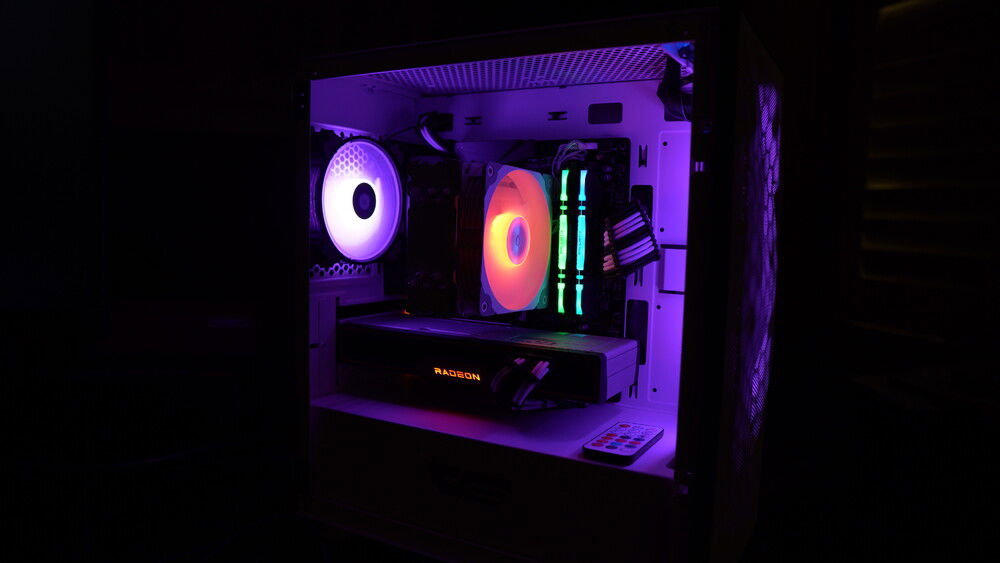
These are the parts for the RGZebra build as I’m calling this PC. Why that name? It's a mostly Black and White build that also incorporates RGB elements from the fans, cpu cooler, and RAM. I more or less picked all the parts with this theme in mind. Granted the GPU deviates from that scheme a tad, but I don’t think it will be too bad.
Overall, the build process was smooth. I was definitely reminded that MATX cases do not have a lot of room below the GPU, so keep that in mind should you get an MATX case. The lighting was a bit of a pain to set up as Gigabyte's RGB Fusion software is not the best and the white for all 3 RGB components are different shades, which sucks.
Ultimately this build cost me $1544 and some change and then $1666 and some change after taxes and shipping. I was able to find many items on sale and/or with rebates to help curb the spending. Obviously the GPU was the big outlier, and while it wasn't as expensive as it could have been, it was still overpriced.
Let me know what you think of the build and thanks for your view!
2021 was the year things should have gotten better for computers. I mean 2020 was a major crap show am I right? 2021 just ended up being a continuation on so many levels. With regards to computer building, unless you were lucky, well-timed, or had connections, getting a GPU and even a CPU at times was a near impossible feat. Prices for components constantly bounced up and down--more up--especially after February. Luckily over the year I was able to take advantage of many deals, and things calmed down for the most part . . . except when it came to GPUs.
The struggle was real to find even a budget builder GPU in a GTX 1650 or 1660 and even then sellers wanted $150-$200 more than MSRP for a USED GPU. One day while I was scouring eBay I came upon a listing for an AMD RX 6700XT new in box. The rub? The seller had 0 reviews. Screw it I said, and went YOLO on the bid. Buyer protection would be my Superman should the seller turn out to be some nefarious ne'er-do-well. I put in my max bid not even thinking I'd win the auction considering my bid was $689 and the GPU was going for well over $800 and $900 bucks on other listings. Shutting the browser tab, I went to sleep thinking that in 8 hours when the auction was over, I would be outbid. However, fate it seemed, was on my side . . .
Upon waking up, I checked my phone and there was an eBay notification . . . "You won the auction pay now . . ." or something to that effect. Since this was an eBay transaction, I felt confident enough that if I was screwed by the seller, I'd get my money back, so I paid; and then the waiting commenced. A week went buy and the package arrived. I opened the shipping box and was greeted to a pristine, factory sealed, RX 6700XT. I immediately removed the shrink wrap, opened the box, and checked the GPU for cosmetic issues or anything else that might lead me to think it was a fake, there were none. I then plugged it into my test bench, powered up the PC and loaded GPU-Z where I was greeted with the specs for a working Big Navi card for less than the 200% asking price of most other RX 6700XT listings . . . sure it was still $289 over MSRP, but it's the small things am I right?
And that is the story of how I procured the last part for the all AMD system.
The goal for this build was to make an upper-mid tier PC that could game, stream, and do content creation all for under $1600. Since component prices and availability have been all over the place in 2021, I bought items as they became available or were on sale. Believe it or not, even with the graphics card I’m using in this build, I was able to stick to my budget.
I made a couple of videos for this build if you want to check them out, click the following links:
- Build Video: https://youtu.be/sFjYAjSPpDo
- Motherboard overview: https://youtu.be/25JNvZU3Cxw
- A tour of the BIOS and Gigabyte software: https://youtu.be/nXHITyAc_U0
THE PARTS
CPU
Starting with the CPU, because Ryzen 3600s have become harder to find at MSRP, I decided to go with a 5600X for this build. I know this can be controversial part since the price to performance isn’t all there, but if you keep a look out, you’ll find this CPU on sale making it an even better proposition. Having said that if you save a little, you can find a 5800X on sale too, which makes going with a 5600X very hard to swallow. The 5600X has 6 cores and 12 threads, which is enough to drive many a demanding game. You’ll also have no problem streaming at the same time, and it’s also a good workhorse for content creation.
CPU COOLER
Instead of relying on the 5600X’s stock CPU cooler, I thought I’d give the Vetroo CPU cooler a try. It’s well-regarded by users and known techtubers alike. It’s inexpensive, performs well, and it also tends to go on sale a lot—so keep an eye out for it if you’re looking to replace your stock CPU cooler. It comes in black or white and I used the white version.
If you want to same some cash, stick to the stock cooler that comes with the 5600X. Your temps will be a bit higher and the noise a bit louder, but you can put that money saved into other components.
The Vetroo definitely keeps the CPU temps down as well. During idle the CPU was 34C and during gameplay testing, the CPU never went above 64C.
MOTHERBOARD
If the CPU is the brains, then the motherboard is the nervous system and driving that for this PC is the Gigabyte B550M Aorus Pro-P. It’s an mATX motherboard with quite a lot of features for not a lot of money. It has a robust rear I/O with plenty of USB ports, loads of internal connectivity, a 2.5Gb/s LAN port and USB Type-C on the back as well as PCIe 4.0 capabilities for your GPU and one of the two NVMe slots. The only things missing are an internal Type-C header for cases and troubleshooting LEDs. Other than that, it’s a nifty little board with a 10+2 phase power delivery.
RAM
For the RAM, I’m sticking to the tried and true 16 GB capacity of DDR 4 3600 CL 16. This is an affordable speed, but this time I’m going RGB. I went with a Crucial Ballistix kit and was able to find this particular kit on sale for around 84 bucks which is fantastic considering most RGB RAM kits start at 90 or more.
RAM prices tend to fluctuate a lot, so keep an eye out as a sale can happen at any time.
I will say, if you are dabbling in content creation you may want to consider going with 32GB of RAM at a minimum.
STORAGE
Storage for this build is going to be very simple. I’m using a 1TB NVMe PCIe 3.0 SSD. It’s the WD Black NMVe. This is WD’s first NVMe drive that came out before the SN750. While it is an older model, it still performs very well. If you want to be current, I recommend going with WD’s newer SN750, or if you can afford the PCIe 4.0 option the SN850. Crucial’s P5 Plus is also a very good and affordable PCIe 4.0 option. Of course, if you have all the monies, look at SamSung’s 980 Pro.
While 1TB of storage isn’t a lot in the grand scheme of things, it’s enough to get this rig off the ground with the OS, some games, and key programs. You'd definitely want to expand the storage eventually, and as an affordable option, I would recommend either the Crucial MX500 1TB SATA SSD, which usually hovers around the 90 to $100 mark; or if you’re fine with a platter hard drive, I recommend the 2TB Seagate Barracuda which you can find for around $50.00
GPU
I've already retold the remarkable story about how I bought this GPU, so let's talk performance. The RX 6700 XT sits somewhere in between an RTX 3060 and RTX 3070. It's a very capable GPU that can play games at 1080p at max settings OR 1440p near max settings. I had zero problems installing and updating drivers or setting the fan curve to keep temperatures down. The GPU could get loud if you wanted it to, but the default fan curve is rather low meaning it will stay quiet but your temps, especially the "hot spot" will get a bit toasty. Definitely fiddle with the fan curve to find that right temp to noise ratio.
CASE
Ever since I saw the DarkFlash DLM 21 Micro-ATX case, I wanted to get it to have a look at it. Unfortunately, everywhere I have looked it’s been sold out. Fortunately, I found one on eBay through the DarkFlash store there. It is a refurbished version, but that’s okay. I wanted this mesh model because it’s very reminiscent of Fractal Design’s Meshify case series but it costs much less. Of course, this decreased price also comes with less features. For one, it’s an mATX case, so only mATX or smaller motherboards will fit in it. It also comes with no fans, has no grommets for cable management, and the PCI slot covers are not re-usable—in fact I’m missing two. The front I/O also doesn’t have a Type-C header but does have two USB 2.0 ports and one USB 3.2 Gen 1 port. The power and reset buttons are nice and clicky at least.
What the DLM 21 Mesh does have going for it is a nifty hinge mechanism for the glass side panel, so no fiddling with thumb screws, speaking of the back side panel thumbscrews are not captive, which is a shame. There is room for 4 hard drives: You can install two 2.5” drives on the side and 2 3.5” drives in the removable cage behind the PSU shroud—that’s right removable. Additionally, the feet are also removable making this a highly customizable little case should you want to mod it. Finally, the DLM 21 Mesh supports 330mm length GPUs and 165mm tall CPU coolers. It’s mostly white with some black, which is great as I’m going for a Black and White + RGB look with this build.
Because the DLM 21 Mesh is pretty costly and comes with 0 fans, I can't really recommend it at the price I paid for it--$72. I can, however, definitely recommend the Phanteks P360A (especially in white with a black interior) as this case will easily support all the components in this build, costs about the same, BUT comes with 2 ARGB fans and the PCI slot covers are re-usable. I've also done a review on it, which you can watch here: https://youtu.be/zqY1Q2LenwI
POWER SUPPLY
Powering this computer is the EVGA B5 750W 80+ Bronze PSU. It’s fully modular, and reasonably priced at around the $65-70 mark. If you want to go with an 80+ Gold PSU, which I wouldn’t blame you if you did, expect to pay around $40-55 more.
750W is plenty to power this PC as the current estimated power draw is around 389W. I personally like to have a PSU that’s nearly double what the draw is so the PSU can maintain its efficiency. Of course, you’d be fine going with a 650 or 700W PSU which could also save you some money.
FANS
Because no fans come with the darkFlash DLM21 Mesh, I am using a 3-pack of Asia Horse’s Magic N’ ARGB fans. I’ve used Asia Horse in the past, so when these went on sale for $25.00, I figure I’d try them. After opening them up to get a look, I will say they look cool, but they don’t necessarily feel good. They’re a bit flimsy compared to the other Asia Horse fans I used which were the FS9001-ARGB. These Magic N’ ARGB fans come with a controller and hub which is good as the non-standard connectors they use means I can’t directly plug them into the 3-pin ARGB headers on the motherboard or control them via Gigabyte’s Fusion software.
With regards to performance and noise, the fans perform well. They move a lot of air for without being too loud at the lowest speed.
CABLE EXTENSIONS
To keep things looking fresh and in line with the black and white theme, I used EZDIY-FAB PSU cable extensions. They’re very affordable and also have received good customer reviews. Included in its unassuming box are a 24-pin extension, 3 PCIe 8 to 6+2 pin extensions, and two 8 to 4+4 pin extensions. They’re all 300mm long, use 18AWG wires, have cable combs, and use braided nylon sleeving.
I found using these cable to be quite nice. They train well and the cable combs were not brittle at all.
CONCLUSION
These are the parts for the RGZebra build as I’m calling this PC. Why that name? It's a mostly Black and White build that also incorporates RGB elements from the fans, cpu cooler, and RAM. I more or less picked all the parts with this theme in mind. Granted the GPU deviates from that scheme a tad, but I don’t think it will be too bad.
Overall, the build process was smooth. I was definitely reminded that MATX cases do not have a lot of room below the GPU, so keep that in mind should you get an MATX case. The lighting was a bit of a pain to set up as Gigabyte's RGB Fusion software is not the best and the white for all 3 RGB components are different shades, which sucks.
Ultimately this build cost me $1544 and some change and then $1666 and some change after taxes and shipping. I was able to find many items on sale and/or with rebates to help curb the spending. Obviously the GPU was the big outlier, and while it wasn't as expensive as it could have been, it was still overpriced.
Let me know what you think of the build and thanks for your view!
Color(s): White
RGB Lighting? Yes
Theme: none
Cooling: Air Cooling
Size: Micro-ATX
Type: General Build
Build Updates
Build complete but waiting on parts to be added to the list.
Hardware
CPU
$ 194.34
Motherboard
$ 275.00
Memory
$ 107.02
Storage
$ 178.68
Case
$ 68.99
Estimated total value of this build:
$ 1,581.84
Approved by: