


Lisa
AD:
Hello everyone, welcome to my build :)
This is hard to explain but it's my second PC I've ever built, but the 4th time I've built it... In other words, it's mostly the same components from my second PC just in a different case, different cooling, cables, fans, graphics card... I could go on. It's been an ongoing project for the past couple years since I upgraded from an AMD FX6300 and GTX 960, and I've loved every moment of it.
I have listed my components under hardware, all apart from the water cooling parts - I'll talk about them here.
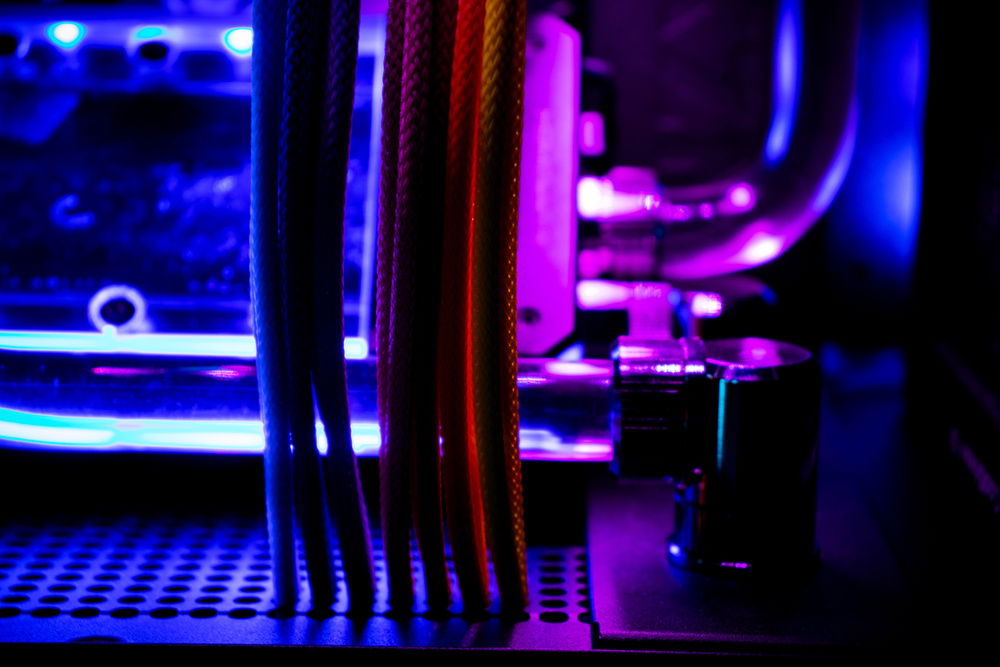
To start off, this is not a beast machine. It's not supposed to be as I do not have the budget for such high end components, and my dream was to watercool what I had. Now for the meat of it. This is a colourful, retro 70s - 90s style build set at night. I'm using a dark environment and bright LED's to create that neon cyberpunk vibrancy which looks gorgeous when gaming at 2am. The chassis is small so everything is compact and snug to minimise dead space, looks bad when larger cases have a stubby pump-res combo for example. Seems like a poor use of space. (-MKBHD)
The original theme about 6 months ago was black/aluminium everything but with RGB's to allow for a completely dynamic colour scheme - say it's a cold winters day, I'd like to make my whole PC a warm orange, or a bright sunny day, I'd like to make my whole PC blue and green. I was using the same components at the time but with some cablemod pro cables I got for a 1070... that had one 8pin PCIE. After getting my 2070 Super, I ended up with an 8pin + 6pin and I did not want to spend so much buying a single 6pin pro cable from cablemod. I planned on sleeving my own extensions, however in such a small case, 2x the cables I already had weren't going to happen, so I ventured into sleeving full cables for myself. Originally, the idea was to recreate the black and grey scheme I had before but with MDPC-X variety, though on sample pack arrival, I was blown away by the vibrancy of their bright colours under my PC lighting. So black friday comes around and with a jar full of money and a "go on, do it!" from my girlfriend, an order was made to MDPC-X. I chose 7 colours: Gulf Blue, B-Magic, Vivid Violet, Perfect Pink, Purple, Papaya Orange, & Mellow Yellow. 3 days into designing and creating them, I tested, and voila they were beautiful. I reused my aluminium cablemod combs because they reflect light really well and I totally didn't ruin my old cables to get them off... I'd also like to mention how I routed the ATX cables through my cable bar slit and my PCIE cables through the basement panels perforations. Glad I didn't blow everything up or something too. This continued my love for implementing neon tokyo, cyberpunk, and the 70's use of bright colour into my build and setup.
On black friday I also mashed out on custom watercooling parts. Mainy from EKWB but also a Barrowch reservoir.
CPU Block: EK Velocity RGB Nickel + Acetal
GPU Block: EK Vector RGB Nickel + Acetal
Front Radiator: EK Coolstream SE 280mm
Rear Radiator: EK Coolstream SE 120mm
Reservoir: Barrowch Boxfish POM 250mm Black
Pump: EK D5 Acetal
Fittings:
- EK Torque 16mm Black Nickel x13
- EK Torque 90 Black Nickel x6
- EK Torque T Black Nickel
- EK Pass Through Black Nickel x2
- EK Rotary Extender Black Nickel
- EK 6mm Extender Black Nickel x2
- EK 12mm Extender Black Nickel
- EK Plug Black Nickel x7
- EK Ball Valve Black Nickel
Tubing: EK Hardline Acrylic 16mm
Coolant: Distilled water with EK Clear Concentrate
Once this all arrived, I got straight to building. Some notes on watercooling for the unexperienced:
Check all your components physically thoroughly before installation. My D5 pump was not assembled properly from factory and leaked due to the oring not being in the right place. With a pump hardlined into the basement of an H510 Elite, this was a 24 hour nightmare.
Buy a couple extra lengths of tubing than what you think you need. I bought 2m and used every last bit of it - I reheated my rad-to-res bend 5 times to get the perfect bend as that was my last piece. Don't worry about reheating, be slow and gentle and nothing will deform.
The best radius for 16mm acrylic is 25mm - 30mm for an easy and smooth curve in my opinion, however I have a 12mm radius bend which wasn't easy, but it's possible.
Don't be affraid of acrylic. PETG is quicker, but from using acrylic for my first loop, I learned it's not as hard as it seems.
Last but not least, take extra care when disassembling and reassembling your graphics card. I managed to chip off a tiny capacitor like a proper numpty but luckily it was not needed. Card runs fine and has done for days.
My loop order is pretty self explanitory, the pump feeds from the bottom reservoir port. I chose parallel for the looks, it doesn't effect my performance either. I prefer softened RGB with diffusion rather than bare LED's common with acrylic blocks, hence the acetal RGB theme. The CPU block is upside down so the inlet and outlet ports align with my graphics card ports. My founders edition backplate required some filing to sit level on the front of the block, 90% of screw holes were reused too. I managed to fit a 280mm radiator in the front of my case by screwing it in only on one side with the 120mm holes, then spaced my fans off the bracket a millimeter or so to avoid the screws. My reservoir was an amazing decision. I chose it over the Phanteks Glacier R220 due to it's better flow and OLED screen. It tells me current coolant temperature and elapsed ontime, whilst also being very good looking and built to high quality. Oh and the 8 ports are nice too. I drilled two holes through both the cable bar and basement panel for pass throughs to and from the pump, which hides away down there happily, along with my drain valve.
Overall, I am absolutely chuffed with the finished build and would love to hear any feedback and answer any questions.
The system runs quite and cool for those who are wondering, even though it's quite a choking case everything runs a whole lot cooler and quieter than before. Oh and my Hotwheels Delorean completes the build wonderfully!
If you read all that, I am eternally grateful. Thank you.
This is hard to explain but it's my second PC I've ever built, but the 4th time I've built it... In other words, it's mostly the same components from my second PC just in a different case, different cooling, cables, fans, graphics card... I could go on. It's been an ongoing project for the past couple years since I upgraded from an AMD FX6300 and GTX 960, and I've loved every moment of it.
I have listed my components under hardware, all apart from the water cooling parts - I'll talk about them here.
To start off, this is not a beast machine. It's not supposed to be as I do not have the budget for such high end components, and my dream was to watercool what I had. Now for the meat of it. This is a colourful, retro 70s - 90s style build set at night. I'm using a dark environment and bright LED's to create that neon cyberpunk vibrancy which looks gorgeous when gaming at 2am. The chassis is small so everything is compact and snug to minimise dead space, looks bad when larger cases have a stubby pump-res combo for example. Seems like a poor use of space. (-MKBHD)
The original theme about 6 months ago was black/aluminium everything but with RGB's to allow for a completely dynamic colour scheme - say it's a cold winters day, I'd like to make my whole PC a warm orange, or a bright sunny day, I'd like to make my whole PC blue and green. I was using the same components at the time but with some cablemod pro cables I got for a 1070... that had one 8pin PCIE. After getting my 2070 Super, I ended up with an 8pin + 6pin and I did not want to spend so much buying a single 6pin pro cable from cablemod. I planned on sleeving my own extensions, however in such a small case, 2x the cables I already had weren't going to happen, so I ventured into sleeving full cables for myself. Originally, the idea was to recreate the black and grey scheme I had before but with MDPC-X variety, though on sample pack arrival, I was blown away by the vibrancy of their bright colours under my PC lighting. So black friday comes around and with a jar full of money and a "go on, do it!" from my girlfriend, an order was made to MDPC-X. I chose 7 colours: Gulf Blue, B-Magic, Vivid Violet, Perfect Pink, Purple, Papaya Orange, & Mellow Yellow. 3 days into designing and creating them, I tested, and voila they were beautiful. I reused my aluminium cablemod combs because they reflect light really well and I totally didn't ruin my old cables to get them off... I'd also like to mention how I routed the ATX cables through my cable bar slit and my PCIE cables through the basement panels perforations. Glad I didn't blow everything up or something too. This continued my love for implementing neon tokyo, cyberpunk, and the 70's use of bright colour into my build and setup.
On black friday I also mashed out on custom watercooling parts. Mainy from EKWB but also a Barrowch reservoir.
CPU Block: EK Velocity RGB Nickel + Acetal
GPU Block: EK Vector RGB Nickel + Acetal
Front Radiator: EK Coolstream SE 280mm
Rear Radiator: EK Coolstream SE 120mm
Reservoir: Barrowch Boxfish POM 250mm Black
Pump: EK D5 Acetal
Fittings:
- EK Torque 16mm Black Nickel x13
- EK Torque 90 Black Nickel x6
- EK Torque T Black Nickel
- EK Pass Through Black Nickel x2
- EK Rotary Extender Black Nickel
- EK 6mm Extender Black Nickel x2
- EK 12mm Extender Black Nickel
- EK Plug Black Nickel x7
- EK Ball Valve Black Nickel
Tubing: EK Hardline Acrylic 16mm
Coolant: Distilled water with EK Clear Concentrate
Once this all arrived, I got straight to building. Some notes on watercooling for the unexperienced:
Check all your components physically thoroughly before installation. My D5 pump was not assembled properly from factory and leaked due to the oring not being in the right place. With a pump hardlined into the basement of an H510 Elite, this was a 24 hour nightmare.
Buy a couple extra lengths of tubing than what you think you need. I bought 2m and used every last bit of it - I reheated my rad-to-res bend 5 times to get the perfect bend as that was my last piece. Don't worry about reheating, be slow and gentle and nothing will deform.
The best radius for 16mm acrylic is 25mm - 30mm for an easy and smooth curve in my opinion, however I have a 12mm radius bend which wasn't easy, but it's possible.
Don't be affraid of acrylic. PETG is quicker, but from using acrylic for my first loop, I learned it's not as hard as it seems.
Last but not least, take extra care when disassembling and reassembling your graphics card. I managed to chip off a tiny capacitor like a proper numpty but luckily it was not needed. Card runs fine and has done for days.
My loop order is pretty self explanitory, the pump feeds from the bottom reservoir port. I chose parallel for the looks, it doesn't effect my performance either. I prefer softened RGB with diffusion rather than bare LED's common with acrylic blocks, hence the acetal RGB theme. The CPU block is upside down so the inlet and outlet ports align with my graphics card ports. My founders edition backplate required some filing to sit level on the front of the block, 90% of screw holes were reused too. I managed to fit a 280mm radiator in the front of my case by screwing it in only on one side with the 120mm holes, then spaced my fans off the bracket a millimeter or so to avoid the screws. My reservoir was an amazing decision. I chose it over the Phanteks Glacier R220 due to it's better flow and OLED screen. It tells me current coolant temperature and elapsed ontime, whilst also being very good looking and built to high quality. Oh and the 8 ports are nice too. I drilled two holes through both the cable bar and basement panel for pass throughs to and from the pump, which hides away down there happily, along with my drain valve.
Overall, I am absolutely chuffed with the finished build and would love to hear any feedback and answer any questions.
The system runs quite and cool for those who are wondering, even though it's quite a choking case everything runs a whole lot cooler and quieter than before. Oh and my Hotwheels Delorean completes the build wonderfully!
If you read all that, I am eternally grateful. Thank you.
Color(s): Aluminum Black Blue Light Blue Orange Pink Purple Yellow
RGB Lighting? Yes
Theme: Retro
Cooling: Custom Liquid Cooling
Size: ATX
Type: General Build
Hardware
CPU
$ 198.05
Motherboard
$ 208.00
Memory
$ 539.96
Graphics
$ 599.00
Storage
$ 154.99
PSU
Case
$ 179.00
Case Fan
$ 39.61
Case Fan
$ 239.94
Accessories
$ 74.90
Keyboard
$ 269.68
Mouse
$ 48.50
Approved by: