

The castle running in quiet mode with both wings closed
Front shot of the castle
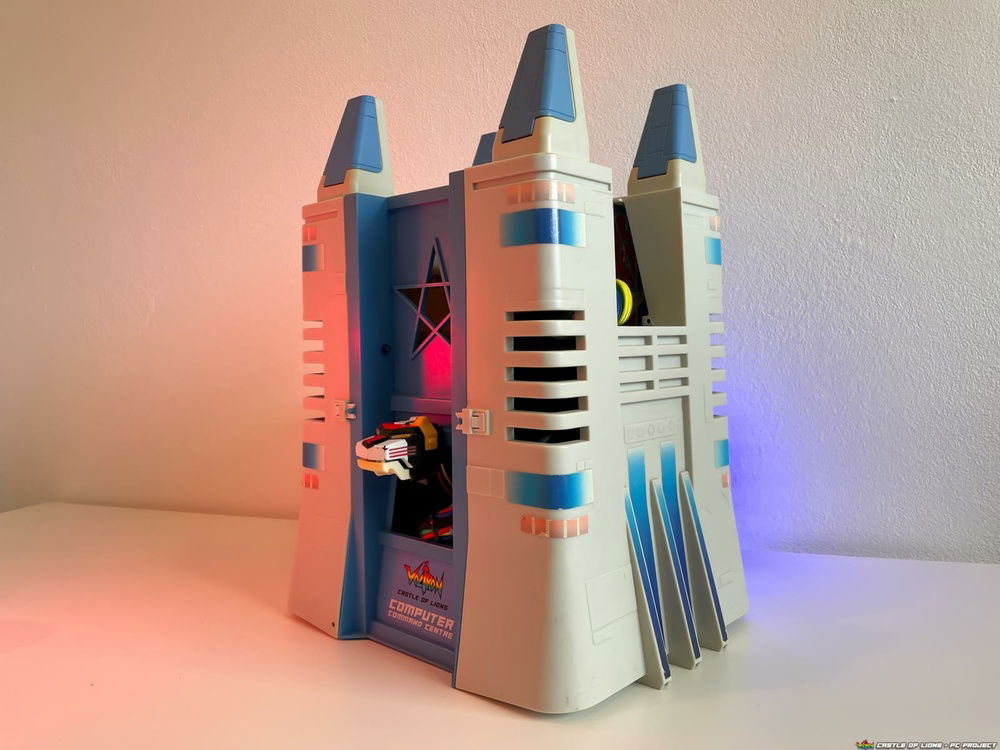
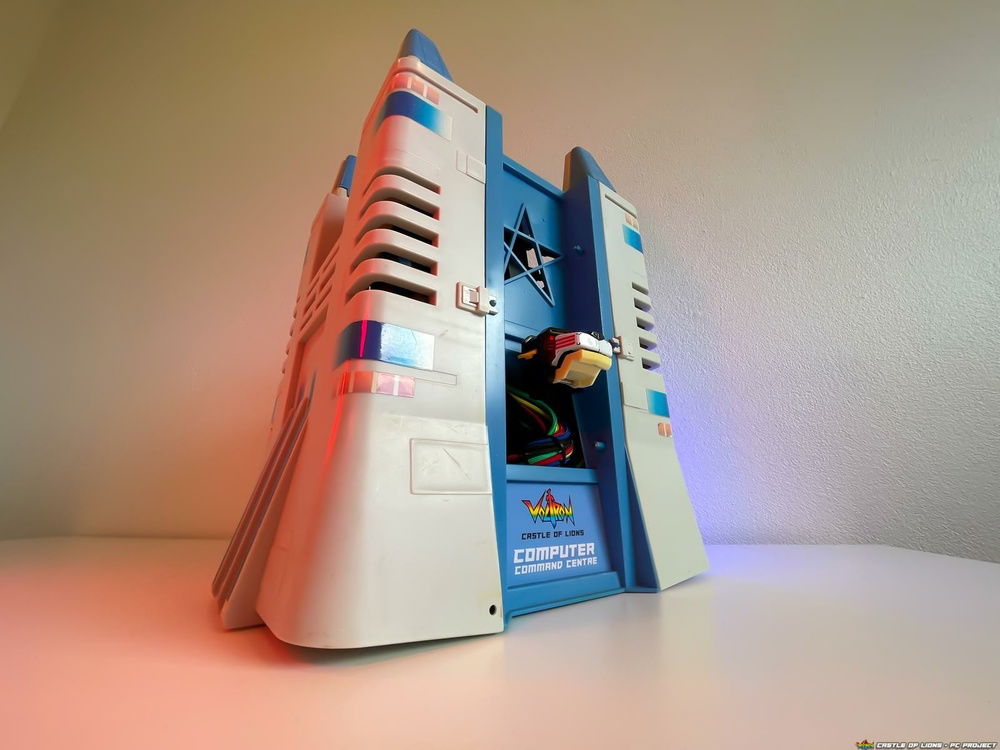
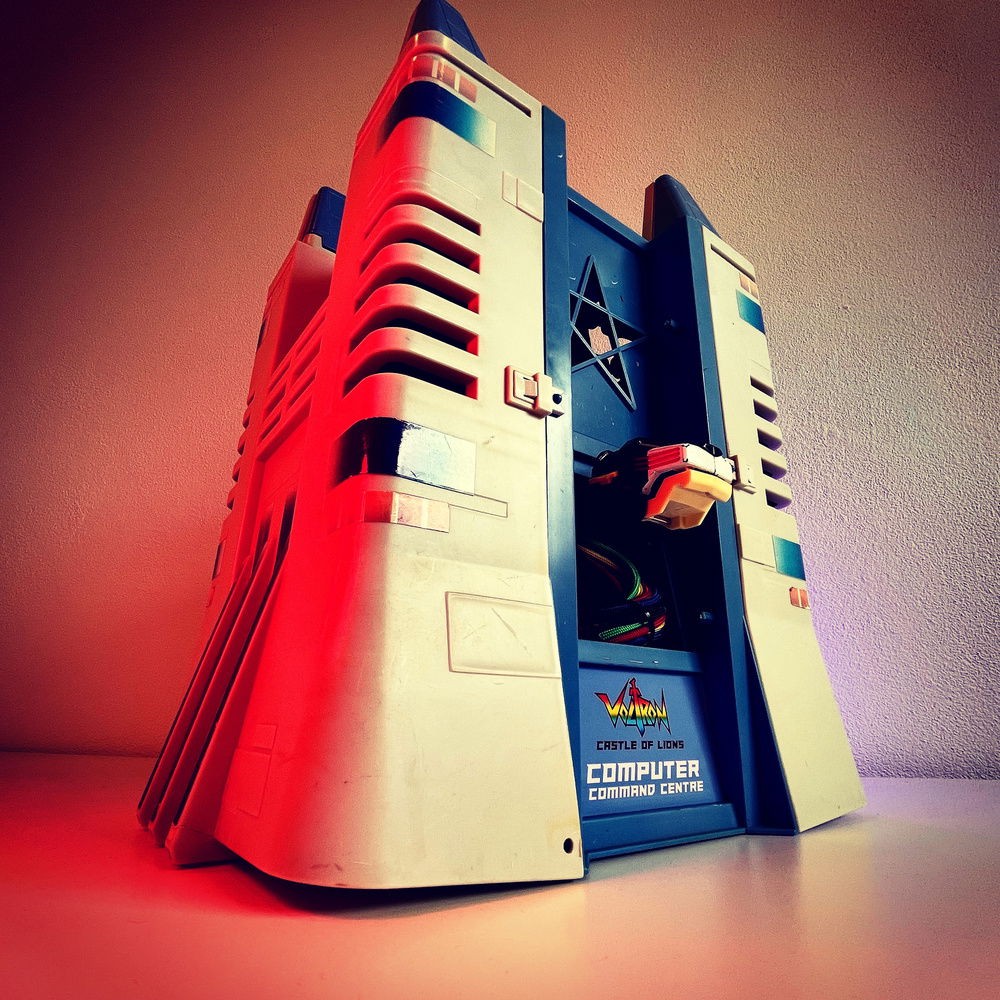
Right side of the castle
Opening in the right castle wall where air is exhausted from the rad
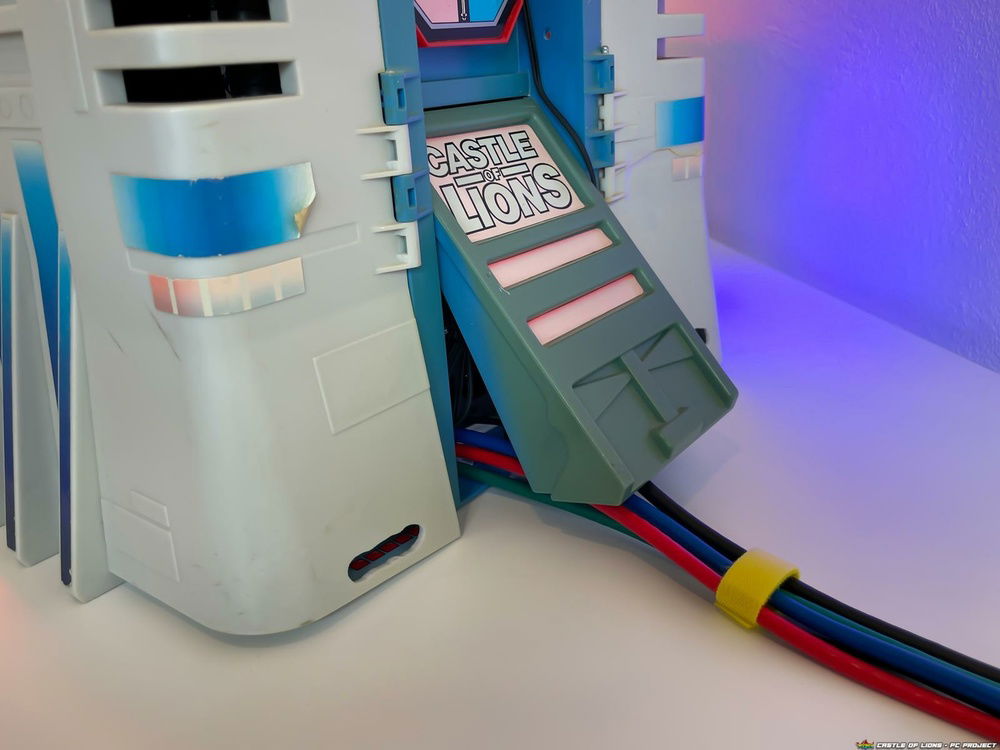
Rear of castle with cables exiting through the door
Rear of castle
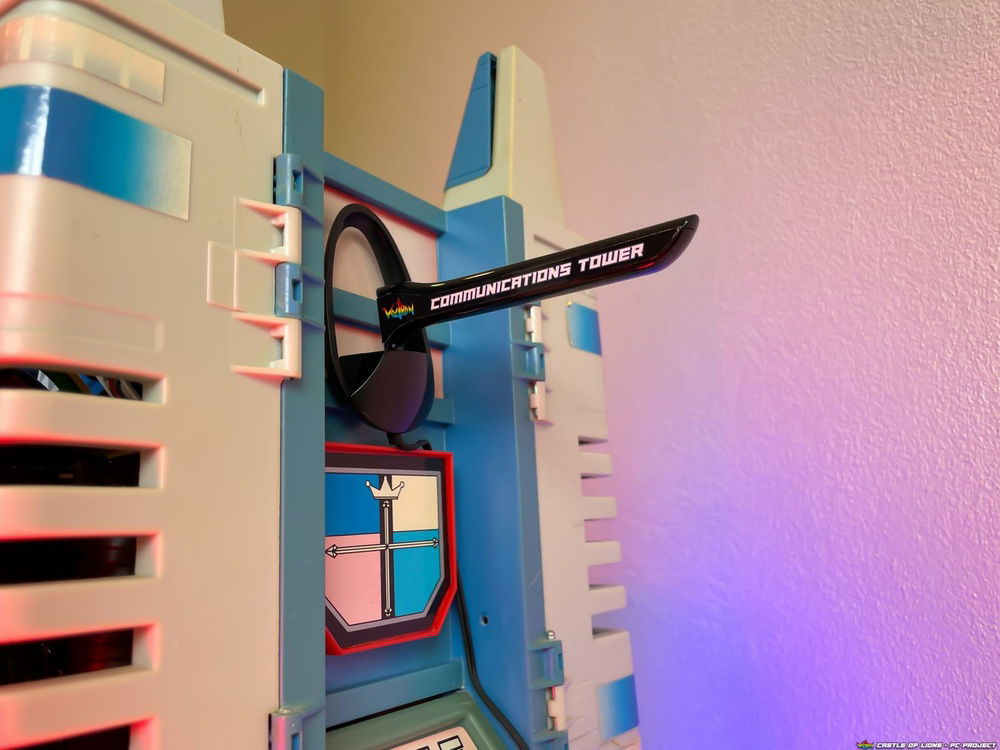
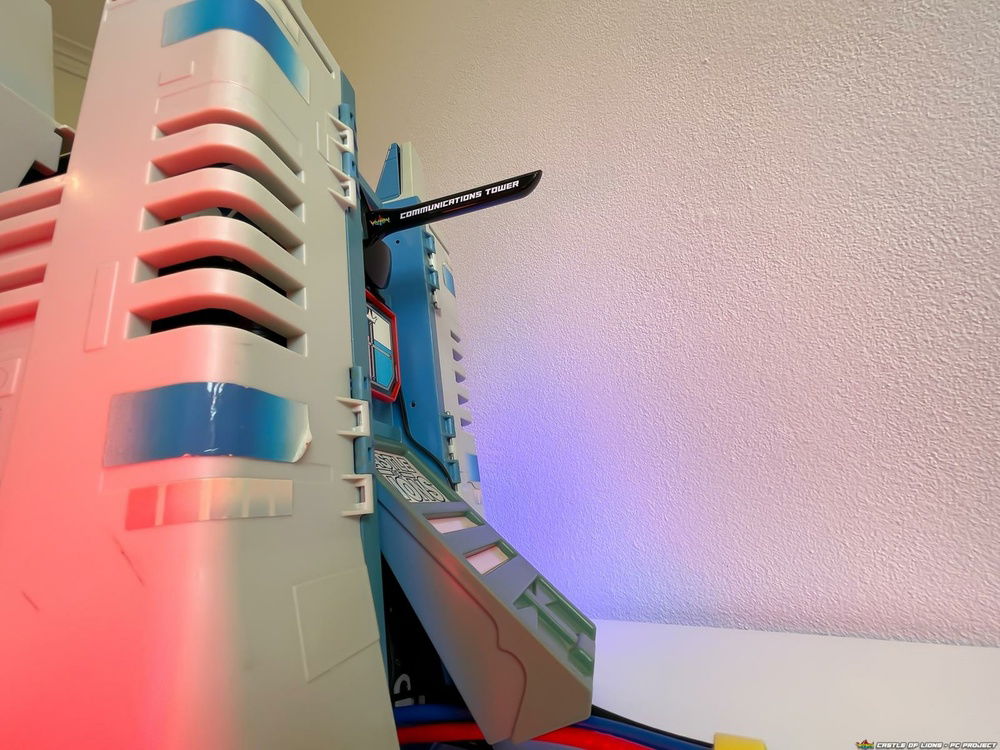
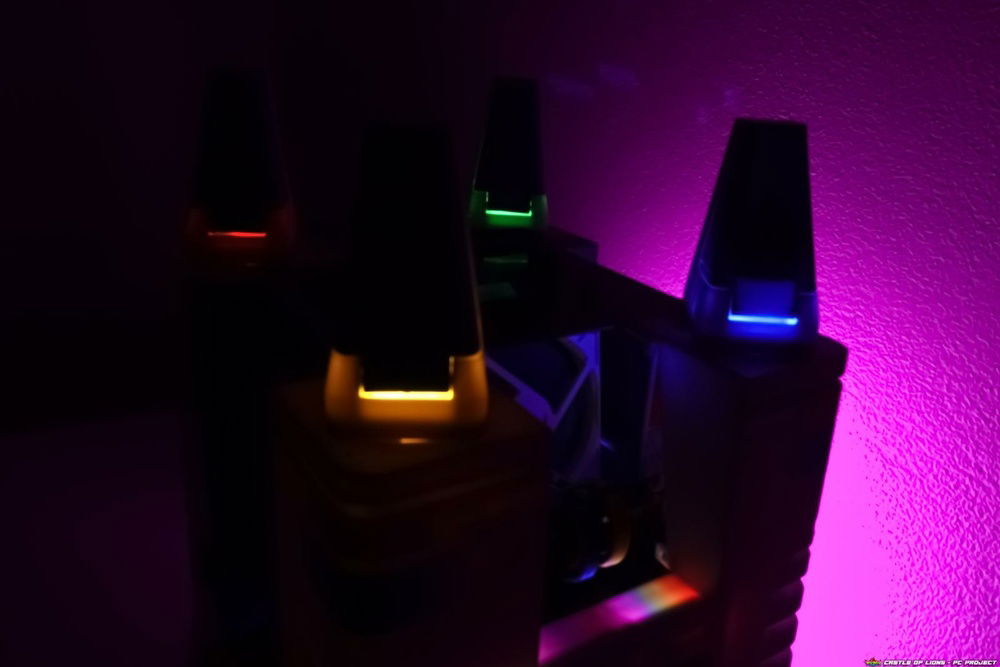
Close up of Communications Tower (Wi-Fi antenna)
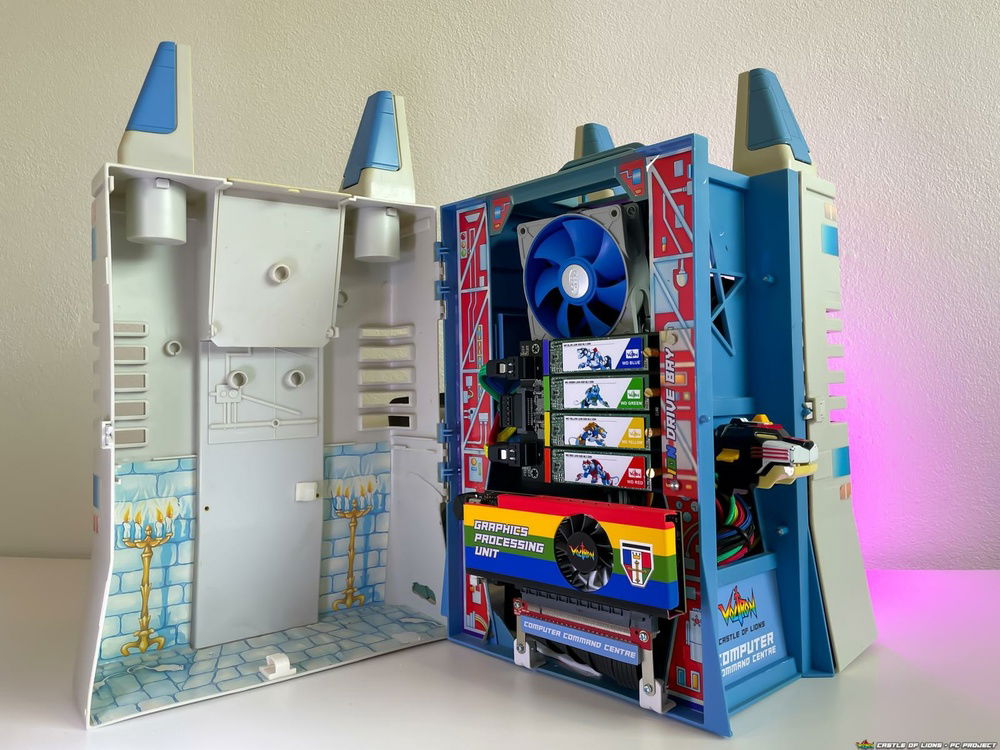
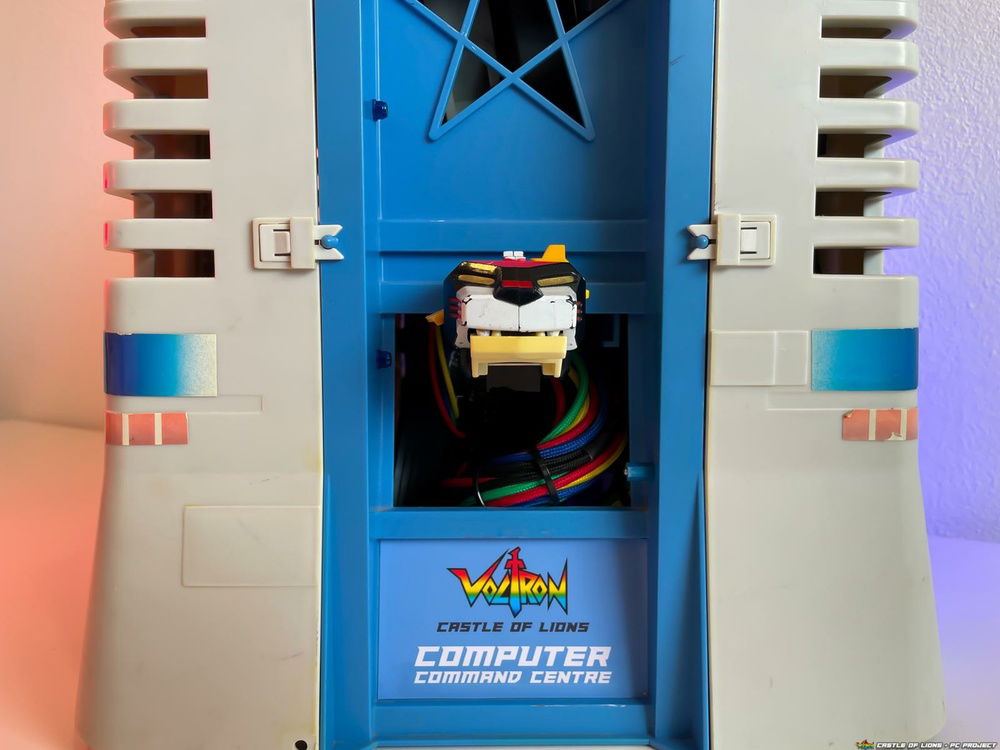
Inside of castle, left side of central chamber. Intake fan top for the 92mm AIO. M.2 bay for the Blue, Green, Red and Yellow Lion drives. RX550 GPU mounted bottom

Close up of the Drive Bay (a Silverstone SDP11). I designed all the sticker art myself and printed onto glossy sticker paper
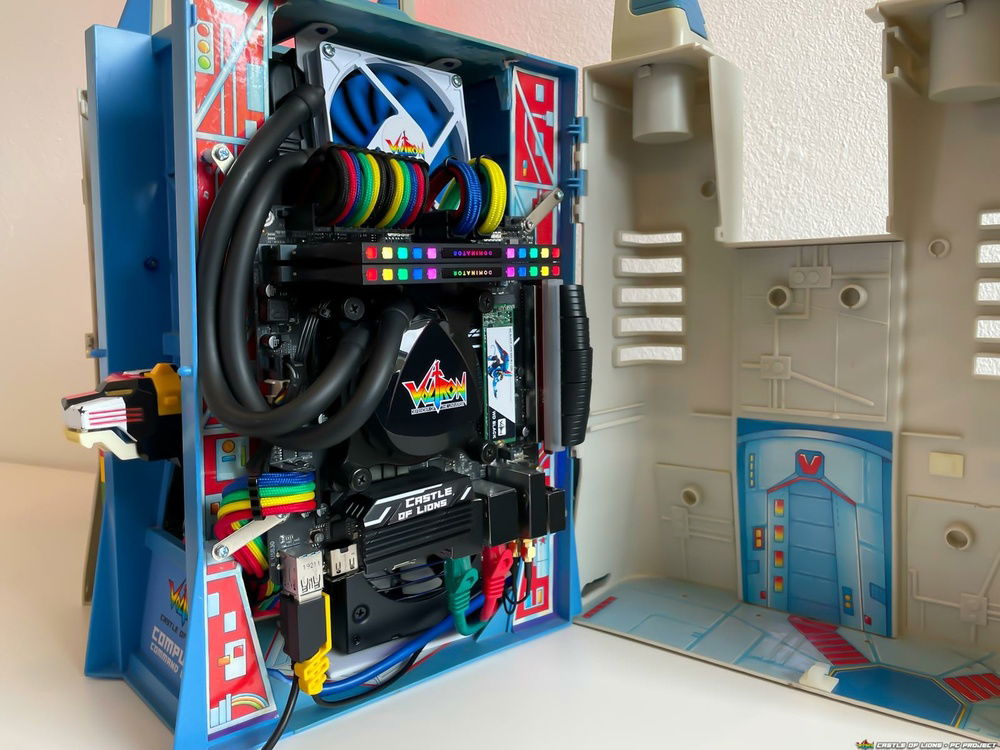
Right side of central chamber, featuring the 92mm AIO, RGB RAM and IO / cables
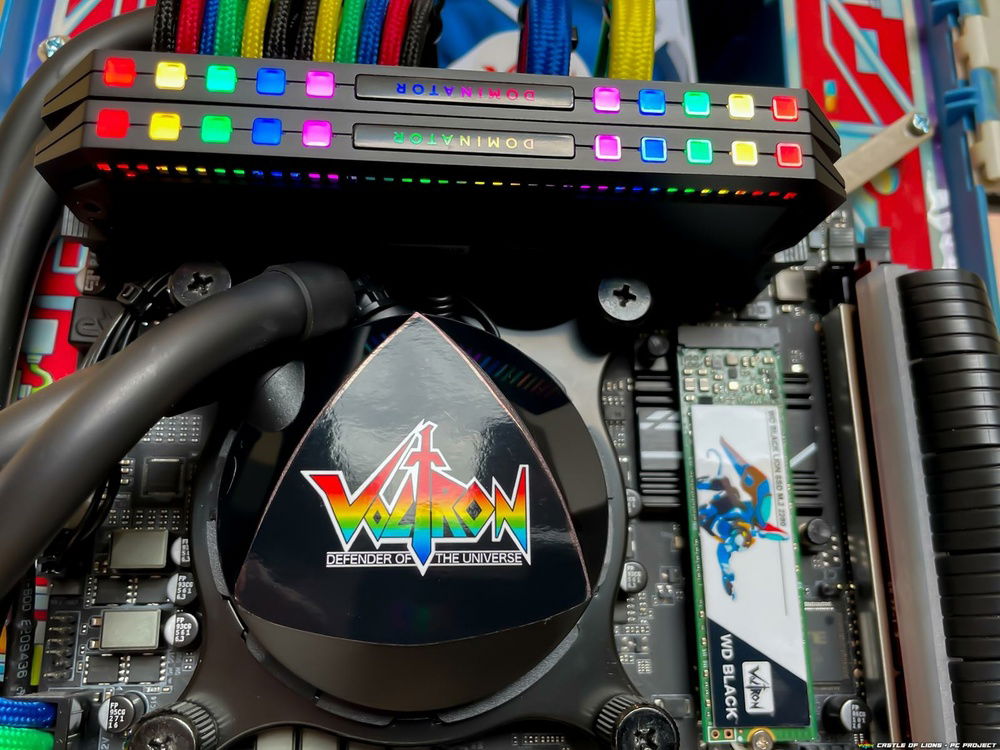
Close up of pump block and Black Lion drive, who obviously belongs on the motherboard
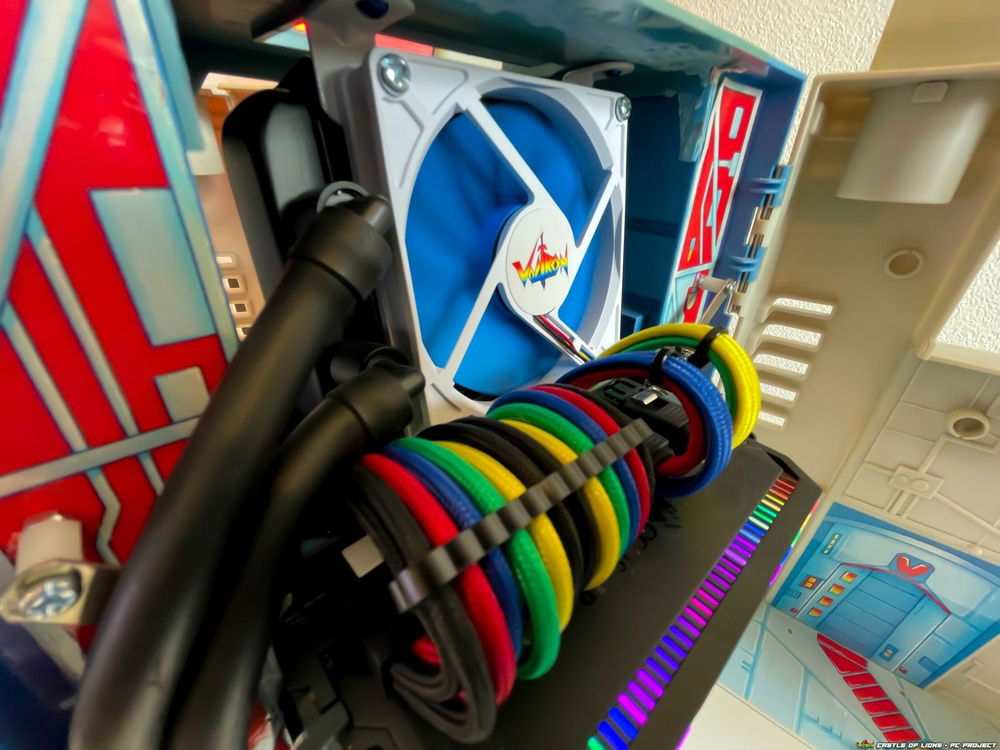
Exhaust fan and coloured cables from CableMod
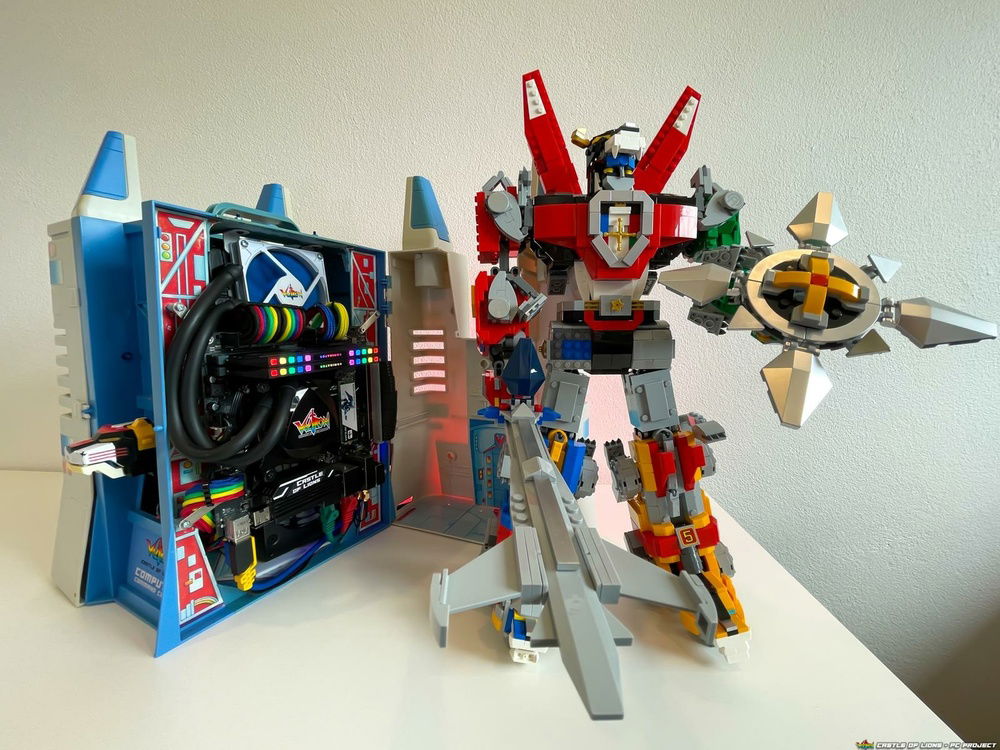
Lego Voltron approves
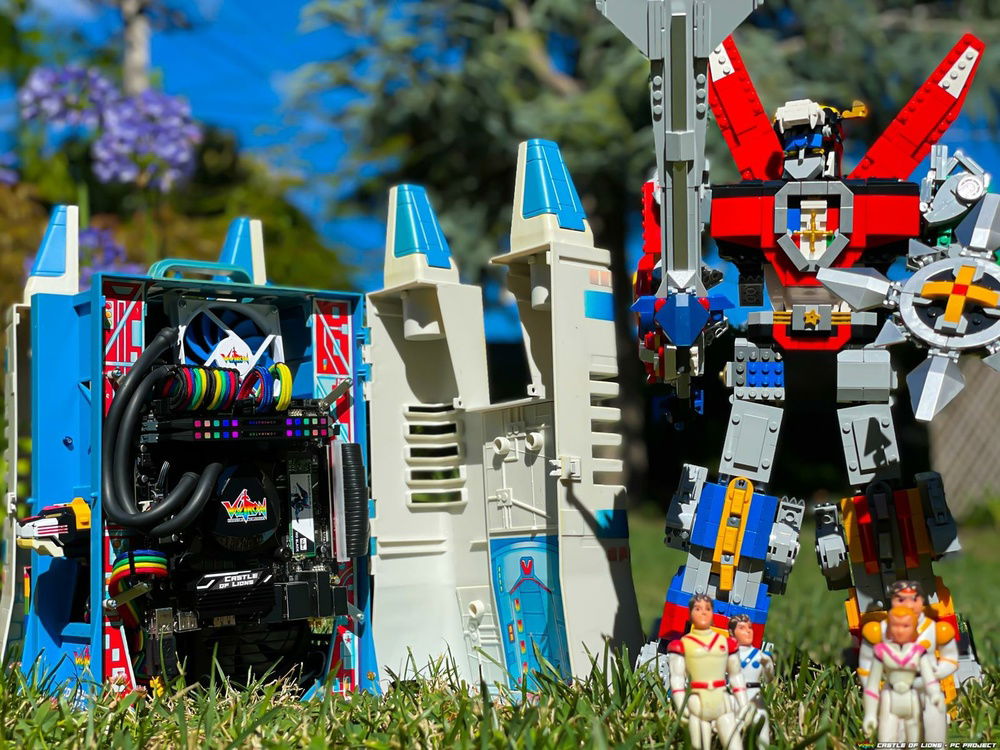
The castle in its natural habitat
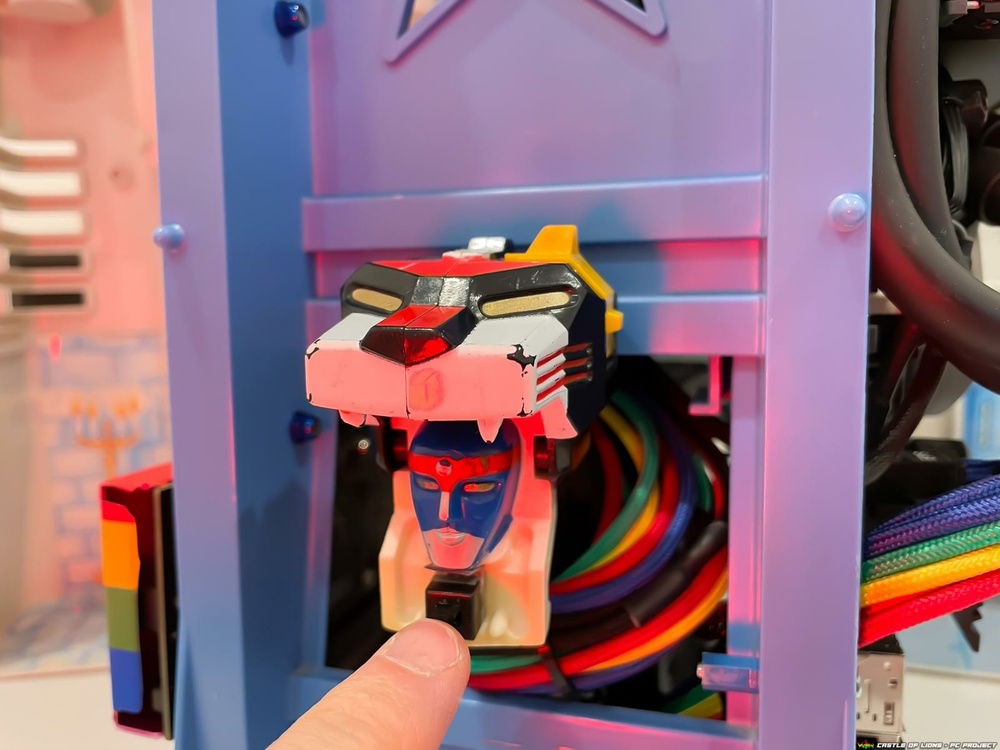
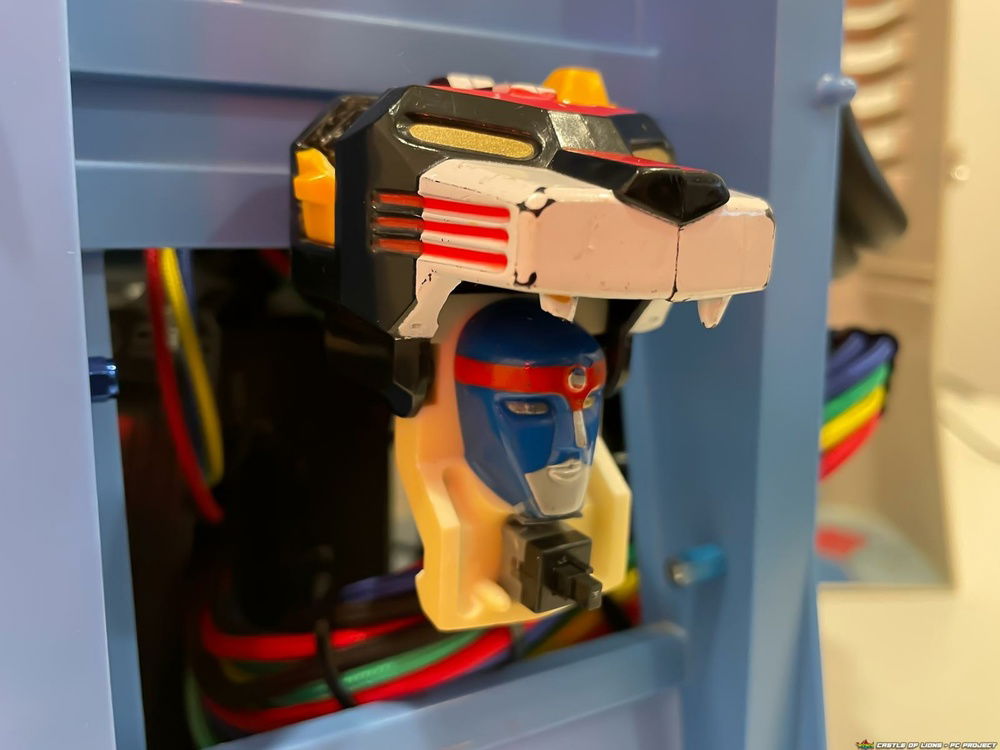
Inside the Black Lion’s head is the power button
More power button
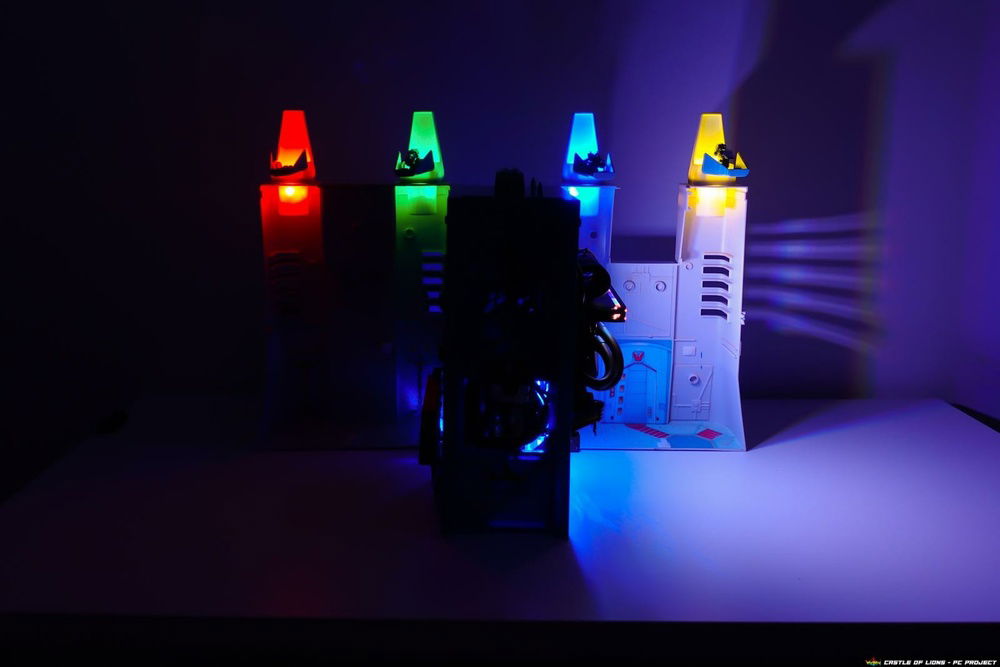
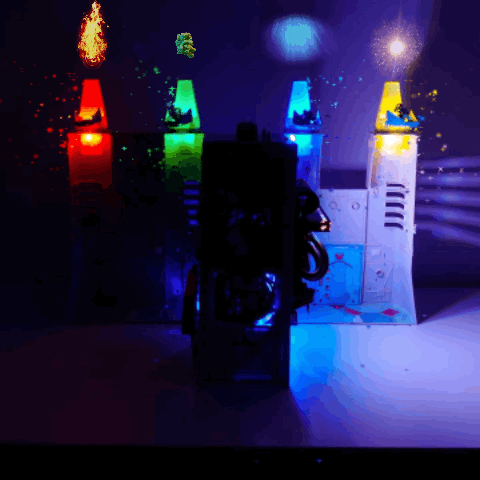
The castle at night, featuring the lit up turrets
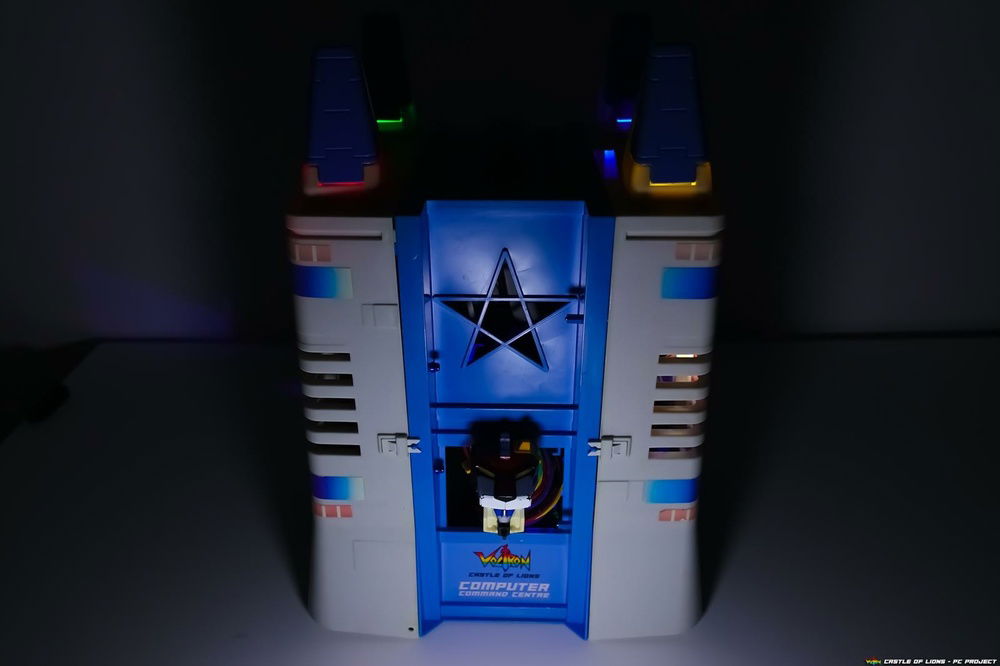
Front of castle at night
The view when I’m gaming, pink light from a smart lamp as a tribute to Princess Allura
Yes this is totally real 🙄

The heart of Voltron
The castle at sunrise
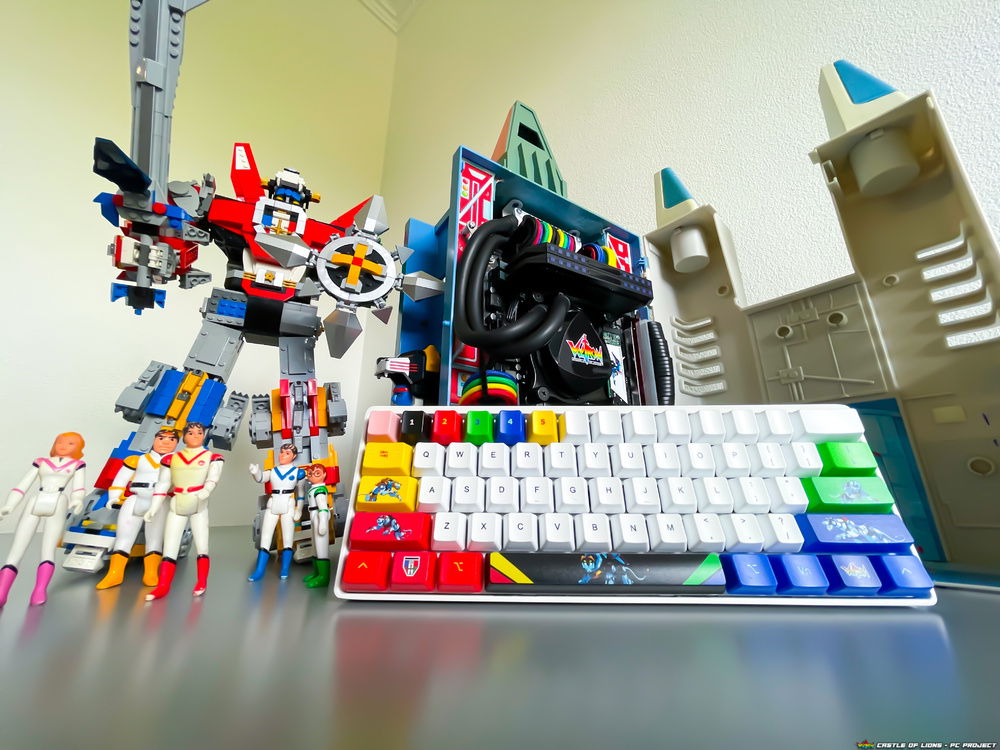
The Voltron keyboard (customised WASD Keyboard)
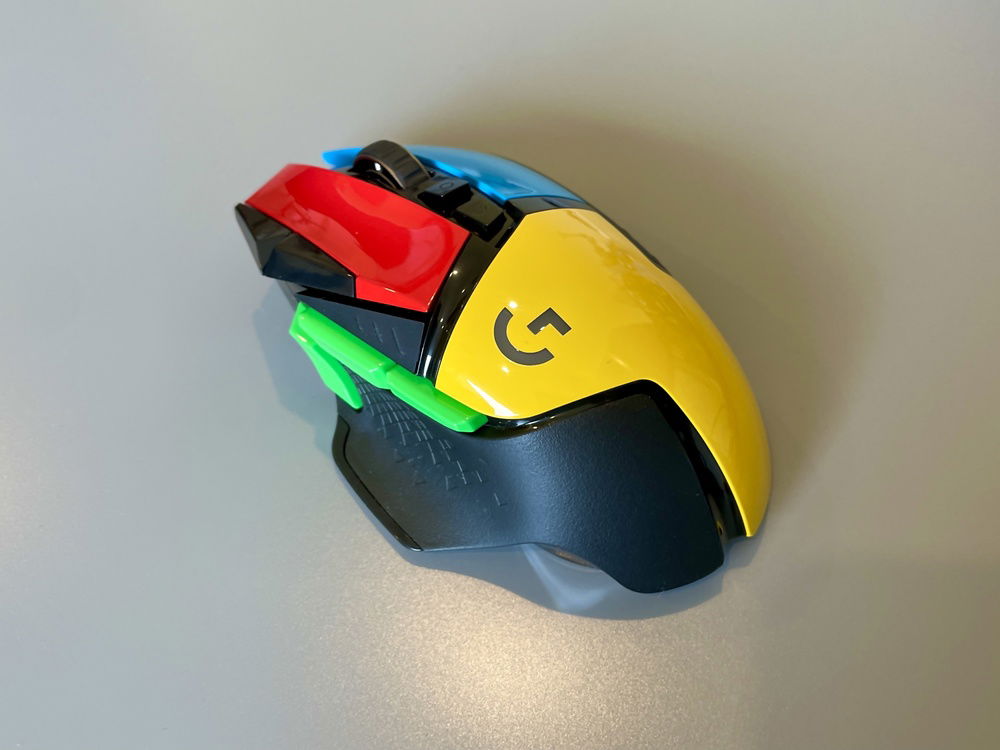
The Voltron mouse, courtesy of Colorware
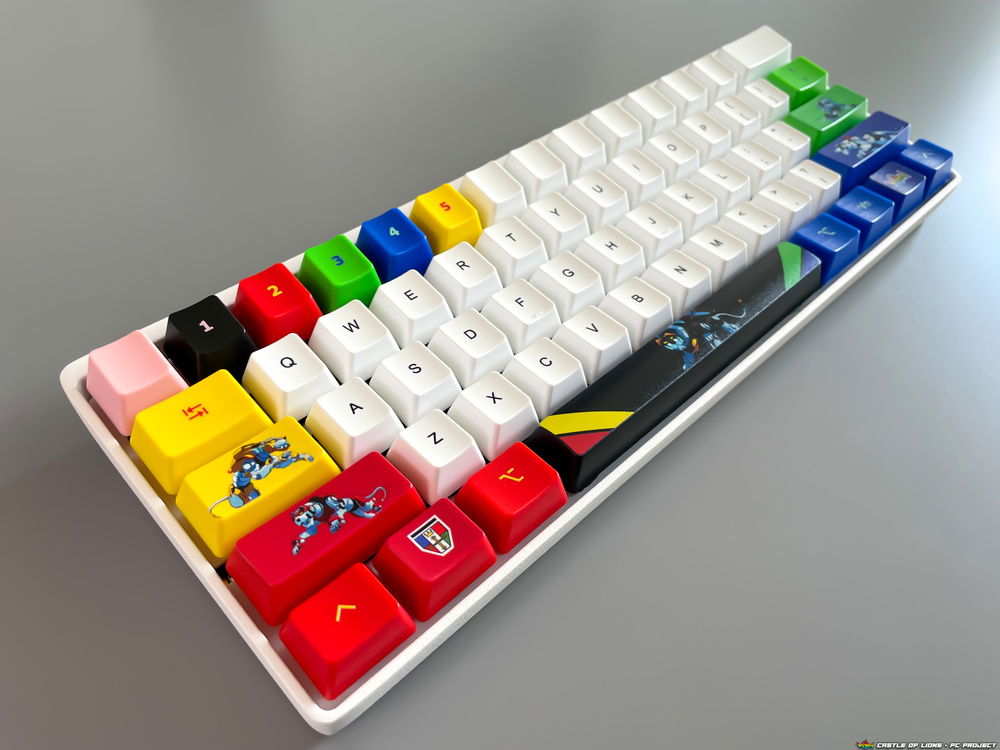
More keeb
Voltron PC Project
AD:
Like many kids of the 80s I was a big fan of Voltron and a few years ago I discovered the old Castle of Lions toy in my mum’s attic. This is my attempt at turning it into a functioning computer. It took me three years to finish this project, thanks to all the things that life throws your way including moving house, having a baby, moving again interstate, accidentally bending the motherboard pins, one stick of RAM failing, almost melting the castle, parts not arriving from overseas, and a global pandemic.. just to name a few.
The toy castle was made by Panosh Place in 1984 and is quite a collectors item these days. Many of the original parts in mine had been damaged. It has two wings and a central chamber. I run it with the wings open most of the time, but for compact and quiet operation the castle can be closed.
I experimented with a lot of different layouts, including a custom loop, lots of fans, and at one stage I had 5 SSDs in the wings of the castle which was a big mess. The final design I settled on involved putting everything in the central chamber and channelling air through the built-in openings near the top of the castle.
Motherboard - Gigabyte H370N gave me everything I needed for this build, namely 4 SATA ports in an ITX form factor and components that would fit when the castle door is closed.
Memory - Two sticks of Corsair Dominator 8GB at 3000MHz. Picked them solely for the ability to individually address the lights for the colours of Voltron (RGBY) and went with pink for the 5th colour to represent Princess Allura.
CPU and Cooler - The i5-8400 does the job for the purpose of this machine, which is mainly emulation (NES and SNES) and some light e-sports gaming.
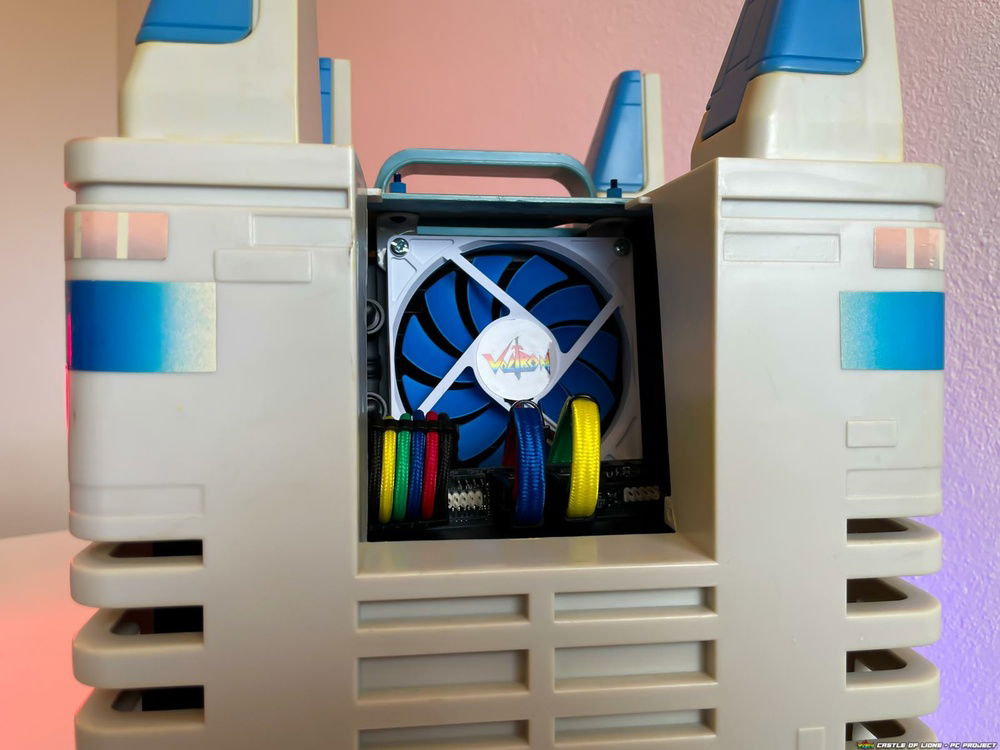
The Asetek 645LT is a 92mm AIO. I didn’t need water cooling for performance, I needed it to move the hot air away from the CPU to avoid heating the castle wall when running in closed mode. There are 2 x 92mm fans running in push / pull: one is the 15mm fan from the Silverstone AR05 (which was the initial cooler for this build until I thought I better switch it due to the smell of overheating plastic) and the other is the Deepcool UF92. Both these fans match the case’s blue/white/grey aesthetic. Even when the castle is running in closed mode the CPU temps are really low as no air is actually retained in the case. I must say Panosh did a great job on the airflow front here.
GPU - One of the earlier designs featured my GTX 1070 mini which took up almost half of the central chamber and also suffered from smelly hot plastic issues. It was overpowered for my goal for this build which was to play retro games so I downsized about as much as you can, to a single-slot low-profile Yeston RX550. I have been pleasantly surprised with this card. My wife used to game with an RX460 and this feels about the same. Mind you I haven’t tested it with anything more demanding than Heroes of the Storm but it has no problem pushing 60 FPS at 1080p with that game on Med/High settings (that game is more CPU bound anyway). I’m using a Silverstone RC04 riser cable, I like how flexible it is and because of the individual ribbons you can guide it through narrow spaces, perfect for building in an 80s toy Voltron castle.
Storage - Sticking to the Voltron aesthetic, I always knew I wanted 5 drives, one for each lion. Initially I had SSDs in the wings of the castle and I even designed custom RGB covers for them from V1Tech, but it just created a mess of cables. The challenge was to get everything in the central chamber, and I knew it could fit enough M.2 drives in there but I had no idea how to make it work. That is until I came across the SDP11 M.2 bay from Silverstone, who are surely the master of manufacturing random hardware parts you never knew you needed. The Red, Blue, Green and Yellow Lion drives are in that bay with the Black drive in the motherboard (obviously, given he is the heart of Voltron).
Power - The castle could only accommodate an SFX PSU in a certain orientation, which is in the bottom of the central chamber. I went with the Corsair SF450 which is more than enough. I had some custom cables made at CableMod to match the Voltron colours. One of these cables strangely stopped working about a year ago so that had to be re-ordered.
Stickers - I made all the custom art for this project, printed on either glossy sticker paper (fans, CPU block, M.2 drives, and a few other bits) or vinyl (GPU). I was a bit worried about the effect on GPU heating but so far nothing has caught fire so I think I'm good on that front. I had a lot of fun with the M.2 labels and hopefully this inspires WD to release a Voltron 5-drive set with the colour of each Lion.
Lighting - Apart from the RGB memory, I managed to find these tiny battery powered LED lego bricks that I placed inside the castle turrets. At night the effect is pretty cool. The RGB on the ram has the nice effect of being diffused through the castle plastic itself (you can see this in the last pick as a rainbow of colour). I thought long and hard about going with more RGB but decided that it didn’t really fit with the aesthetic of an 80s toy.
Build Notes
The motherboard is screwed into the side frame of the castle centre chamber, which was about the only place an ITX board would fit. The PSU is fixed to the bottom floor of the centre chamber, and it helps to anchor the case when I'm transporting it (it's so awesome that it comes with a built in handle on top). All the cables plugged into the motherboard wrap around the edges, and then feed into the PSU, GPU, etc.
I made a bracket for the GPU which is fixed to the bottom of the case, and a right-angle HDMI adapter just allows enough space for the cable to exit out the rear, with all the other cables. The wifi antenna cables run out the back and the antenna (“Communications Tower”) is attached to the back of the case.
The power button alone took many many hours to get right. It’s inside the severed head of the black lion (an unfortunate victim of a childhood incident), which is attached to the castle using something akin to a picture hook. The internal power cable, which would usually run to the front panel power button, is routed under the head, up through the centre chamber, and into the motherboard. There is something extremely satisfying about opening the head of a lion to press the power button for your PC. I hope more case manufacturers adopt something like this going forward.
Featured in some of the photos is the Lego Voltron my wife bought for me last year.
I’ll probably do a few more updates via Twitter @voltronPCguy showing some early build / design shots, including lots of sticker art I never ended up using.
Summary and the Future
I’ve thought a lot about where to from here… do I try adding in more components in the wings of the castle? Do I improve performance and go with a better bigger GPU or maybe a custom loop? I’m not too sure yet, but given how long it took for me to get to this stage, I’m not in a hurry.
It’s hard not to have a smile on your face when I’m playing retro games and I glance across to see the old Voltron toy castle from my childhood with a breathing glowing PC inside it. Hope you all enjoy and good luck modding!
The toy castle was made by Panosh Place in 1984 and is quite a collectors item these days. Many of the original parts in mine had been damaged. It has two wings and a central chamber. I run it with the wings open most of the time, but for compact and quiet operation the castle can be closed.
I experimented with a lot of different layouts, including a custom loop, lots of fans, and at one stage I had 5 SSDs in the wings of the castle which was a big mess. The final design I settled on involved putting everything in the central chamber and channelling air through the built-in openings near the top of the castle.
Motherboard - Gigabyte H370N gave me everything I needed for this build, namely 4 SATA ports in an ITX form factor and components that would fit when the castle door is closed.
Memory - Two sticks of Corsair Dominator 8GB at 3000MHz. Picked them solely for the ability to individually address the lights for the colours of Voltron (RGBY) and went with pink for the 5th colour to represent Princess Allura.
CPU and Cooler - The i5-8400 does the job for the purpose of this machine, which is mainly emulation (NES and SNES) and some light e-sports gaming.
The Asetek 645LT is a 92mm AIO. I didn’t need water cooling for performance, I needed it to move the hot air away from the CPU to avoid heating the castle wall when running in closed mode. There are 2 x 92mm fans running in push / pull: one is the 15mm fan from the Silverstone AR05 (which was the initial cooler for this build until I thought I better switch it due to the smell of overheating plastic) and the other is the Deepcool UF92. Both these fans match the case’s blue/white/grey aesthetic. Even when the castle is running in closed mode the CPU temps are really low as no air is actually retained in the case. I must say Panosh did a great job on the airflow front here.
GPU - One of the earlier designs featured my GTX 1070 mini which took up almost half of the central chamber and also suffered from smelly hot plastic issues. It was overpowered for my goal for this build which was to play retro games so I downsized about as much as you can, to a single-slot low-profile Yeston RX550. I have been pleasantly surprised with this card. My wife used to game with an RX460 and this feels about the same. Mind you I haven’t tested it with anything more demanding than Heroes of the Storm but it has no problem pushing 60 FPS at 1080p with that game on Med/High settings (that game is more CPU bound anyway). I’m using a Silverstone RC04 riser cable, I like how flexible it is and because of the individual ribbons you can guide it through narrow spaces, perfect for building in an 80s toy Voltron castle.
Storage - Sticking to the Voltron aesthetic, I always knew I wanted 5 drives, one for each lion. Initially I had SSDs in the wings of the castle and I even designed custom RGB covers for them from V1Tech, but it just created a mess of cables. The challenge was to get everything in the central chamber, and I knew it could fit enough M.2 drives in there but I had no idea how to make it work. That is until I came across the SDP11 M.2 bay from Silverstone, who are surely the master of manufacturing random hardware parts you never knew you needed. The Red, Blue, Green and Yellow Lion drives are in that bay with the Black drive in the motherboard (obviously, given he is the heart of Voltron).
Power - The castle could only accommodate an SFX PSU in a certain orientation, which is in the bottom of the central chamber. I went with the Corsair SF450 which is more than enough. I had some custom cables made at CableMod to match the Voltron colours. One of these cables strangely stopped working about a year ago so that had to be re-ordered.
Stickers - I made all the custom art for this project, printed on either glossy sticker paper (fans, CPU block, M.2 drives, and a few other bits) or vinyl (GPU). I was a bit worried about the effect on GPU heating but so far nothing has caught fire so I think I'm good on that front. I had a lot of fun with the M.2 labels and hopefully this inspires WD to release a Voltron 5-drive set with the colour of each Lion.
Lighting - Apart from the RGB memory, I managed to find these tiny battery powered LED lego bricks that I placed inside the castle turrets. At night the effect is pretty cool. The RGB on the ram has the nice effect of being diffused through the castle plastic itself (you can see this in the last pick as a rainbow of colour). I thought long and hard about going with more RGB but decided that it didn’t really fit with the aesthetic of an 80s toy.
Build Notes
The motherboard is screwed into the side frame of the castle centre chamber, which was about the only place an ITX board would fit. The PSU is fixed to the bottom floor of the centre chamber, and it helps to anchor the case when I'm transporting it (it's so awesome that it comes with a built in handle on top). All the cables plugged into the motherboard wrap around the edges, and then feed into the PSU, GPU, etc.
I made a bracket for the GPU which is fixed to the bottom of the case, and a right-angle HDMI adapter just allows enough space for the cable to exit out the rear, with all the other cables. The wifi antenna cables run out the back and the antenna (“Communications Tower”) is attached to the back of the case.
The power button alone took many many hours to get right. It’s inside the severed head of the black lion (an unfortunate victim of a childhood incident), which is attached to the castle using something akin to a picture hook. The internal power cable, which would usually run to the front panel power button, is routed under the head, up through the centre chamber, and into the motherboard. There is something extremely satisfying about opening the head of a lion to press the power button for your PC. I hope more case manufacturers adopt something like this going forward.
Featured in some of the photos is the Lego Voltron my wife bought for me last year.
I’ll probably do a few more updates via Twitter @voltronPCguy showing some early build / design shots, including lots of sticker art I never ended up using.
Summary and the Future
I’ve thought a lot about where to from here… do I try adding in more components in the wings of the castle? Do I improve performance and go with a better bigger GPU or maybe a custom loop? I’m not too sure yet, but given how long it took for me to get to this stage, I’m not in a hurry.
It’s hard not to have a smile on your face when I’m playing retro games and I glance across to see the old Voltron toy castle from my childhood with a breathing glowing PC inside it. Hope you all enjoy and good luck modding!
Color(s): Black Blue Green Red Yellow
RGB Lighting? Yes
Theme: Retro
Cooling: AIO Cooling
Size: Mini-ITX
Type: General Build
Contests
This build participated in 1 contest.
| Rank | Contest | Date |
|---|---|---|
| #20 | Build of the Month - January 2021 | ended |
Hardware
CPU
$ 139.00
Motherboard
$ 149.98
Memory
$ 713.25
Storage
$ 293.40
CableMod
$ 100.00
Estimated total value of this build:
$ 1,876.93
Approved by: