


I pulled the case apart and painted each piece so that the look was clean. At this point, if you are not happy with the color, better to disassemble and paint again.
2) Lesson: paint it correctly, sand, remove grease and wipe down with alcohol. Paint in small cover coats and let it dry at least 24 hours. It is a pain, but the finished product will look great.
As I was putting it together, I disliked the plastic start, so I chopped a bit of leather and glued it on. I think I will cut a piece of copper, although I like how it feels, it might be one element that does not fit.
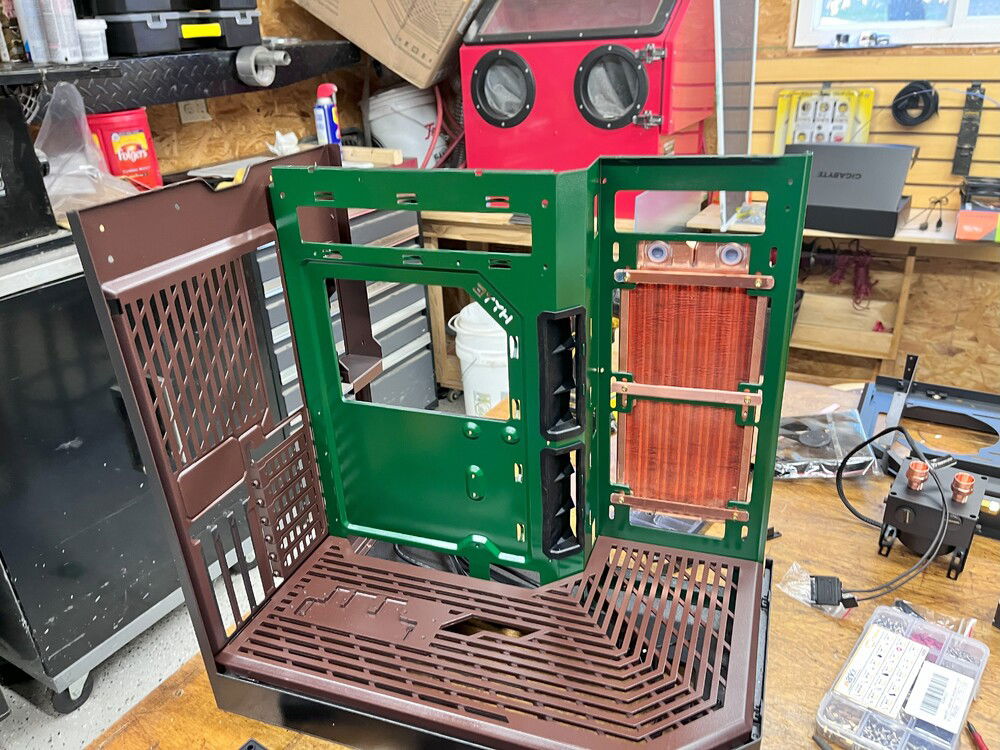
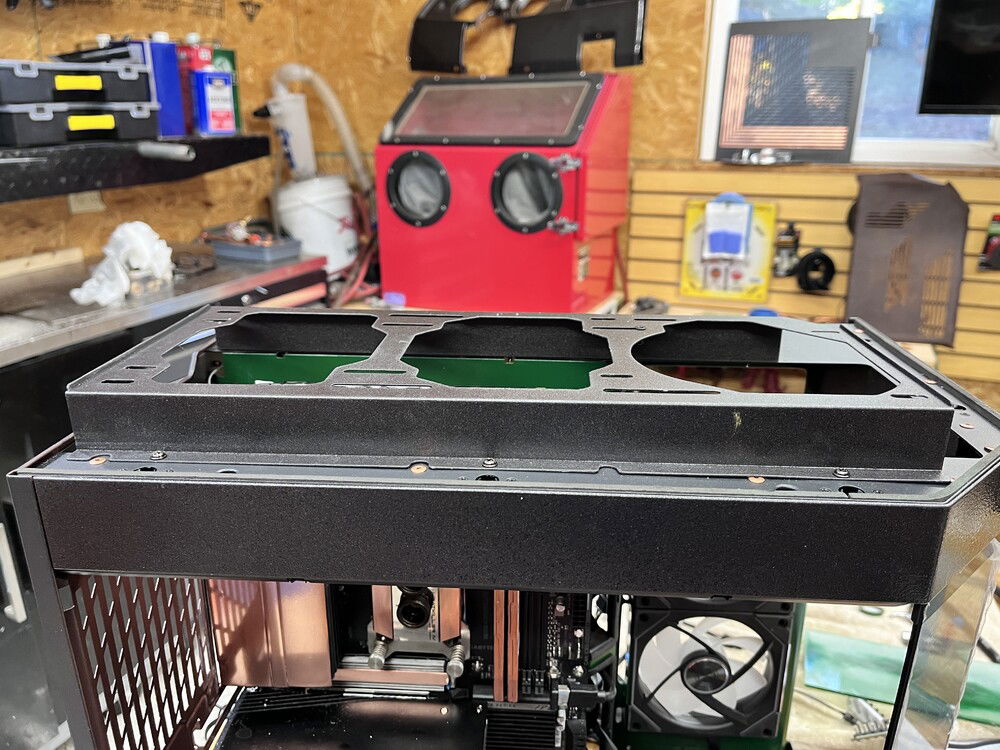
Where does the shit fit? With a case like the Y60, there are bunches of options. I also love the false deck as there is space in the basement. I am not a bit fan of fans as it were, so hiding it looked like a solid option.
Having the case open like this seems like there are limitless options. I think I played around for a couple of days. I decided that I needed to move forward and if I did not like it, I can undo it. Better at this stage in the design phase than after it is all built.

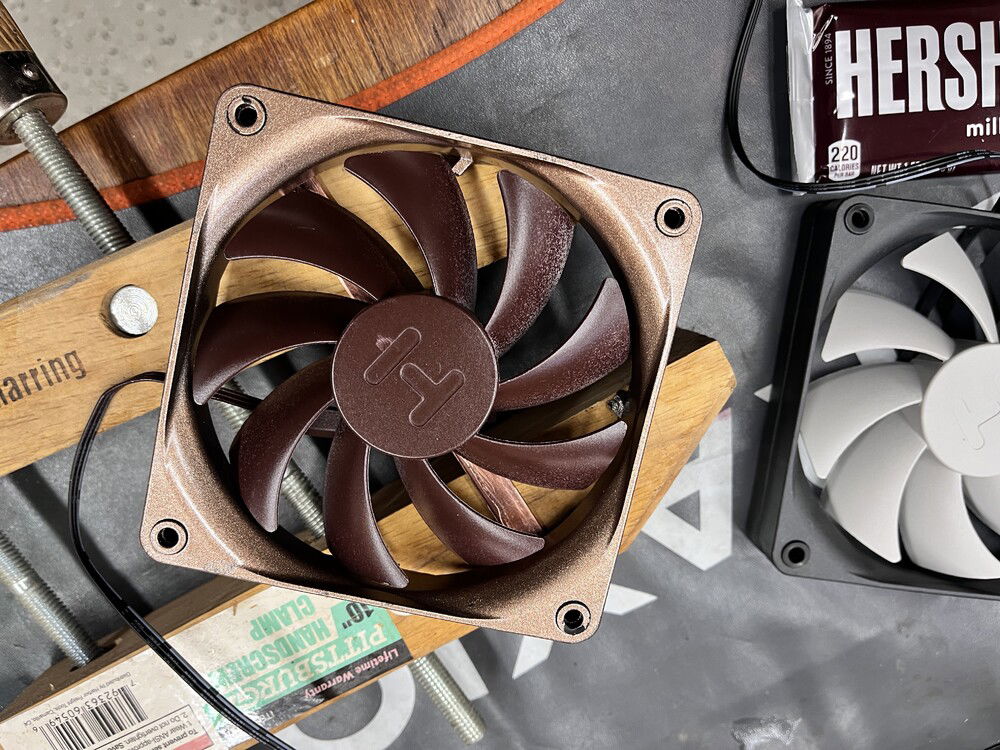
The GForce 3060 was not going to stay with the fans, one way or another, so I started to cannibalize the fans and tried my hand at copper leaf. Not sure where it would go, but an interesting exercise in practicing using leaf.
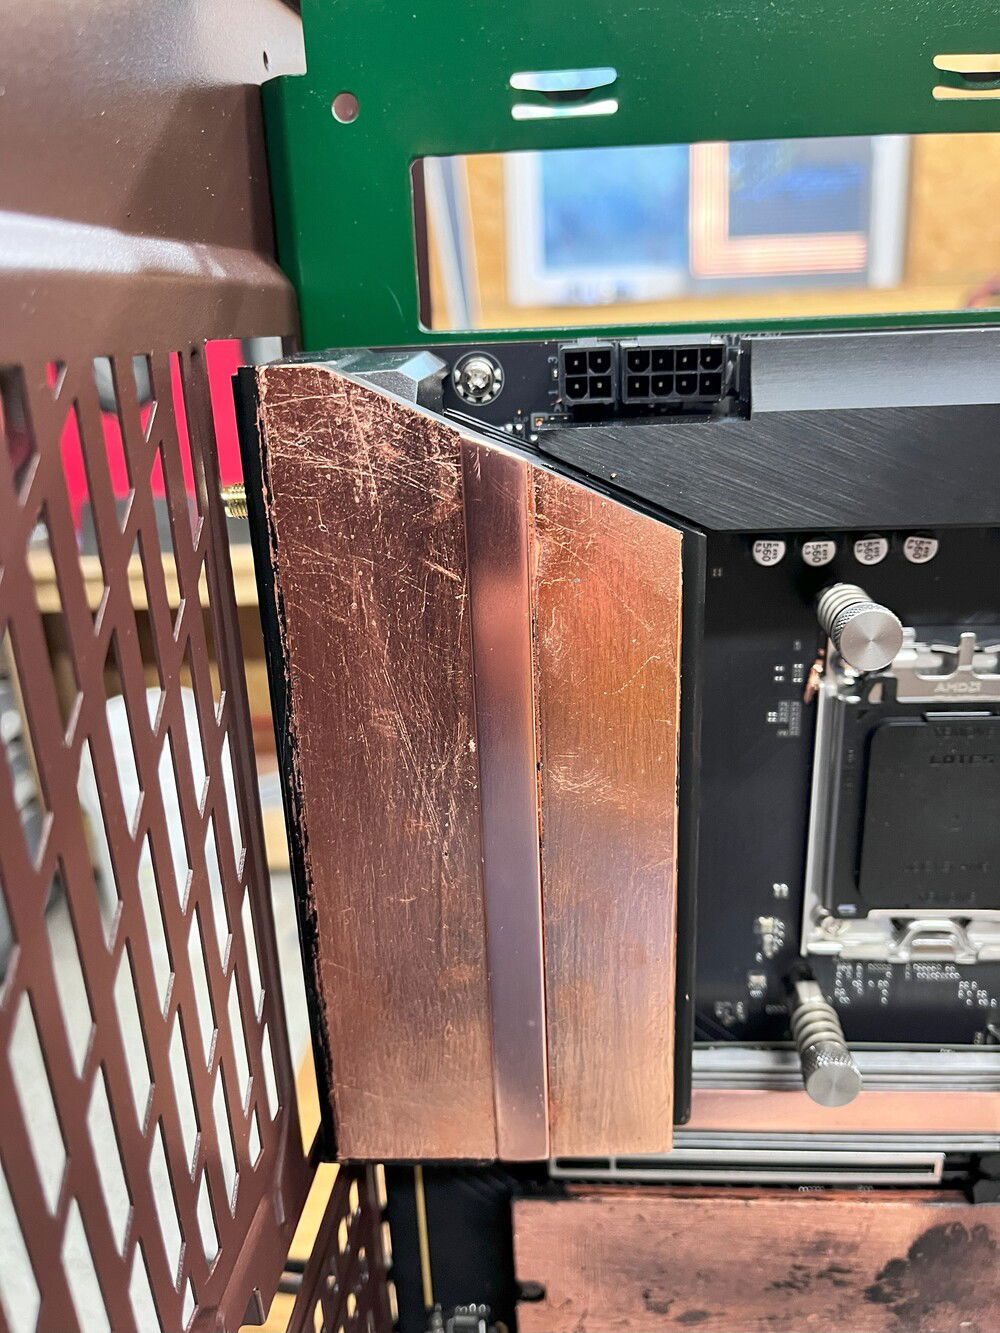
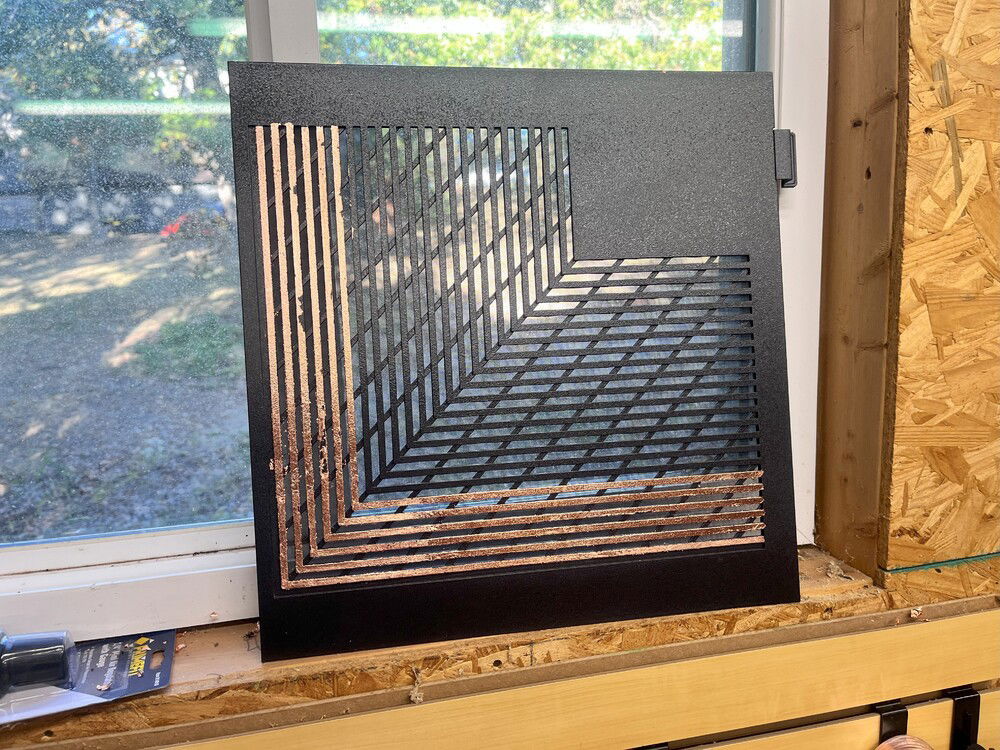
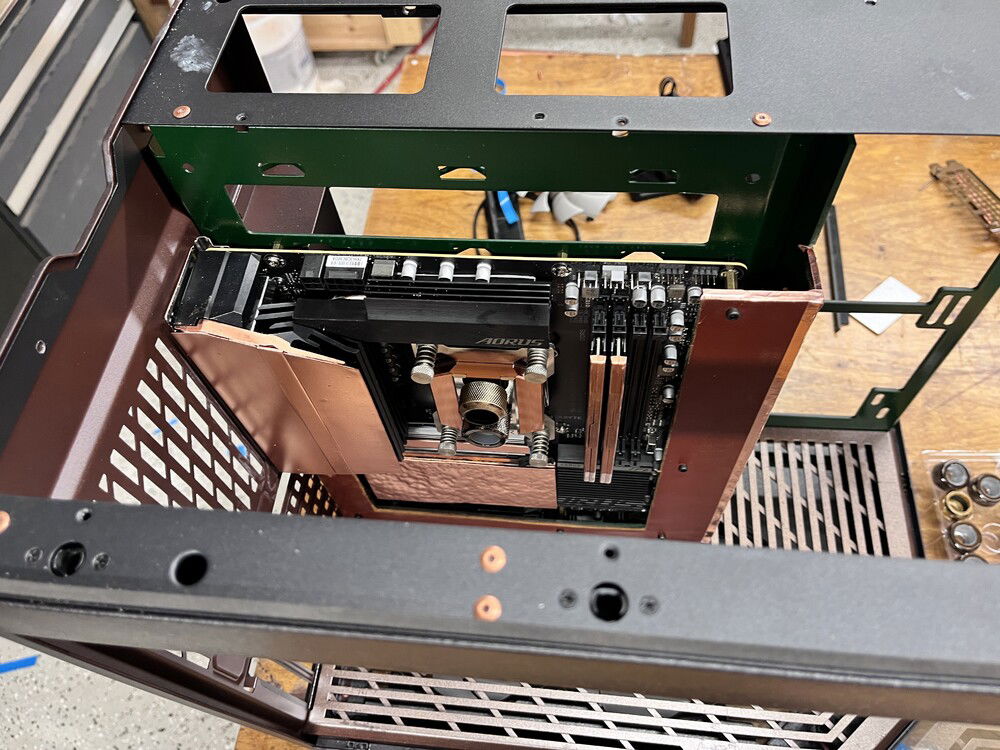
I started pulling it apart and thinking of paint, leaf etc.. and I decided to cut copper sheet metal and fit it on top of the existing heat sink
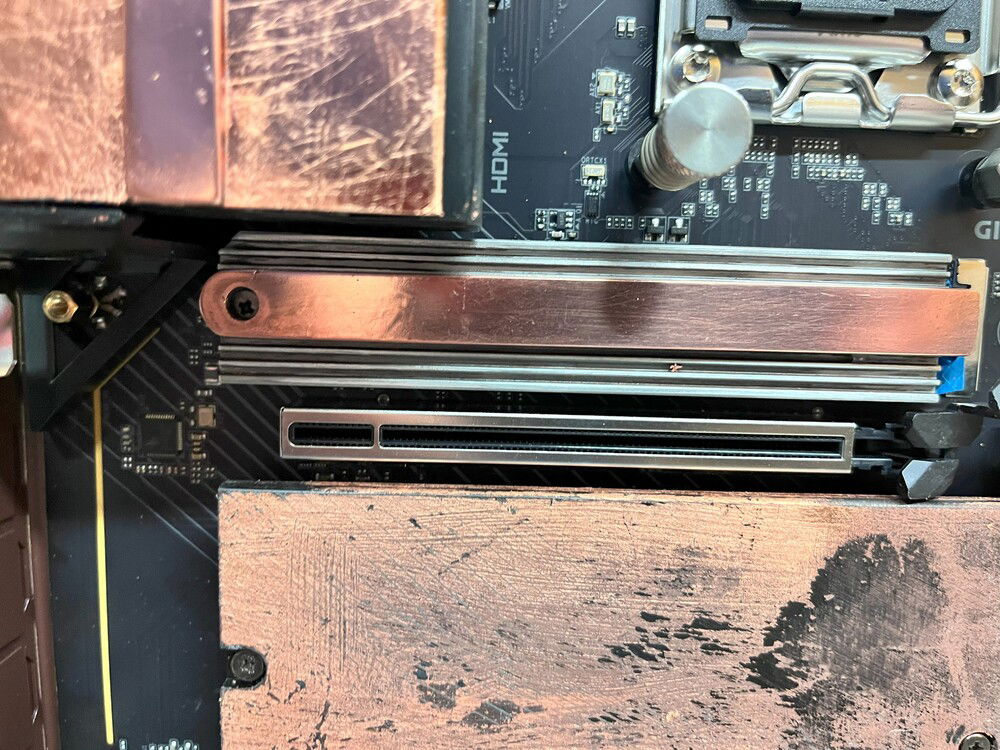
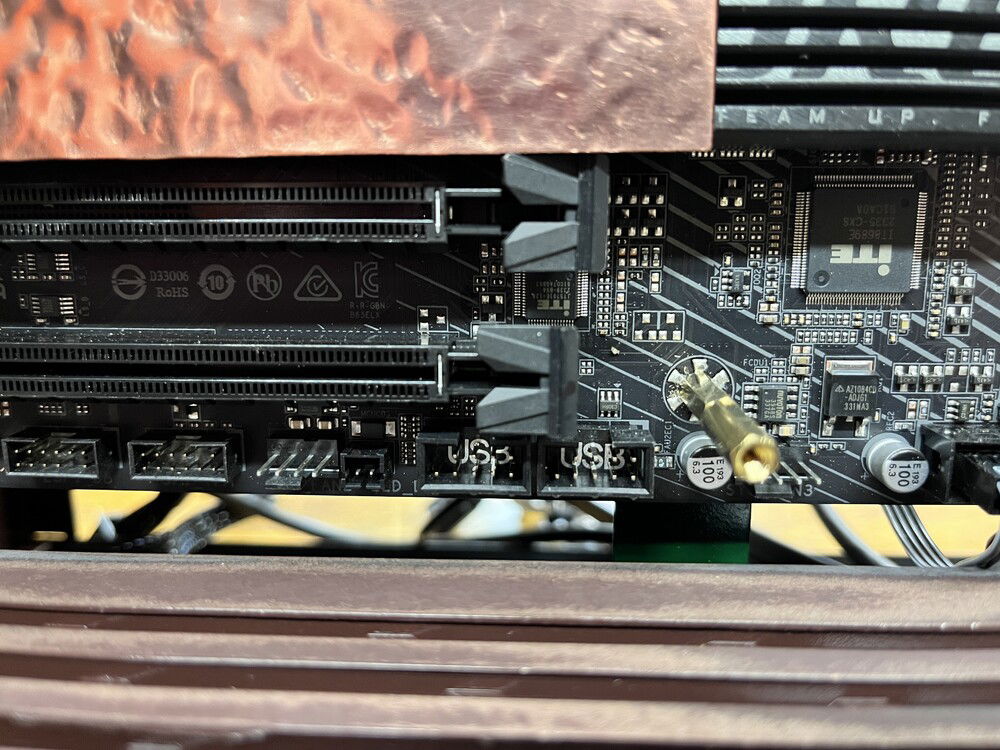
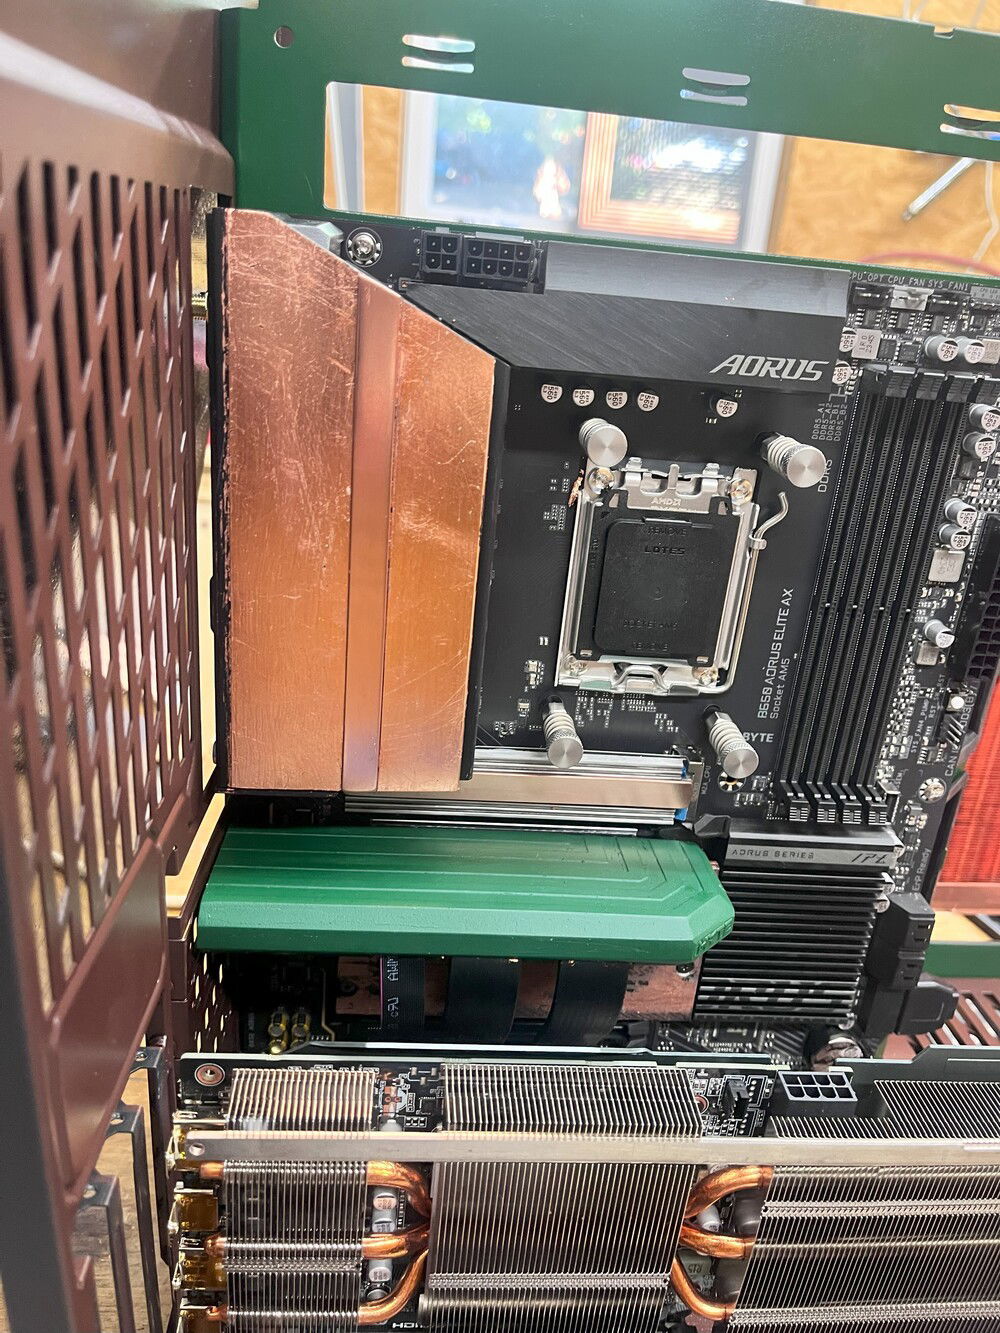
The SSD heat sink for this board really is out of place. So I decided a slight cover up instead of a start from scratch approach. It still looks like crap, so this is on my list to fabricate from a piece of copper bar.
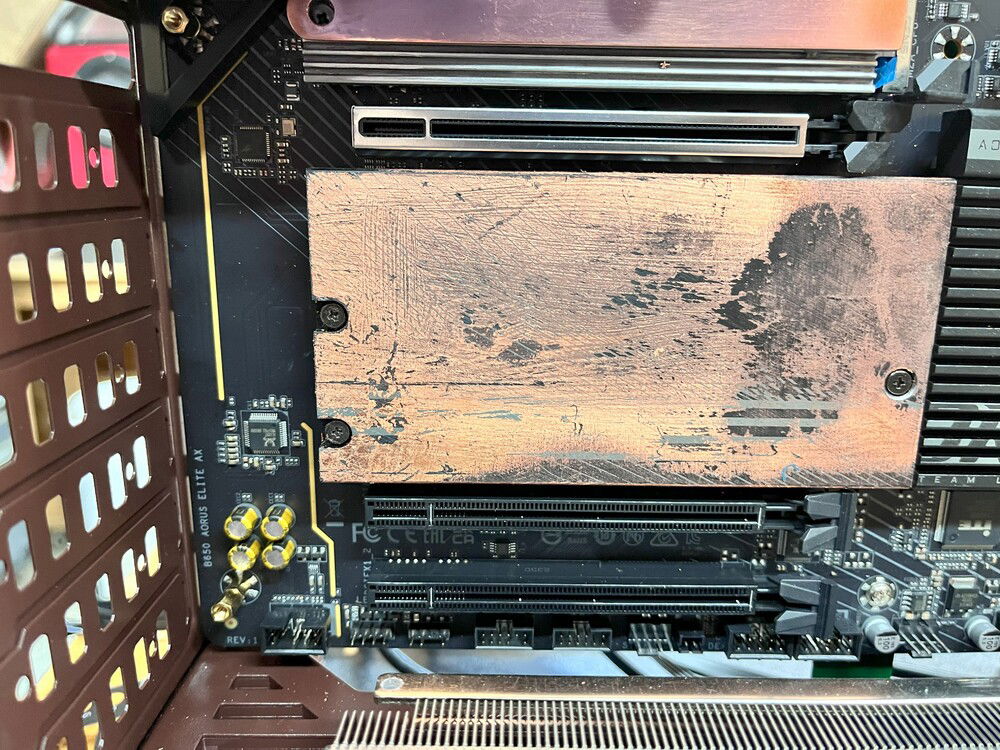
The other SSD cover and heat sinks look like crap, so I started to cover up with leaf, It was not smooth and looked like crap so I cleaned it off. In the process I saw a future build using a the technique that has become instream with older trucks using a patina making it look old and rusty.
I was not done wityh this part of the MB yet.
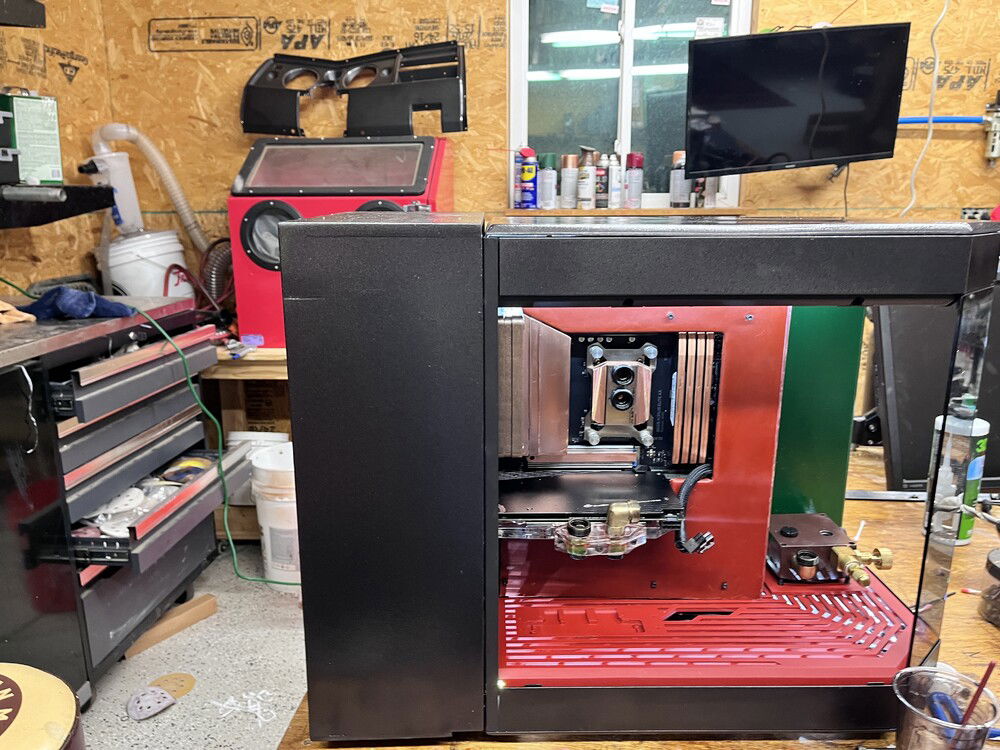
Frustrated, I decided to look at the GPU fitting. The case only allows a vertical mounting option, well one has do do slight mod to mount it horizontally. I painted the grate on the floor and the cable attachment. Then I tried to mount the copper radiator and see how this looked.
I kind of liked it, but it was way too obtrusive and looked out of place.
Back to the heat sinks and I made a copper cover and polished it then painted it with gloss clear, did not trip my trigger, although I liked the look. I rebuilt this multiple times before I got it close.
Then as things were drying I started to look at the external pieces and tried copper leaf. Too messy, not a clean look and finally sanded it off and went back with the Ram gray. Still has potential, maybe a pint design that follows the cover????
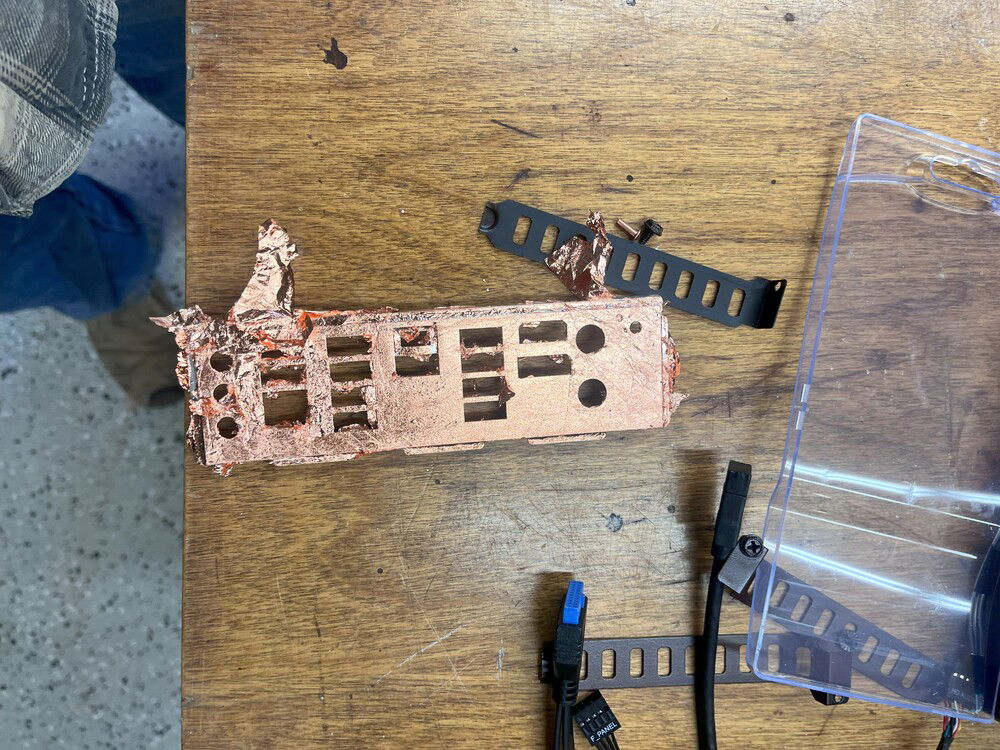
The back cover, awfully messy, but in the end after much practice, the back with leaf looked ok, not great and I do not have a CNC to cut one out of copper sheet.

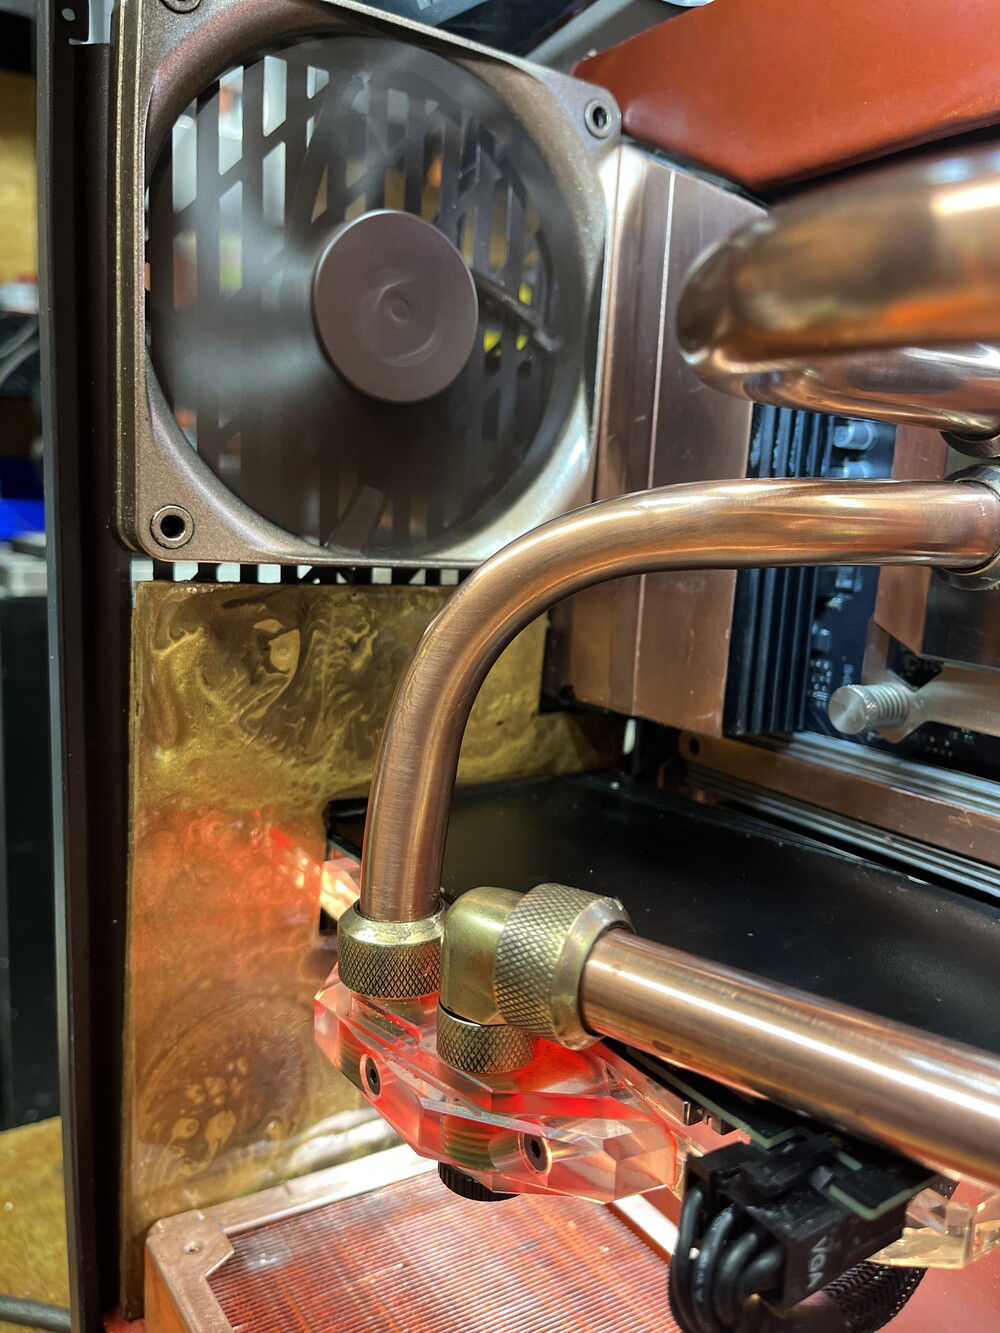
I cam up with a hammered look for the heat sink and saw a video on MB armor. I wanted to use the leather and cover some stuff up and I used the MB screws to hold it in place using offsets and allen head screws
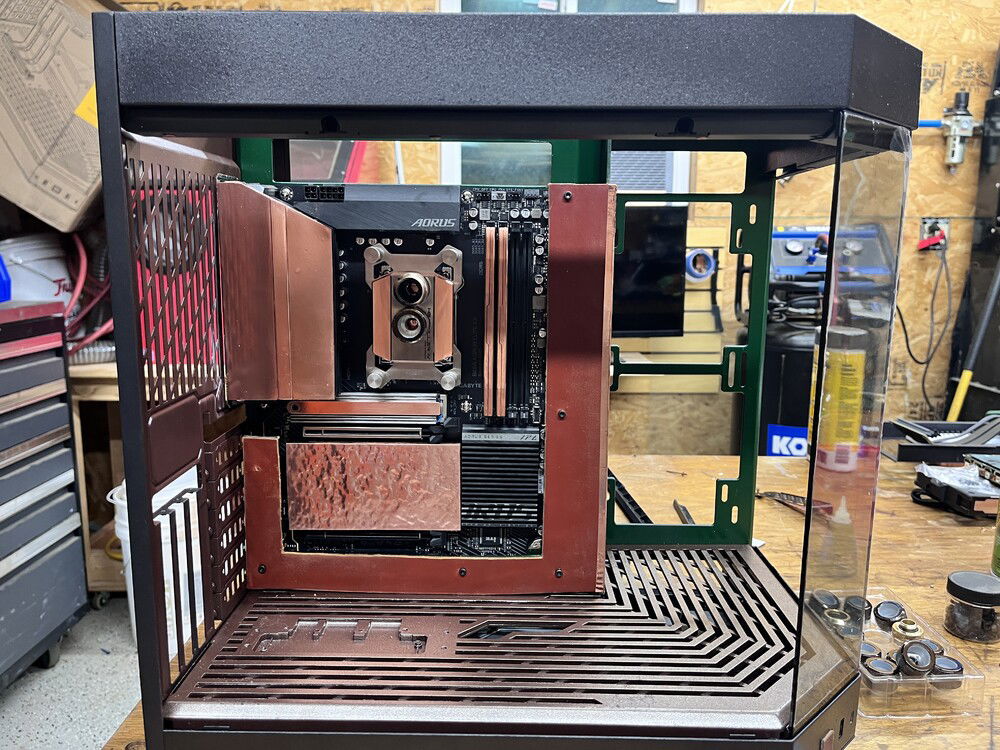
So here is the finished product for the initial design
This is what I had to start with. I did not want the MB to be the focal point exactly and I wanted to incorporate it into the design. As such it meant that I was going to modify it somehow.

Might not be the best looking chick in the house, but I learned so much from her stubbornness which would come in handy soon enough. .

It actually looks sad and piecemeal.


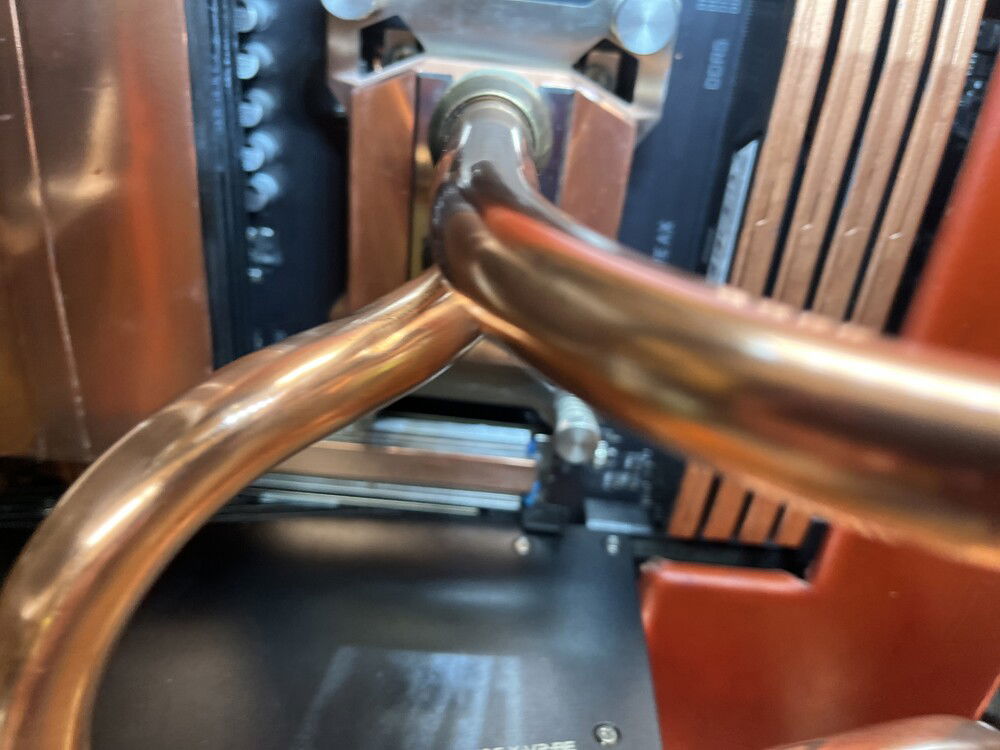
At this point, I had not really considered bending the copper, I would use existing connectors and fittings to make life easy, or not.
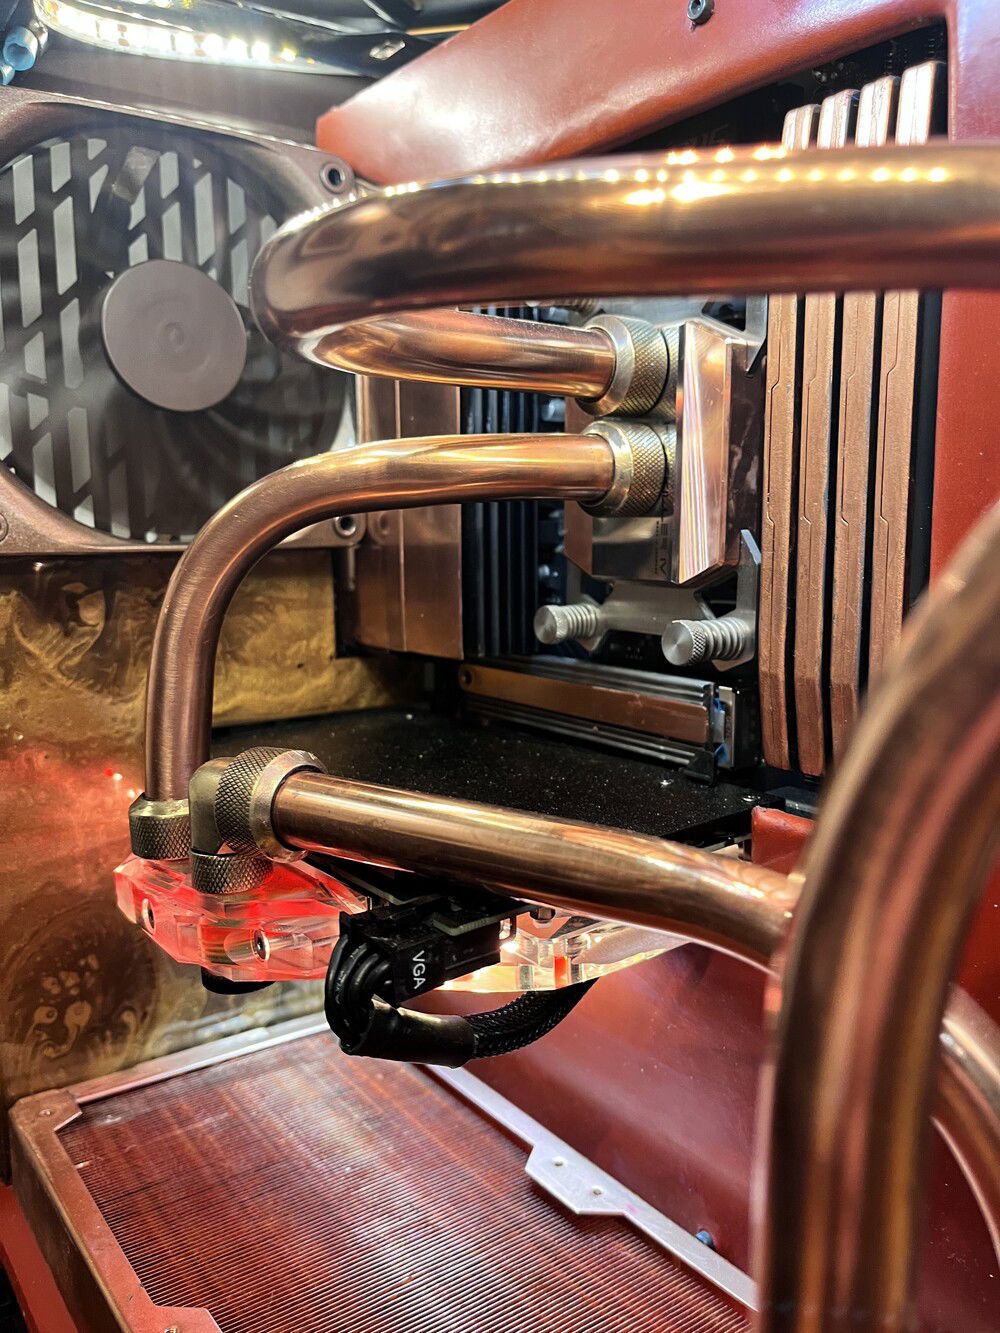
It might be hard to understand, but I built the return from from the CPU and GPU to merge into a single line, a parallel design, but then when I started

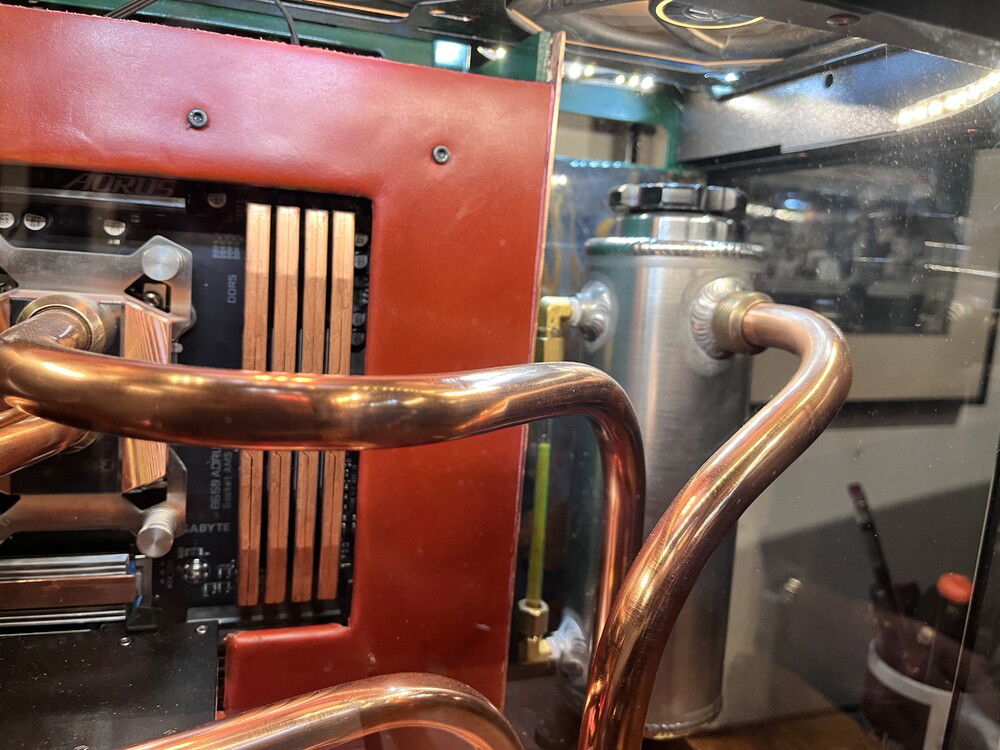
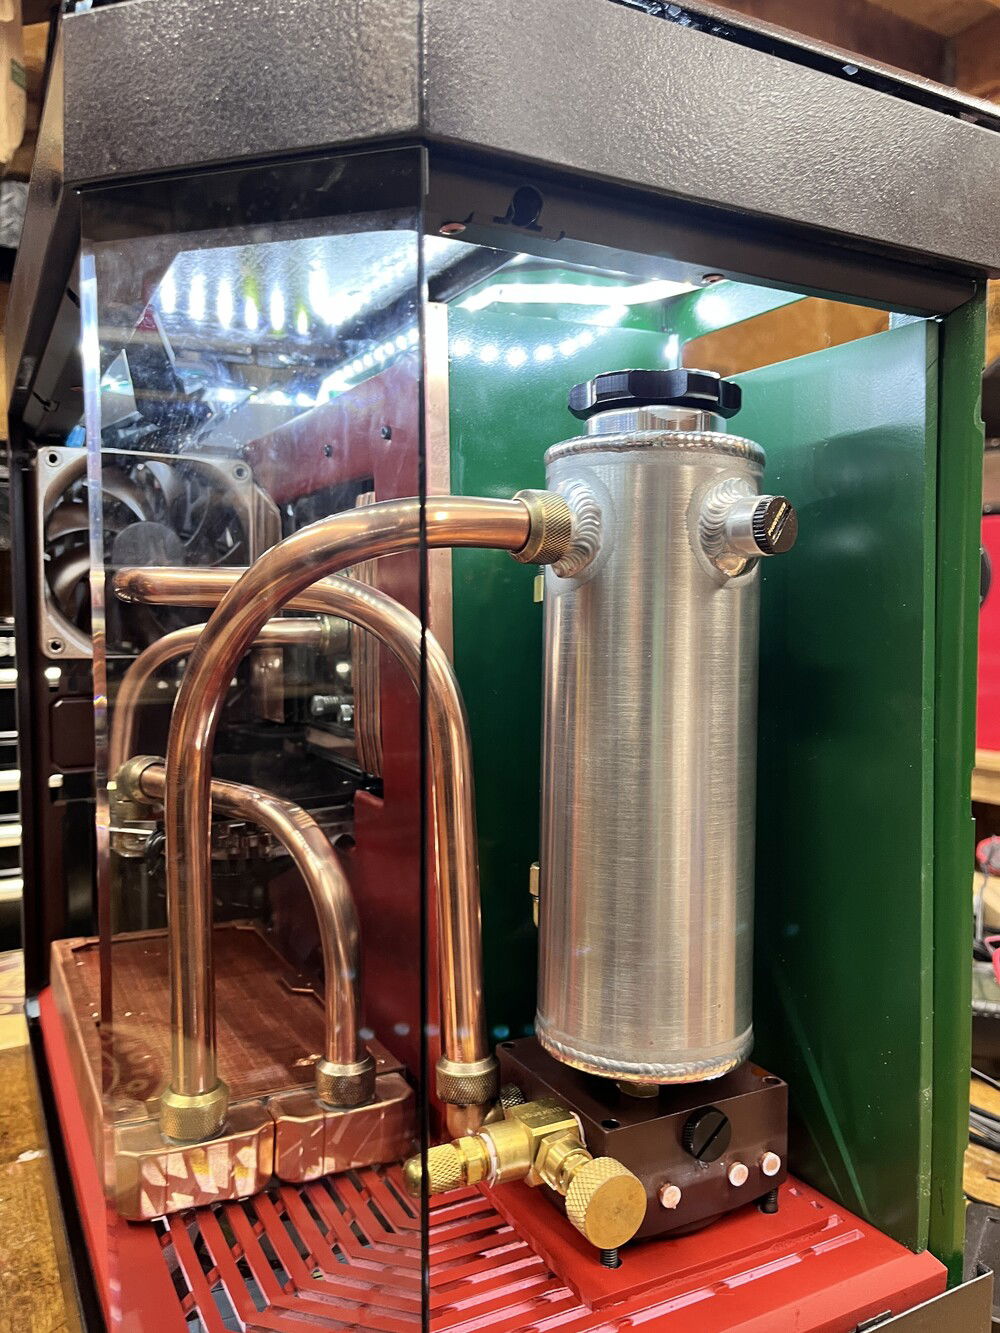
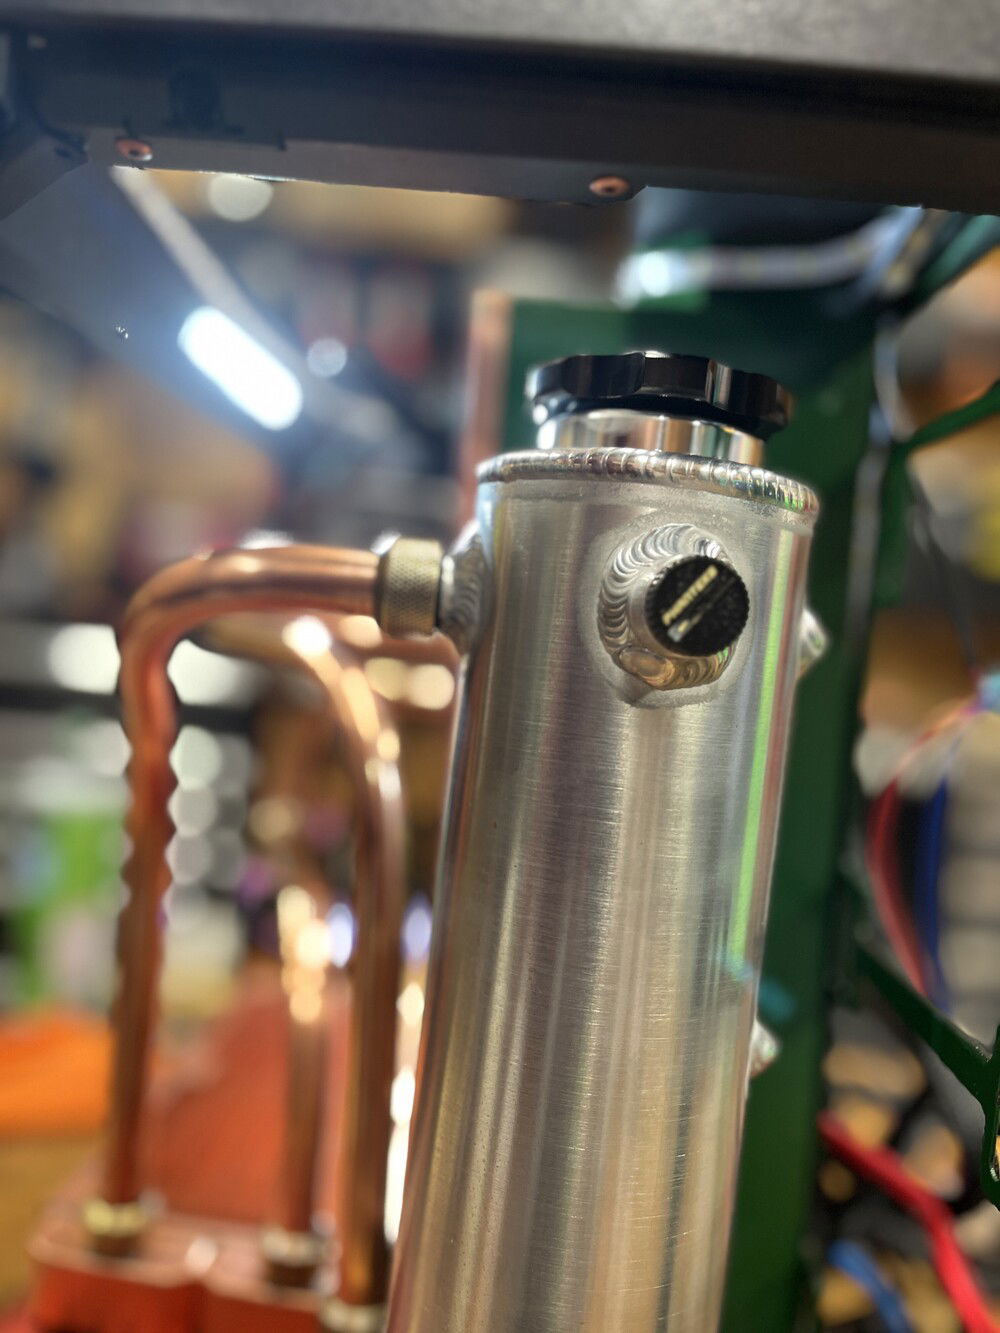
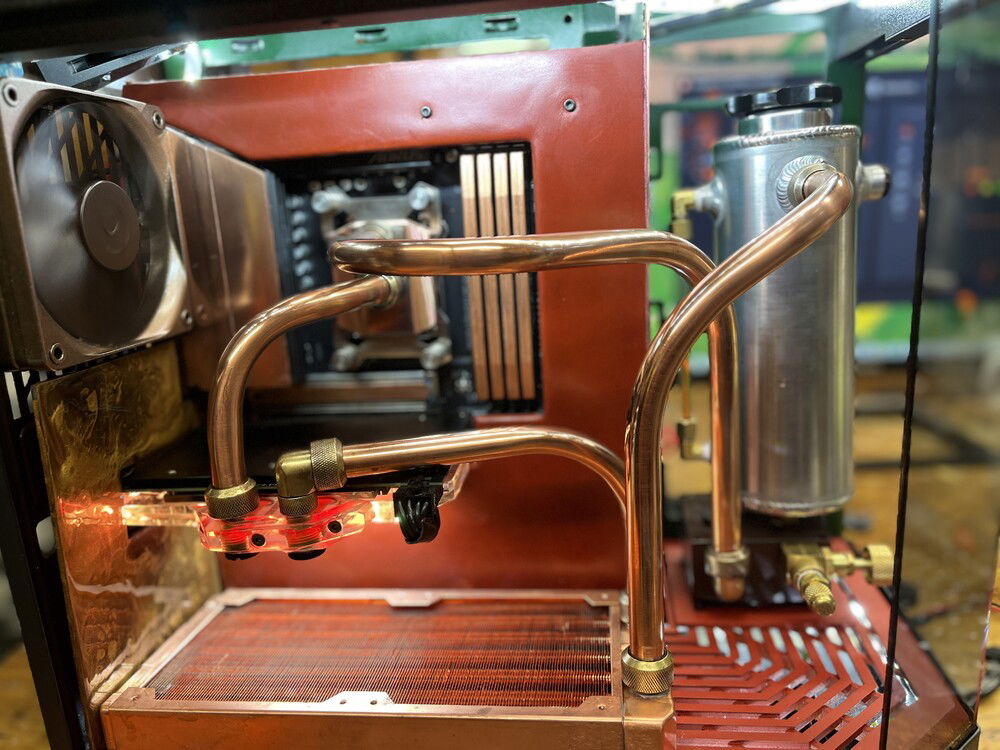
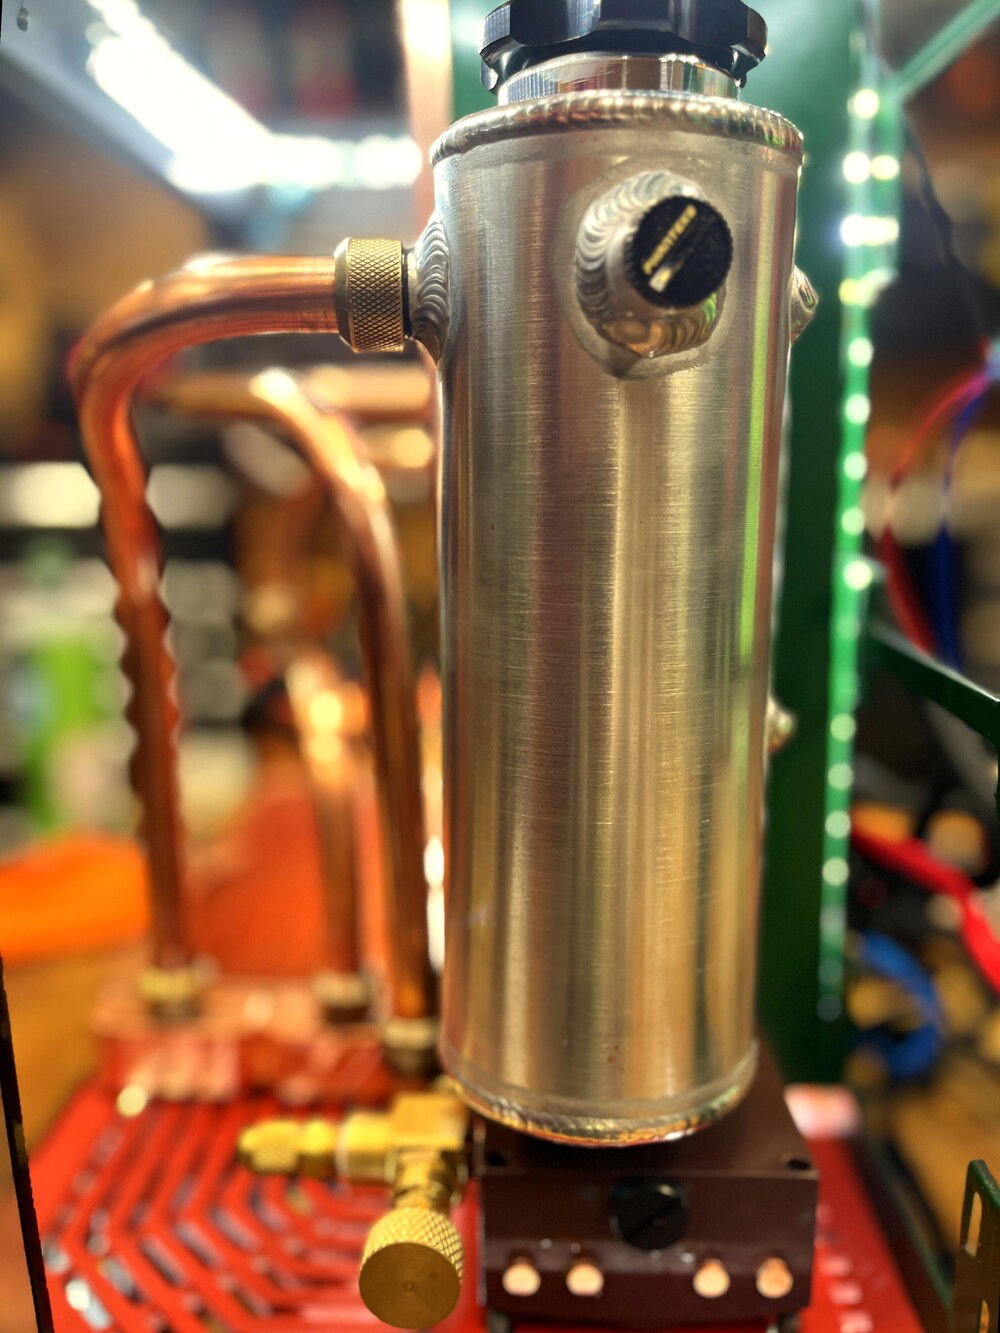
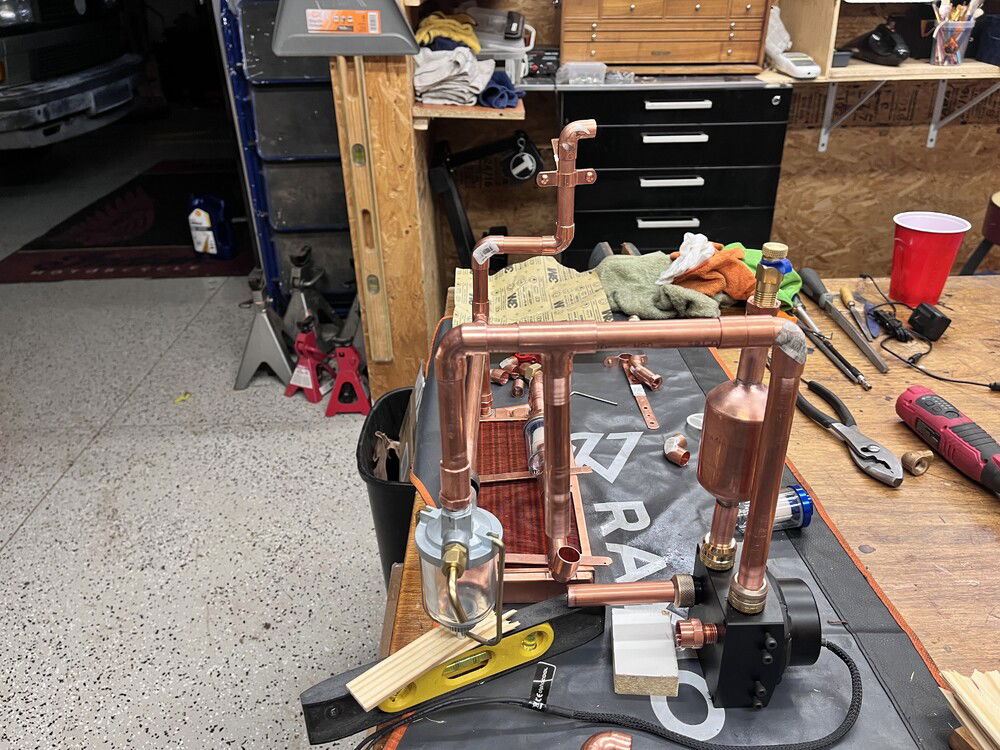
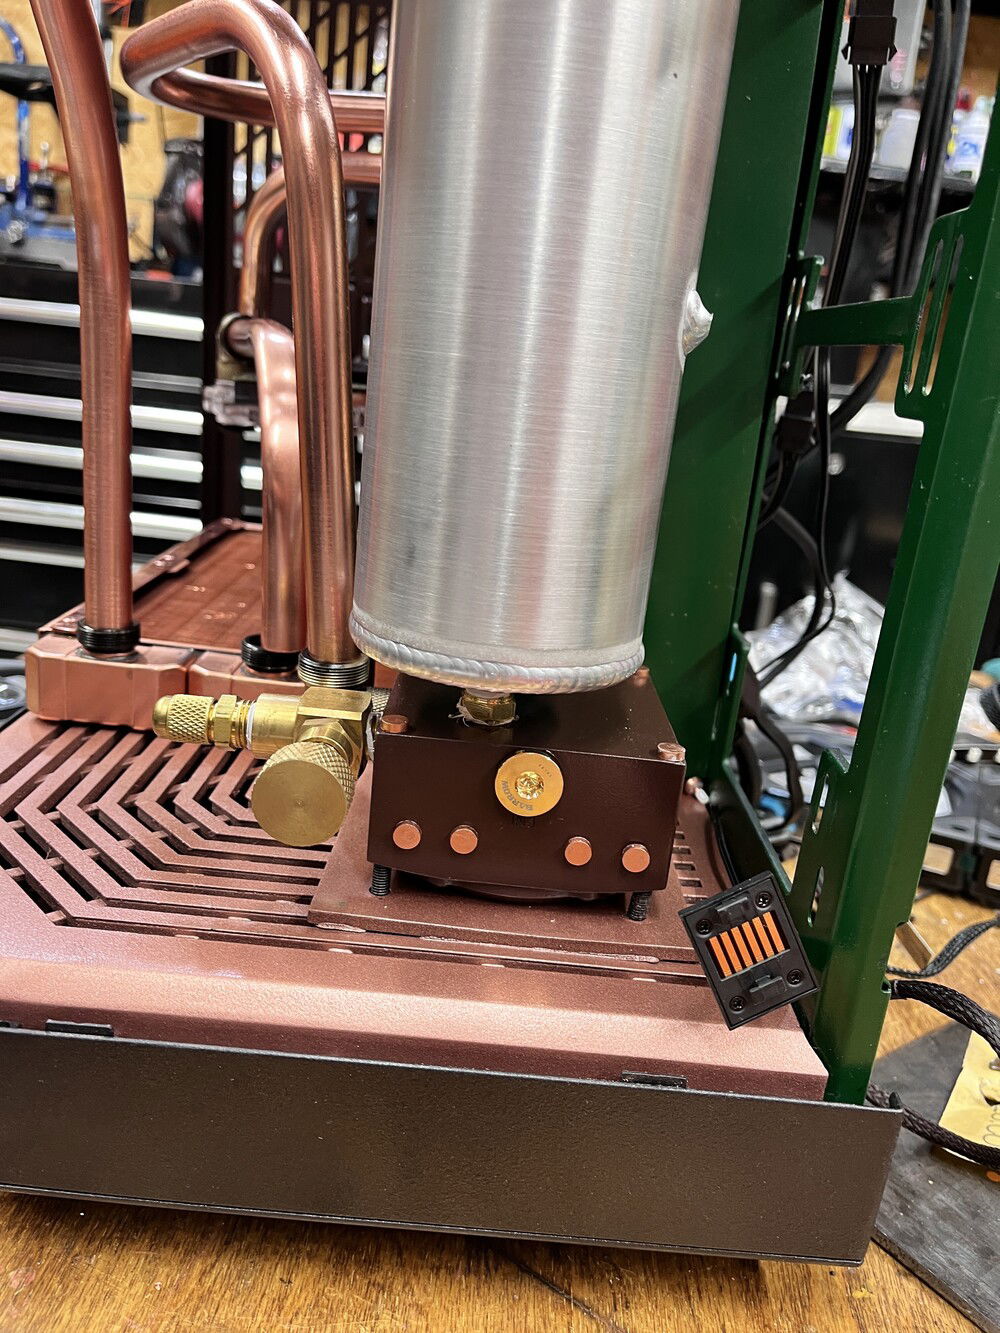
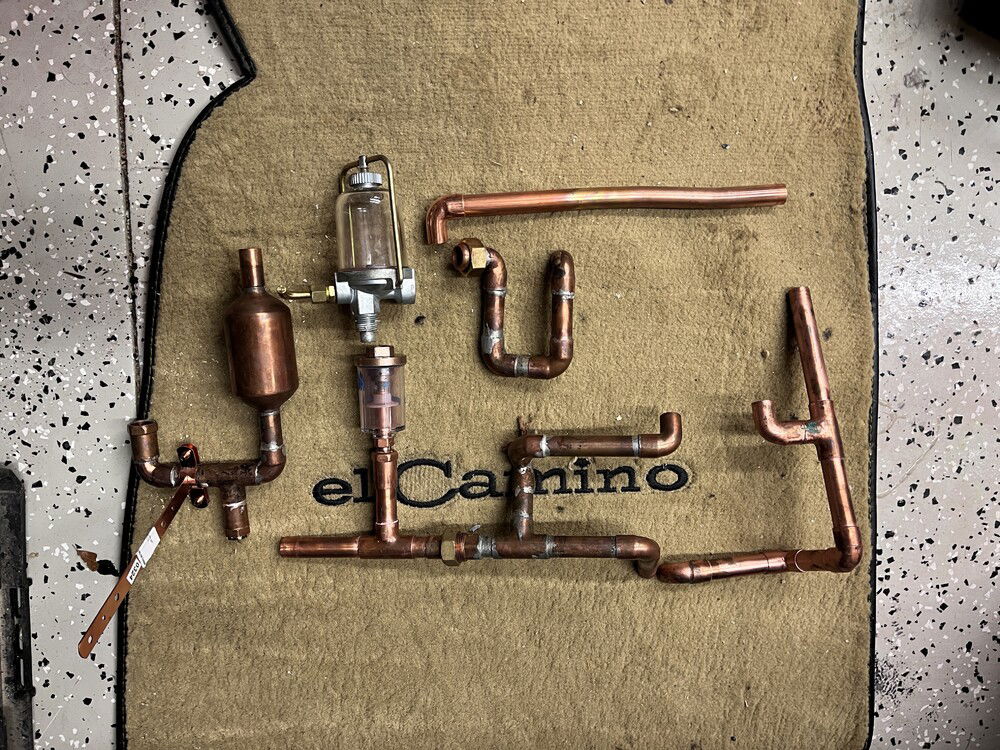
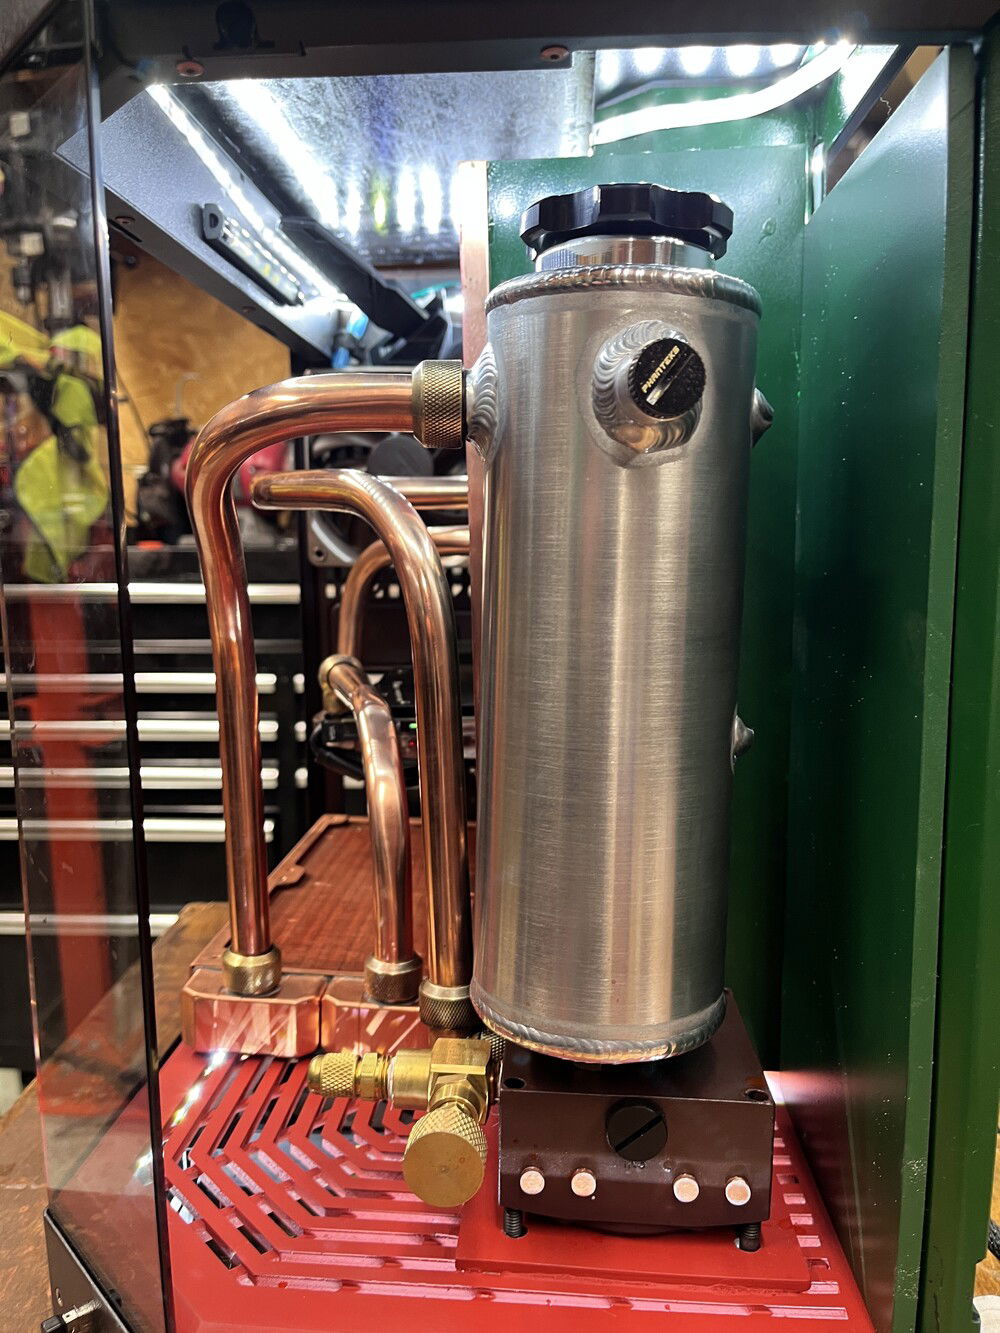
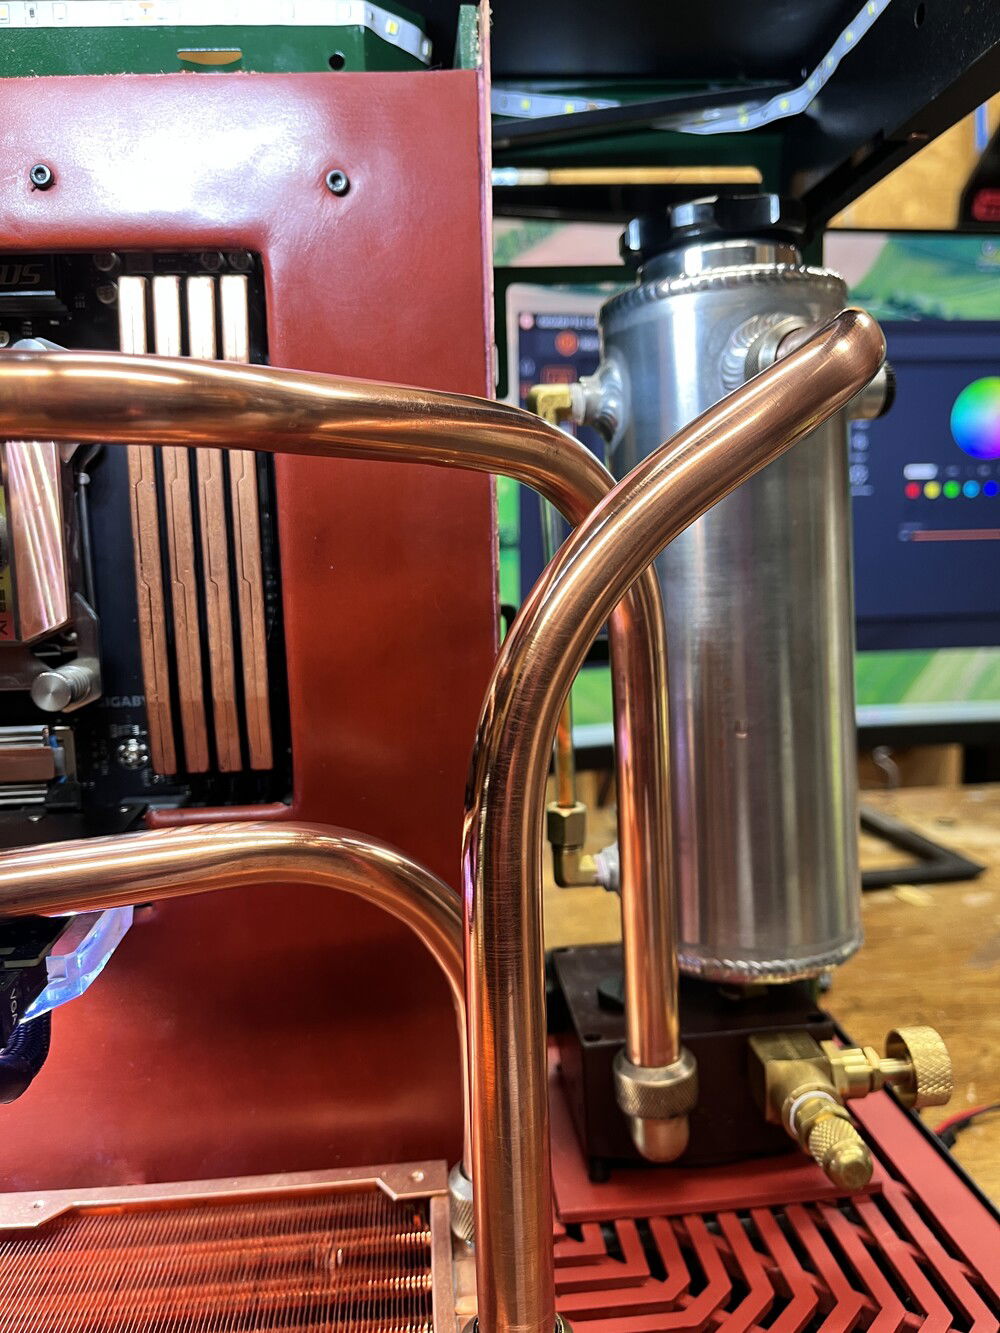
I finally received the puke tank from an automotive fabricator. for drag cars any type of fluid that can emerge from an orifice can be collected and dumped into a single tank. I found this one and once I saw it the other stuff did not cut it. This would be the element that set the standard on how the build would now go. Clean and refined. now where to put it and how to get it to work????

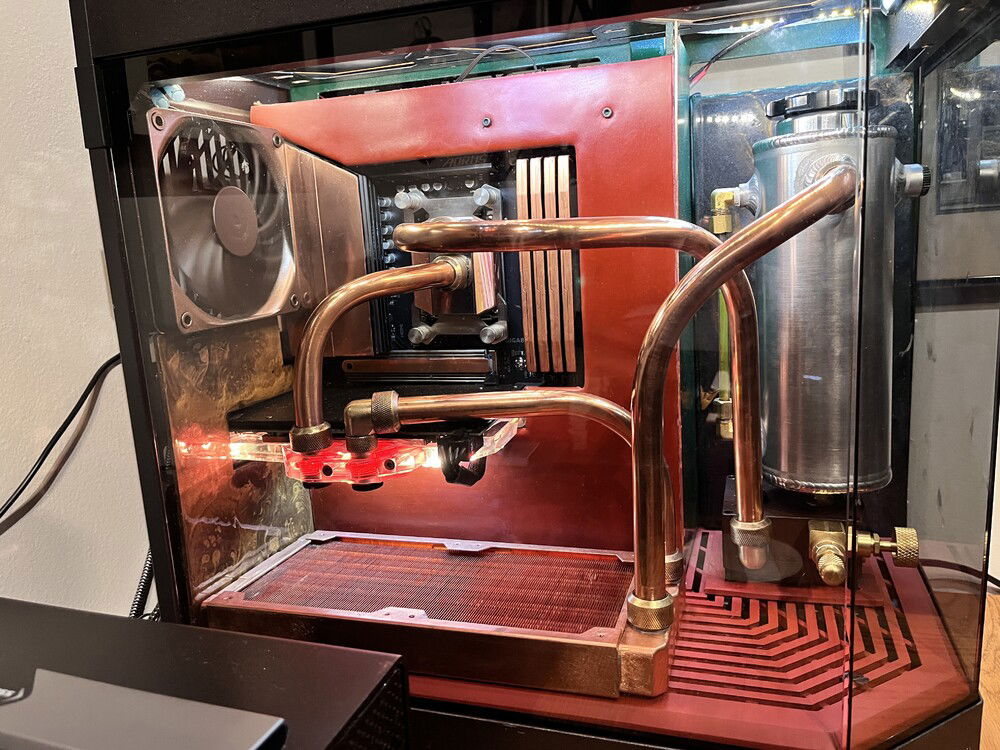
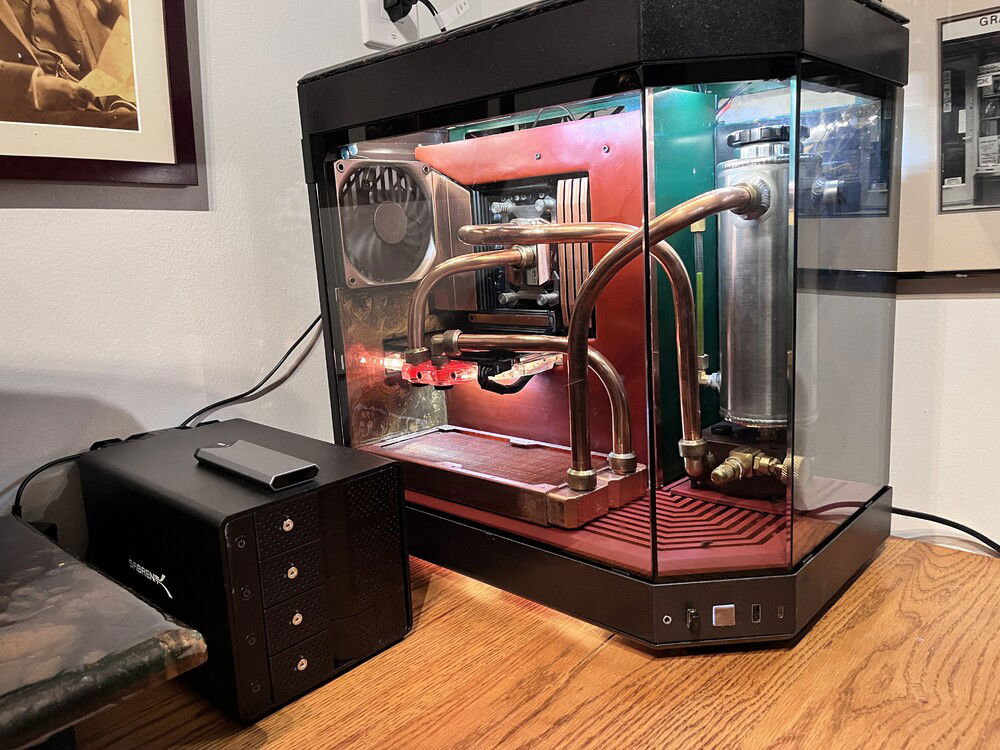
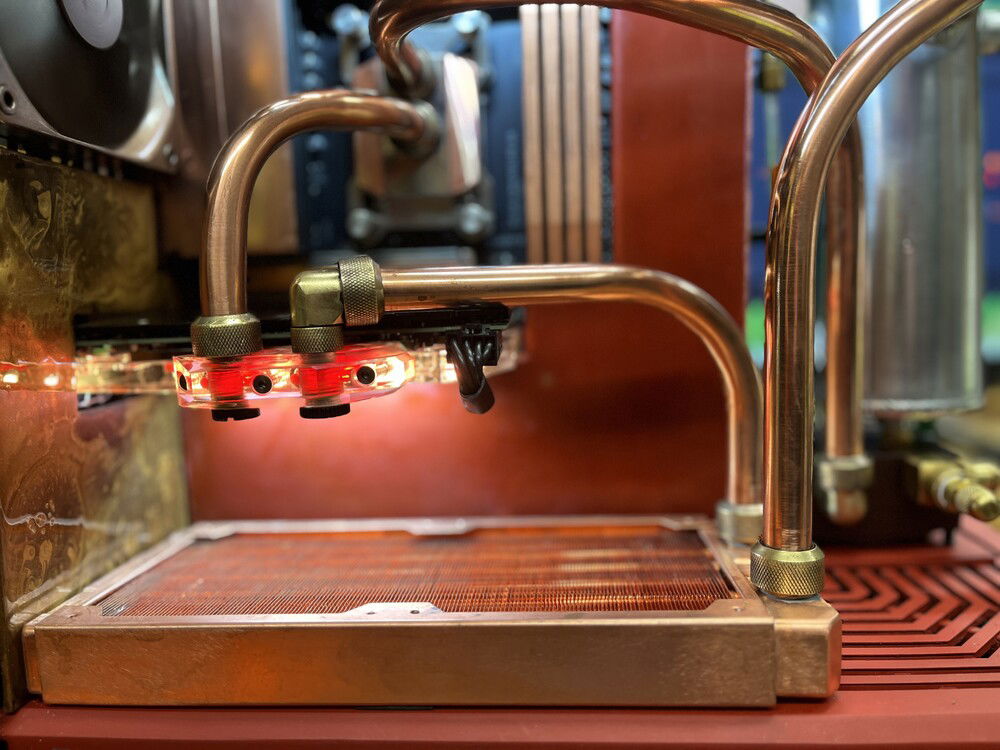
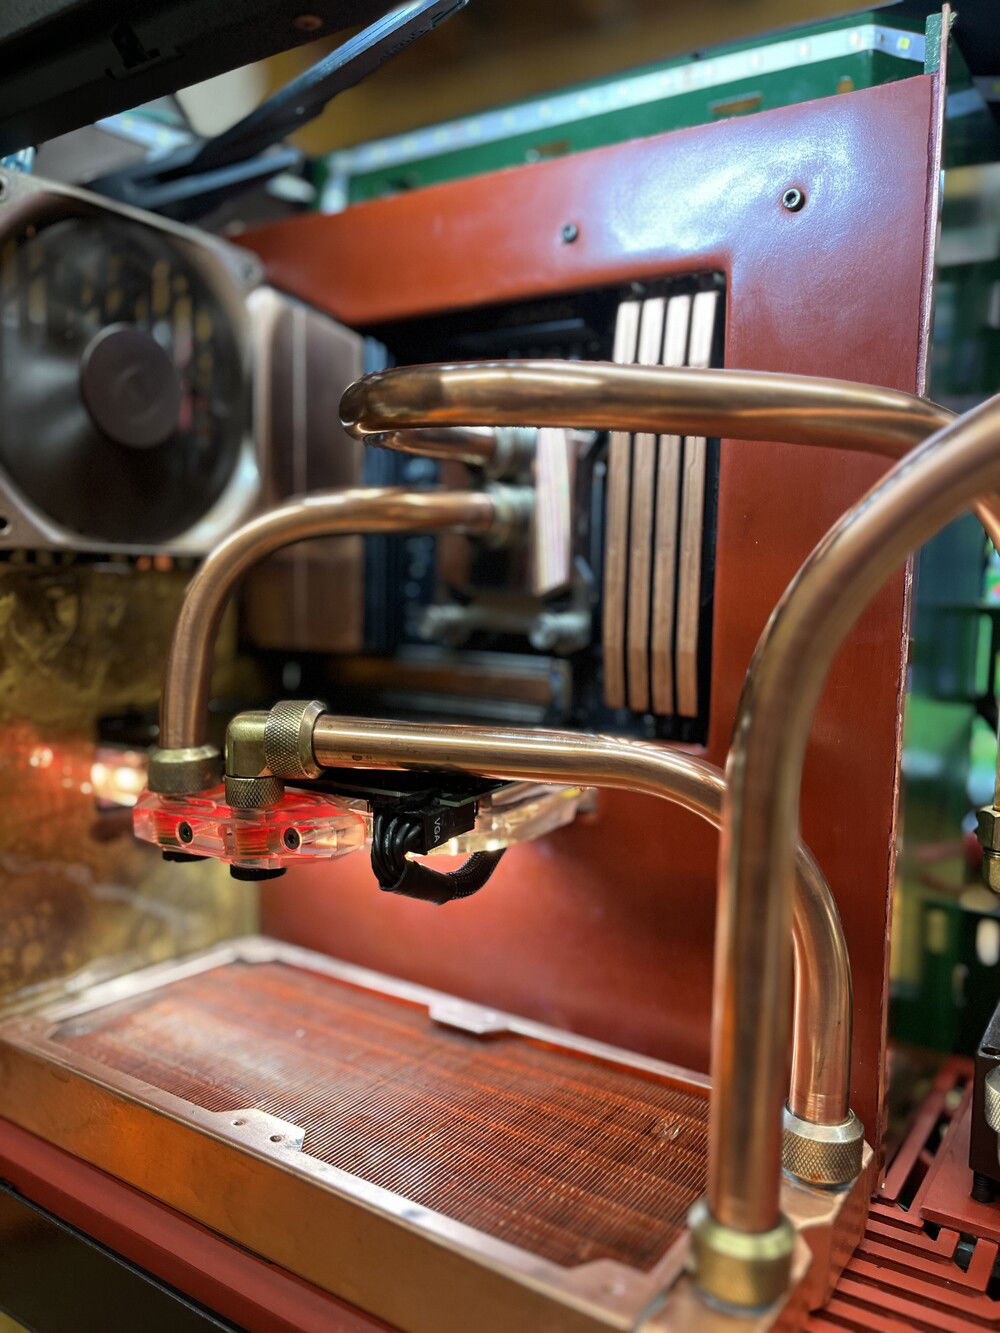
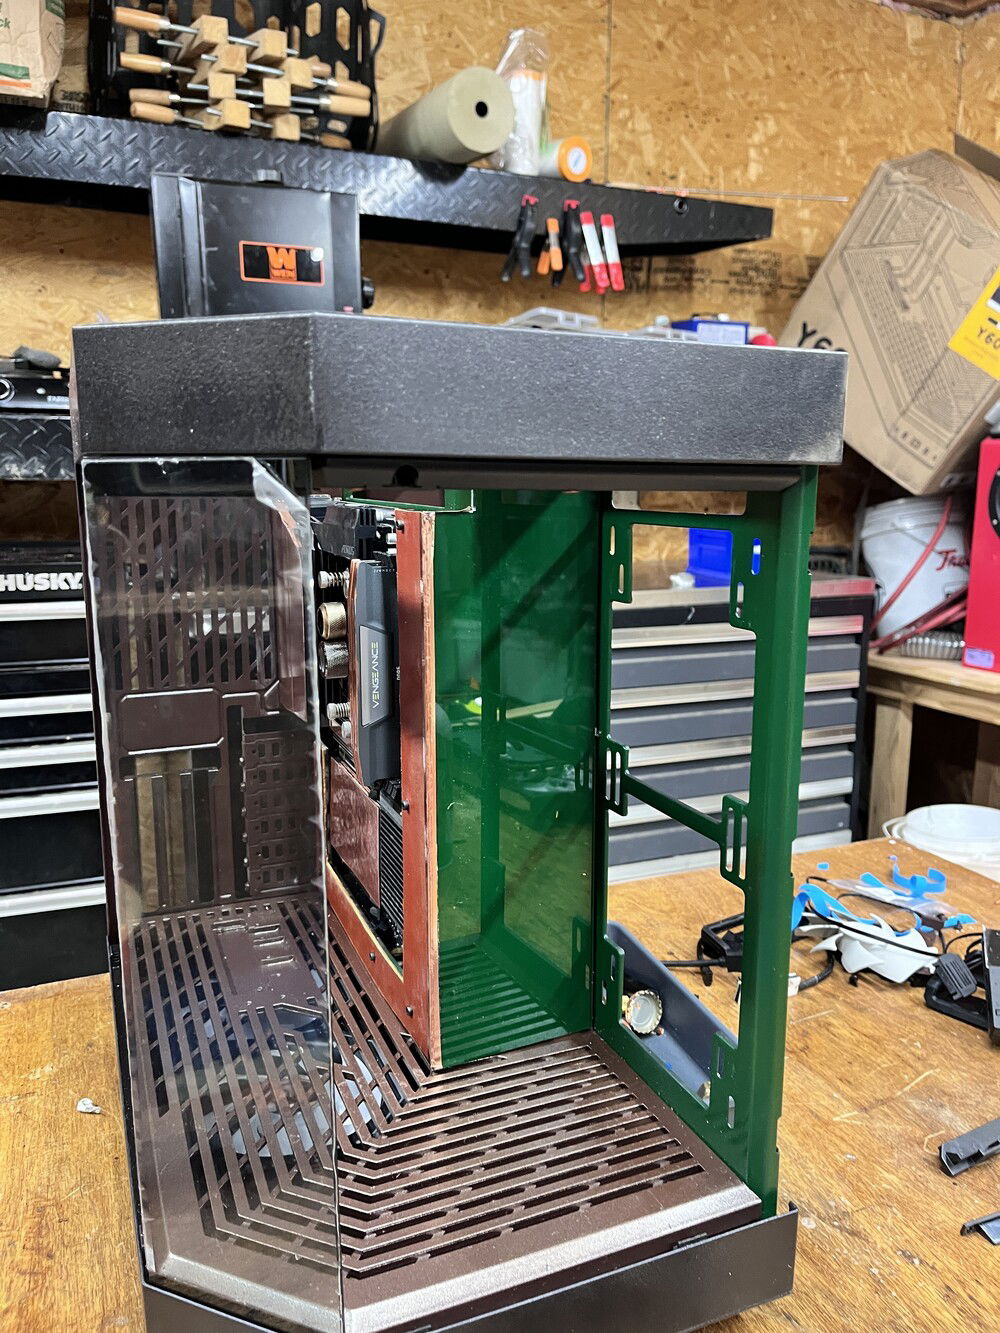
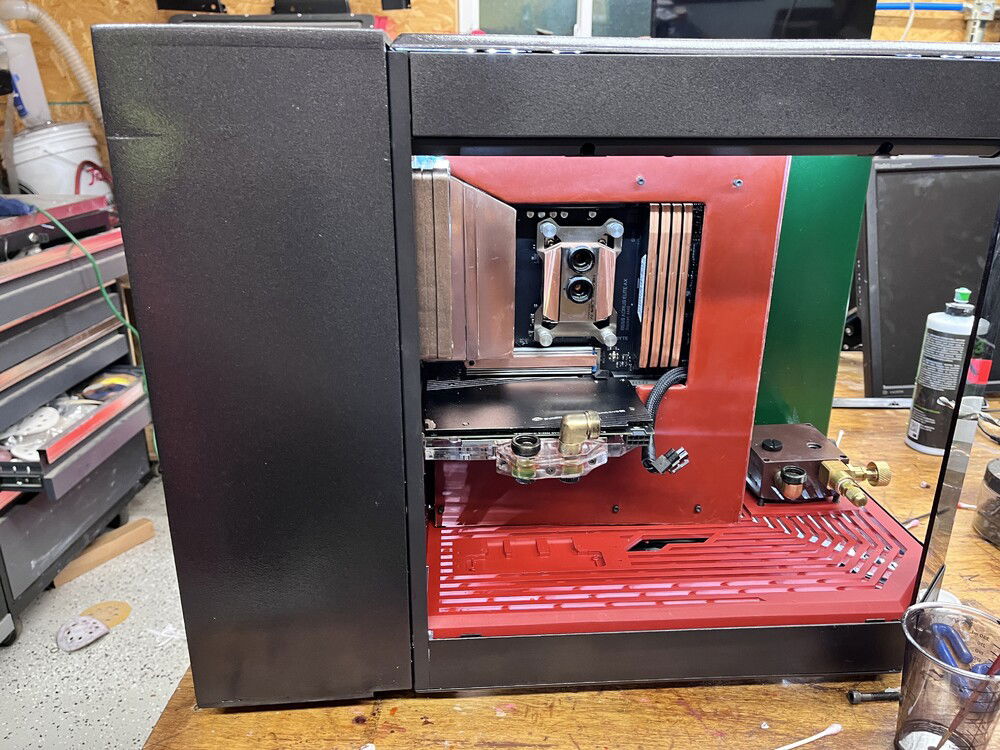
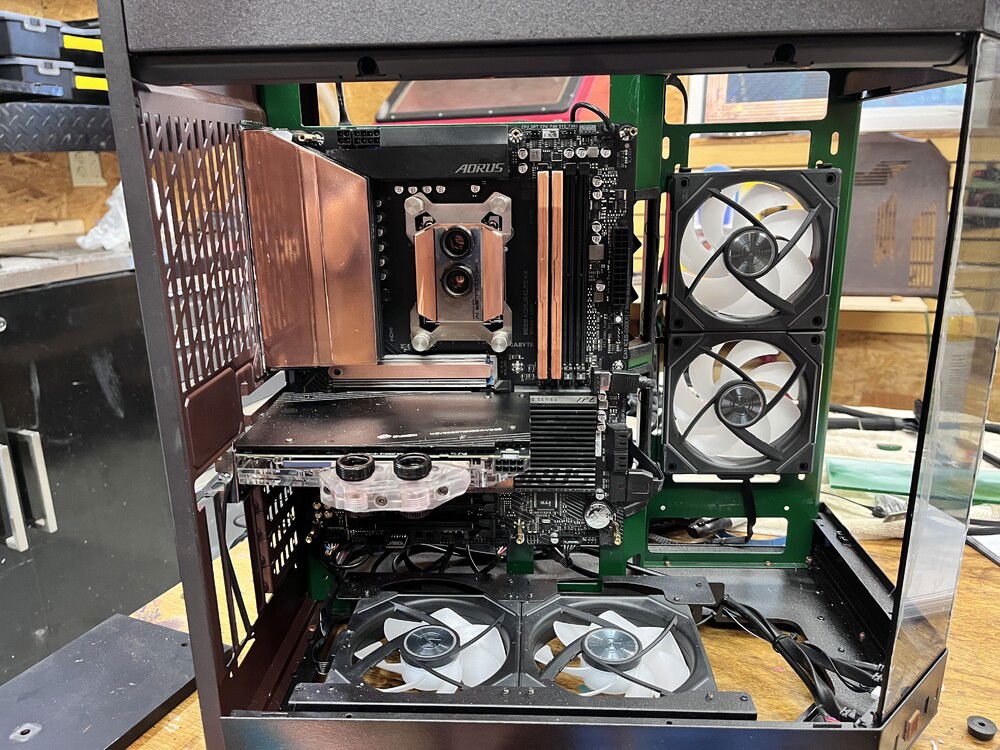
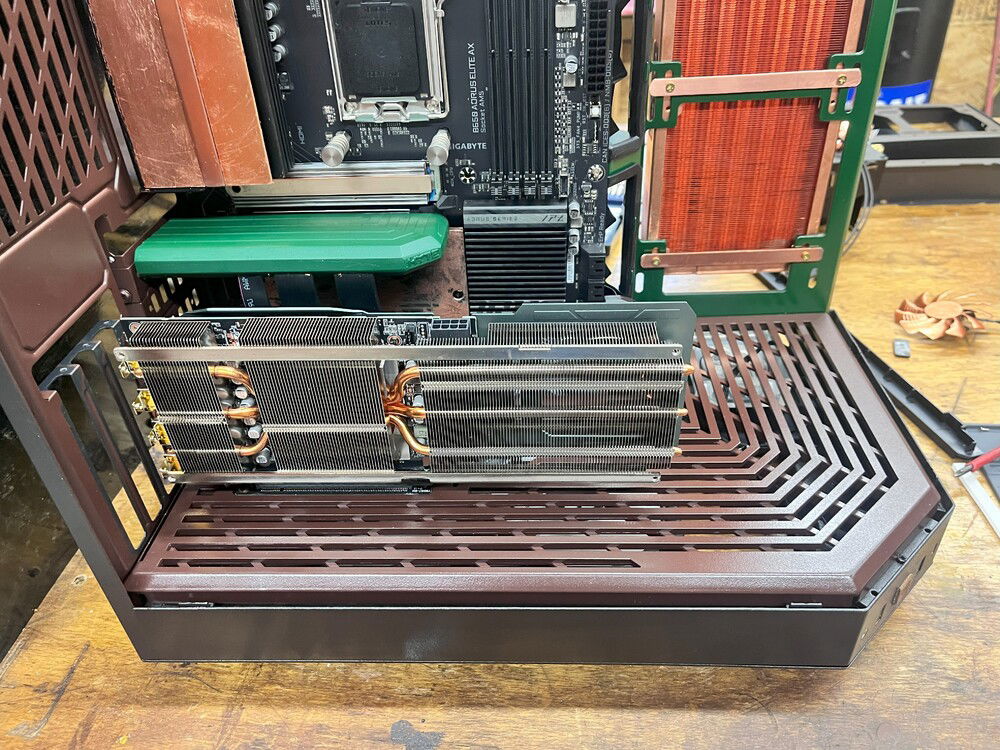
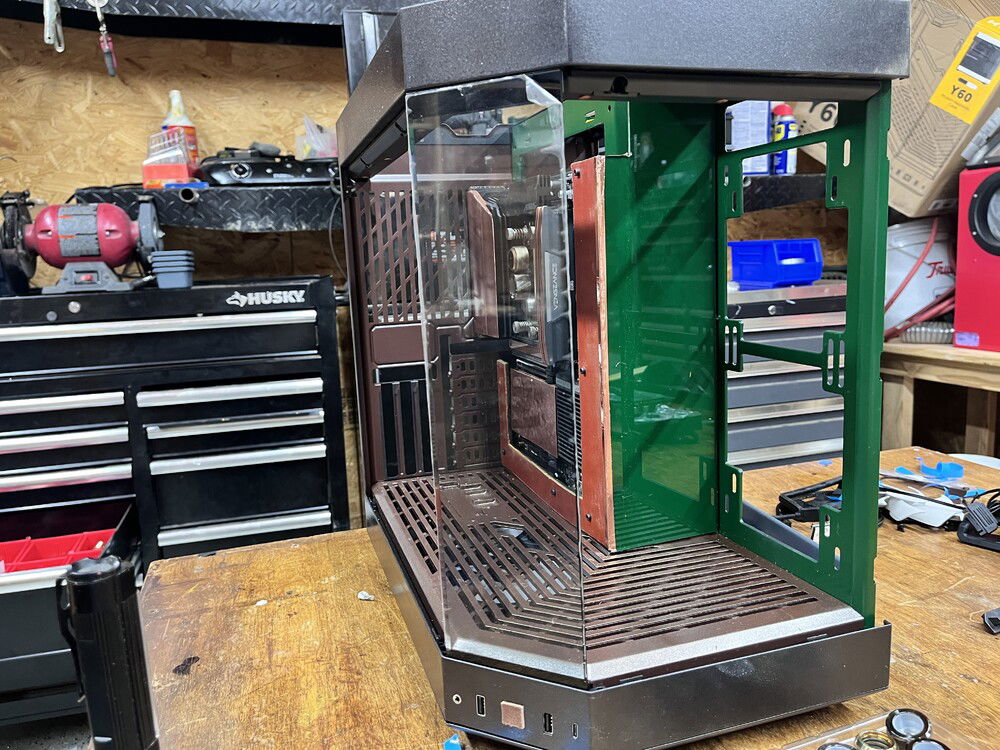
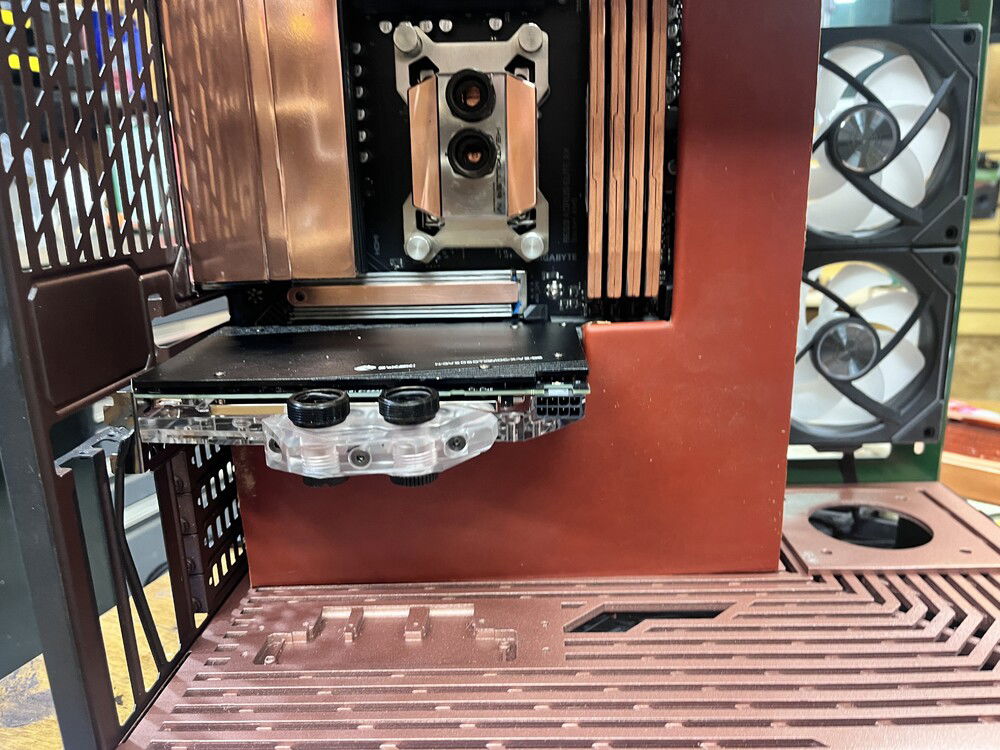
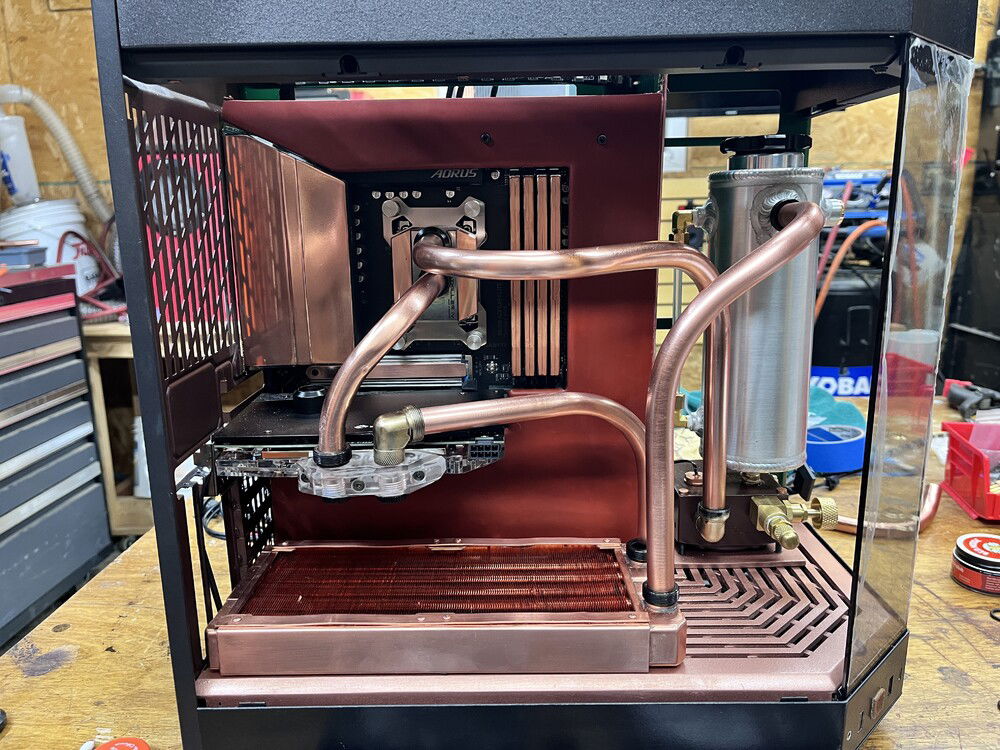
I also received the cooling block for the GPU and I mounted it horizontally which then gives me an option to showcase the radiator. Why hide a copper radiator?
Things starting to jello
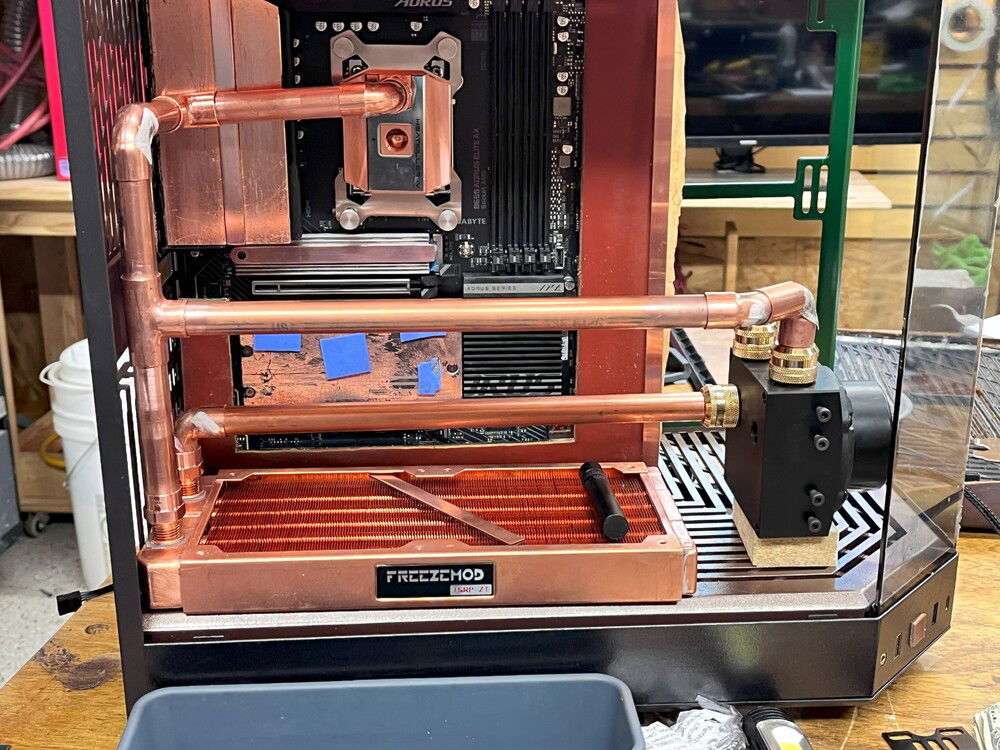
The design was straight, not quite elegant, but certainly utilitarian. The only mod was making a stand for the pump. No problem's.
Way too complicate and it was starting to become an issue routing. Also for every connection is an opportunity to leak, and so it did. Then the cleaning and crappy solder joints, it just started to look like a still in the back country using any and everything. It was not the clean build I was looking for.
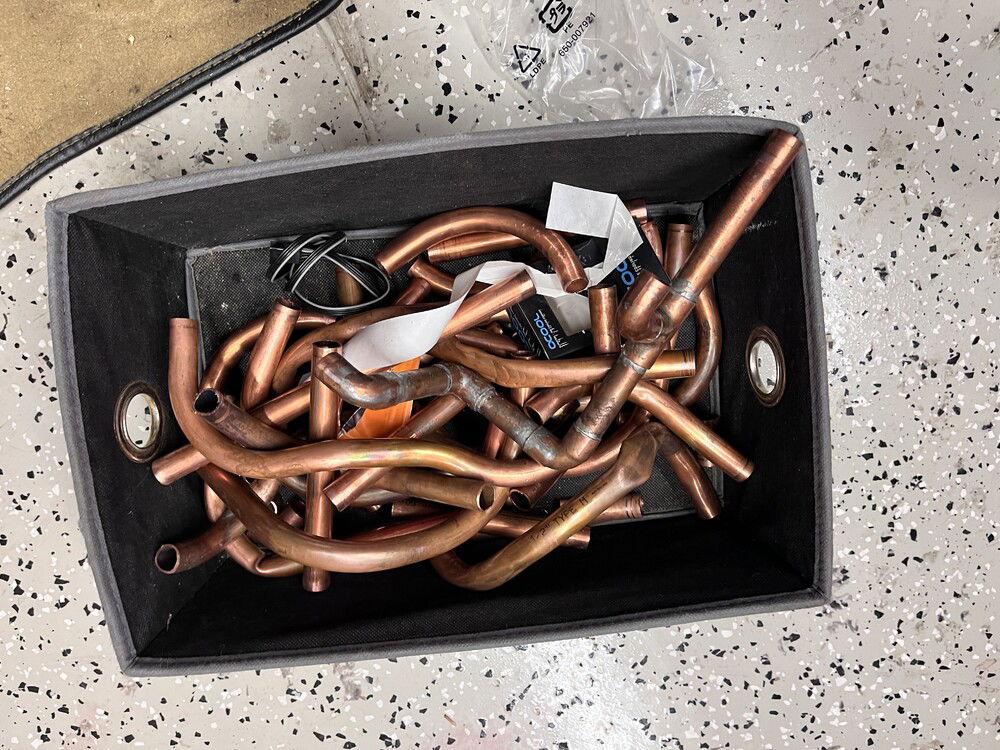
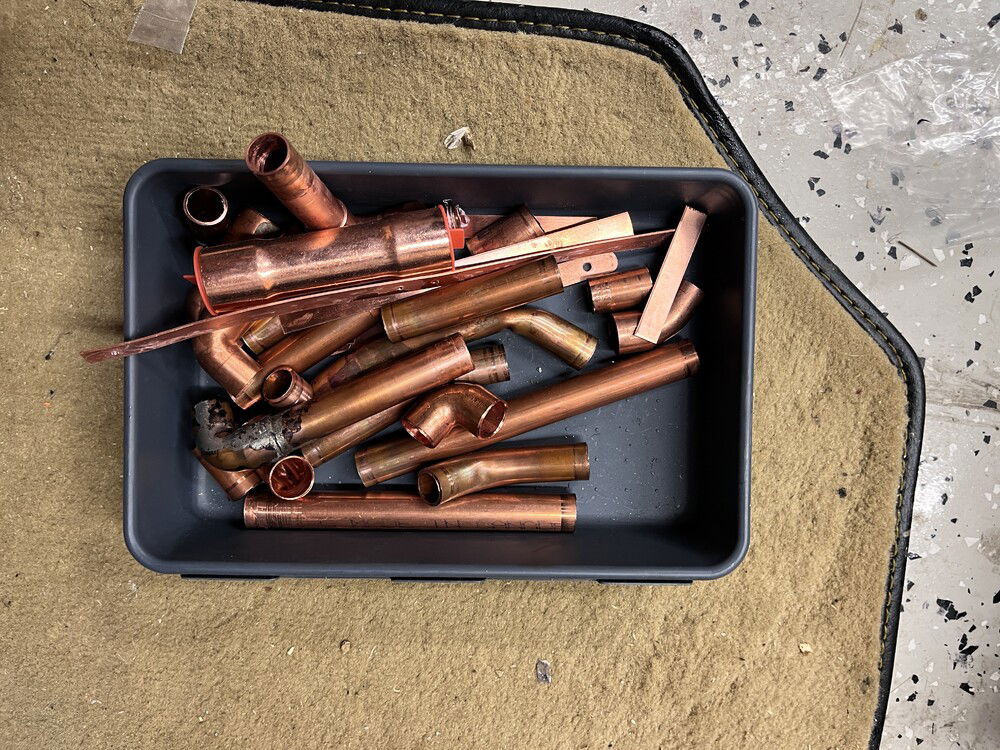
40 ft of copper. Another lesson that I will not go down at this point.
Parts and parts
and more parts
and more

Well one thing led to another as I had so many cool parts to use that it started to get very complicated. No to mention I disagreed with physics and tried to engineer my way around, with no luck. Physics 1 steven 0
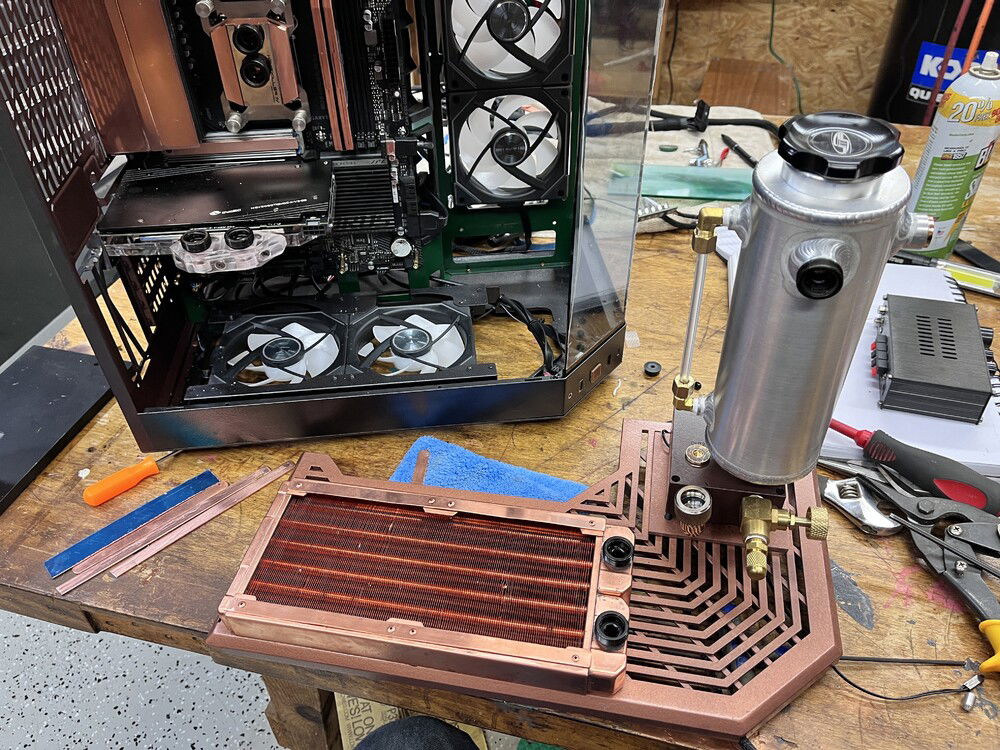
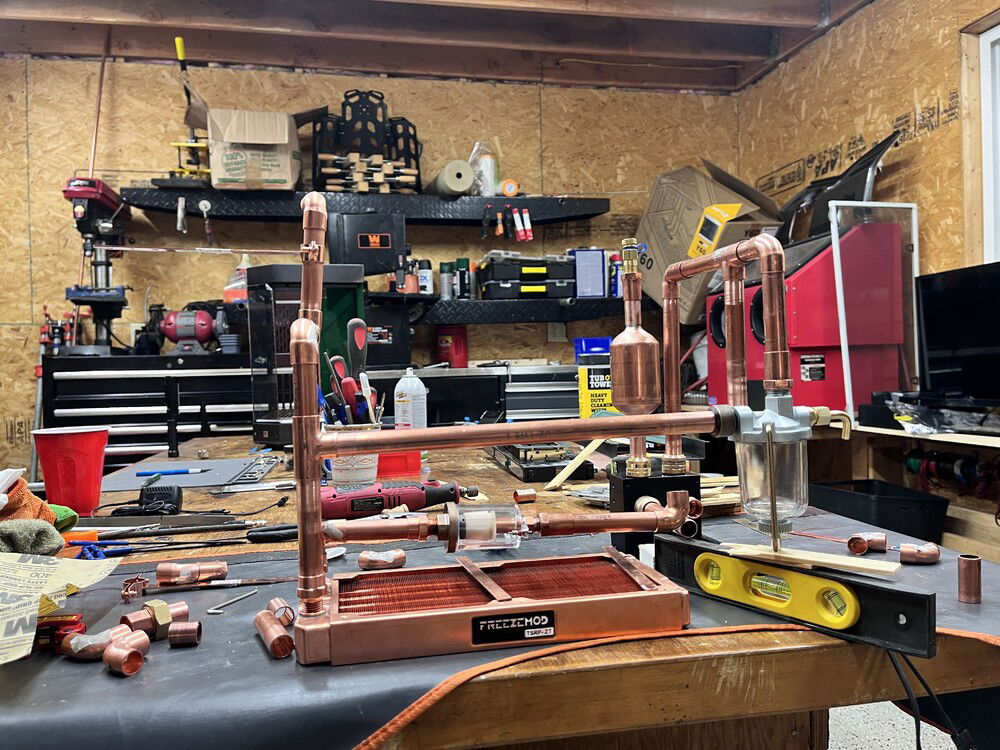
The dump canister was what moved my thinking and gave me focus as being the center point. I decided to mount the copper radiator on the top of the grate as it being the second element for the build that I wanted to emphasis. Not the componant the material.
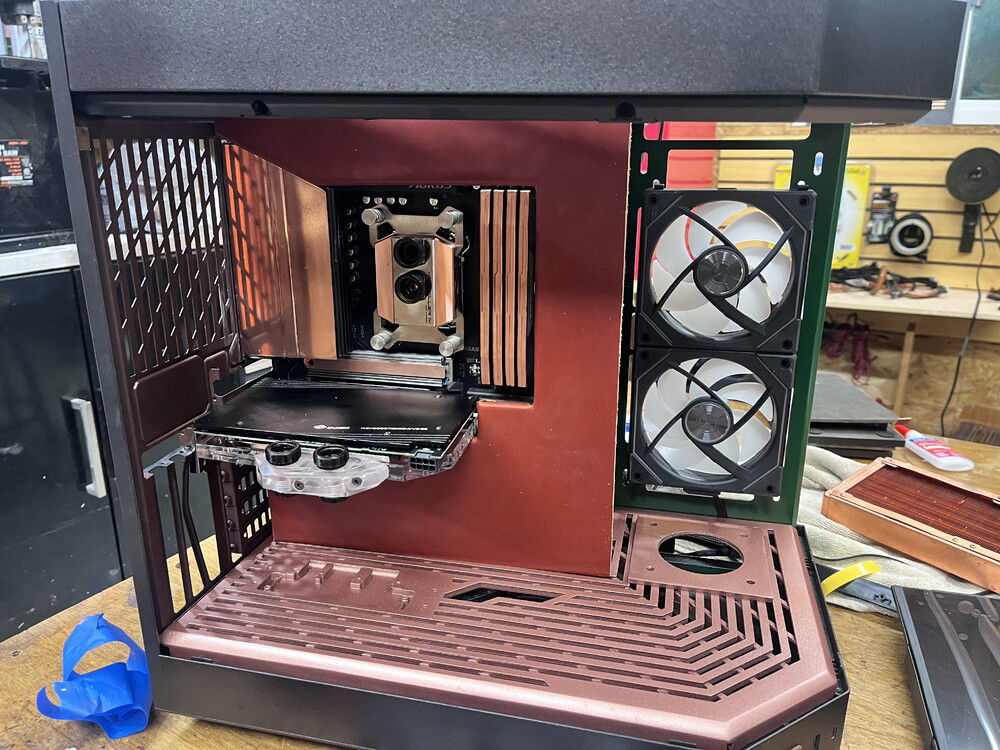
With the GPU set a new front cover for the MB fabricated I am ready to go. Not yet Silver, I had failed to connect anything to the MB which might be an issue down the road. Additionally, I stopped using the 1/4 plexi and started 1/2 as it was much more sturdy, and fabrication was easier, plus it was much more resilient to the constant installation cycles.
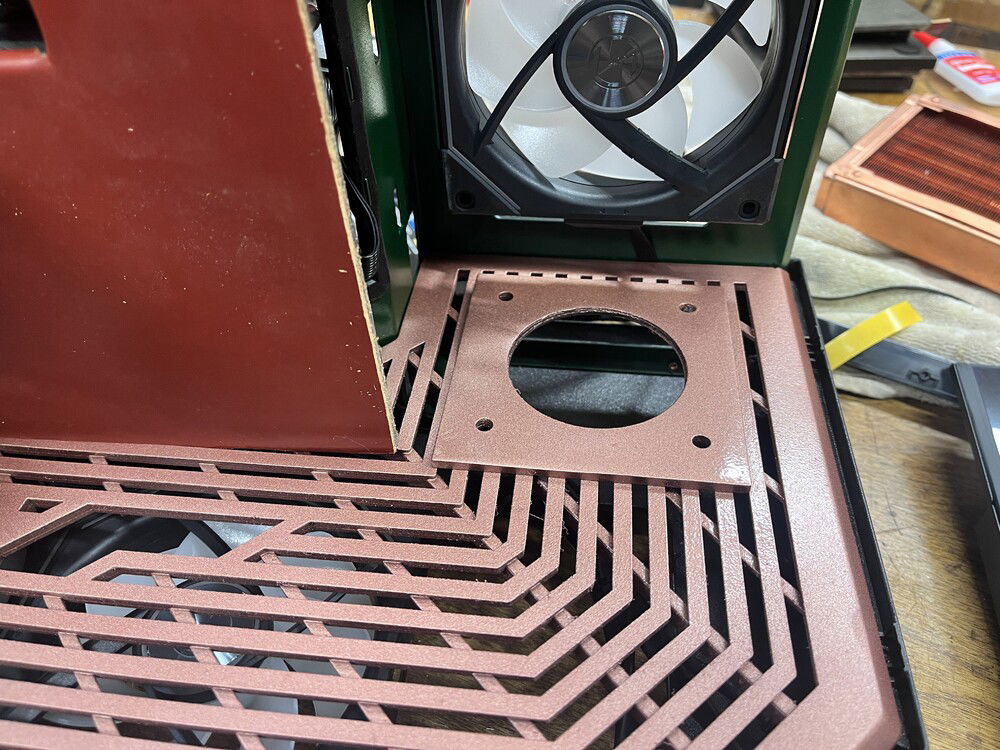
The hole looks kind of like a bogg. Anyway, I made the commitment and chopped a hole into the grate and hoped I had measured it correctly,. Close enough for government work. It was reinforced so that the tank would not lean like the tower of Pisa. Again that pesky physics.
The cover for the MB looked pretty pathetic and had no real purpose. An attempt at something yet undefined. I also broke the light plexi several times and said no more so I went to 1/2 inch.
I liked the leather look and coving up all the ancillary stuff really added a refinement to the look. Who really wants to look at resistors and diodes? (This is a rhetorical question) It took several attempts to get the lines clean and my leather skills to operate.
The top and garage looked pretty good, until I knocked the garage on the floor. I then went to 1/3 inch plyboard.

More parts from amazon, speakers, covers, amp and wiring. Then shelving and organizing the addition as it was fast looking like a major upgrade. I was starting to rethink the garage idea and focus back on the cooling.
Lesson, it is always easy to get derailed, make a plan to do one thing and then as ideas pop up, have a flip chart and make a parking lot to keep your ideas.
Lesson (Yes I stopped listing the numbers) Do not keep anything of value or that can be damaged as you go around doing stuff. If it is not your primary concern move it out of the way. Otherwise you will have to rebuild it several times.

The top was another wonderful learning experience. Originally, it was vented with an angular design. I wanted a case to be approachable, warm and comfortable. Thus, I decided to cover the top in leather.
Stopped numbering lessons: I am not competent in the art of leather craft and have no desire to be an expert. No pictures, as it was a very sad sight. Although I appreciate the folks at hyte, because they manufacturing their components with a fair amount of durability. I learn of this after launching the top like a Frisbee across the shop. Not to bad for ware and as such I had to develop plan B for the top. When in doubt, use bondo. It is far from done, but I got it to it previous fit and function and the gray looked kind of good on the top and the garage.
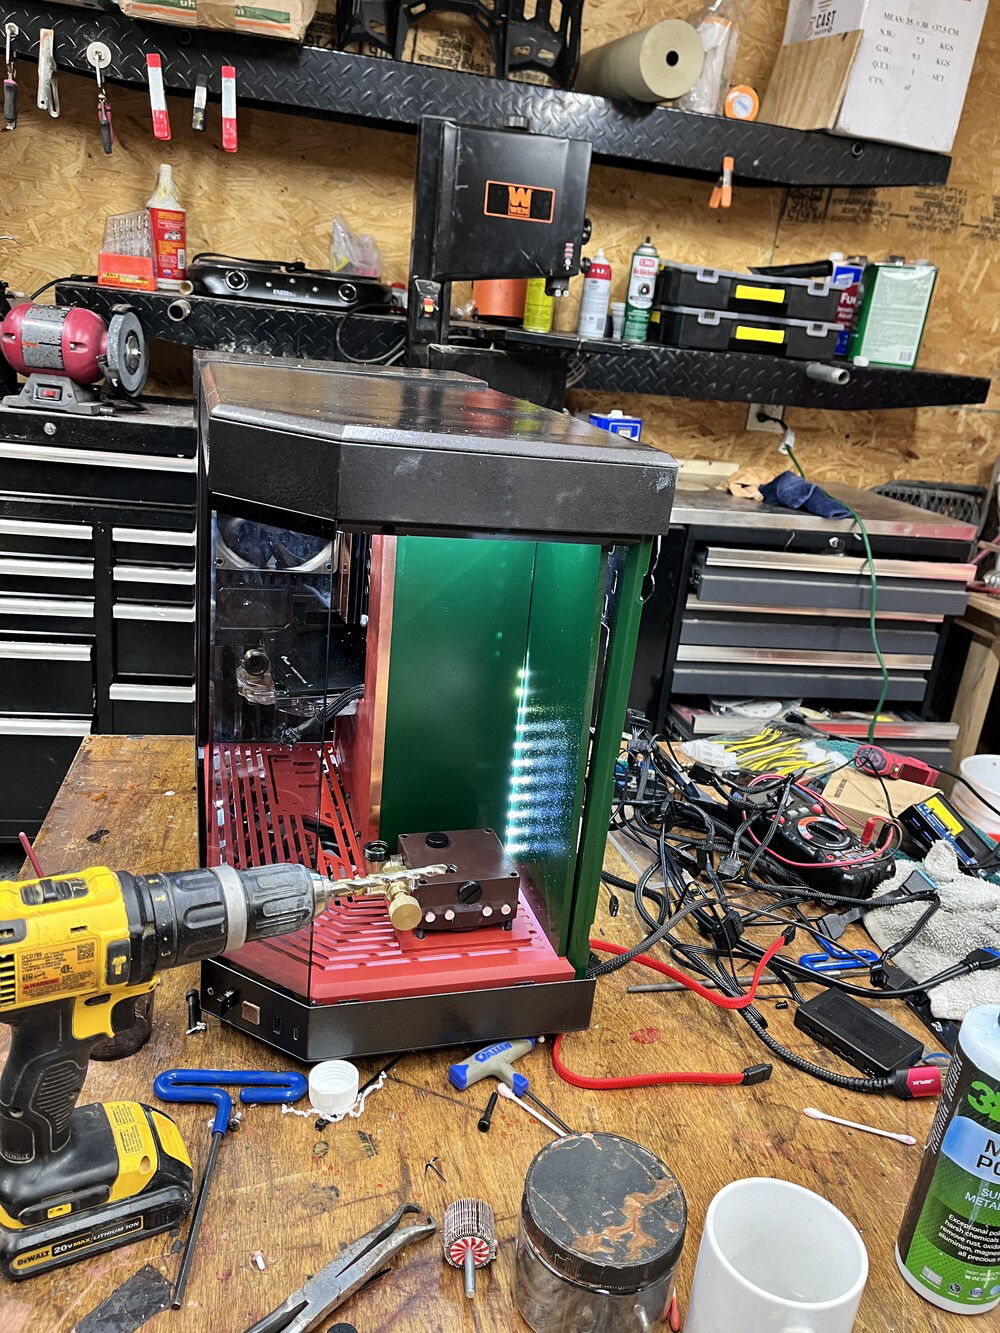
Now that the fans were gone as there was no space with the canister, I decided to use some of my favorite material Plexi and cover up the back. Clean the presentation up and make some continuity.

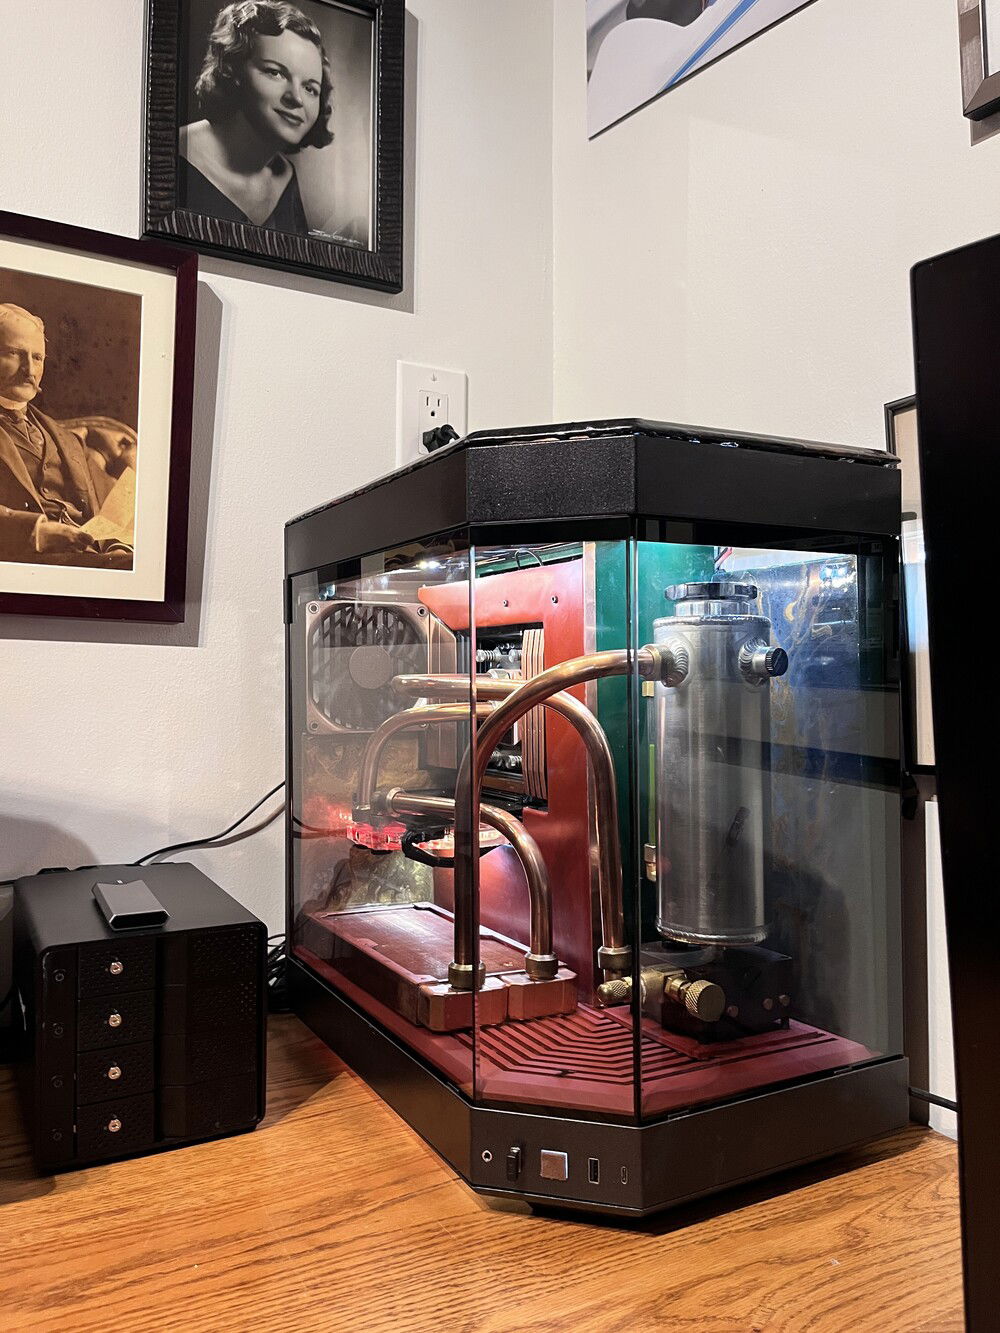
Note the change in the grate color. I was tired of the copper paint and wanted something a bit more bold. Nothing like red to make things stand out. At this point I though about building out the house a bit. Originally just to cover up the wires as I wanted the computer top be seen 360.
Not quite the finished product, but close enough.

As noted, I placed the pump half submerged under the grate and the tank on top. Now what would be my inlets and outlets. Because of space I was limited, but because the design of the pump, the selection was less painful than anticipated.
I bought some rubber stoppers and painted them with my copper paint so one would not be looking at emptiness.
Also use plumbers tape or a thread locker. Not wanting to do it over again, I used both on the tank. However, in the course of the next steps and "stuff" it came out several times so I got pretty good at disassembly and assembly.

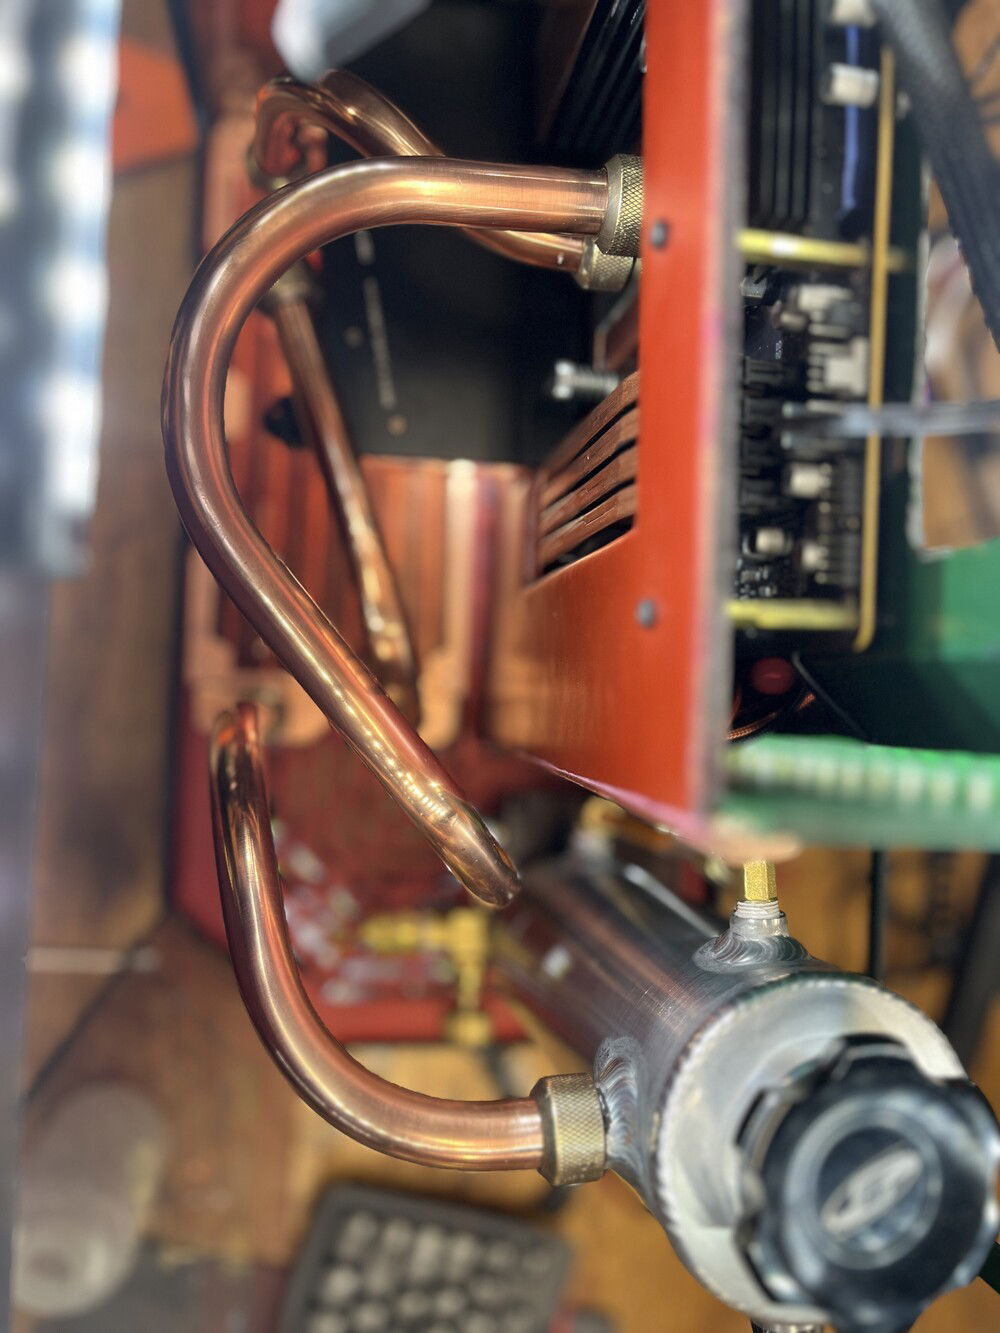
Although I started on the inlet from radiator to the tank which ended up being very straight forward. Unfortunately, it left me with an optimism that faded into frustration.
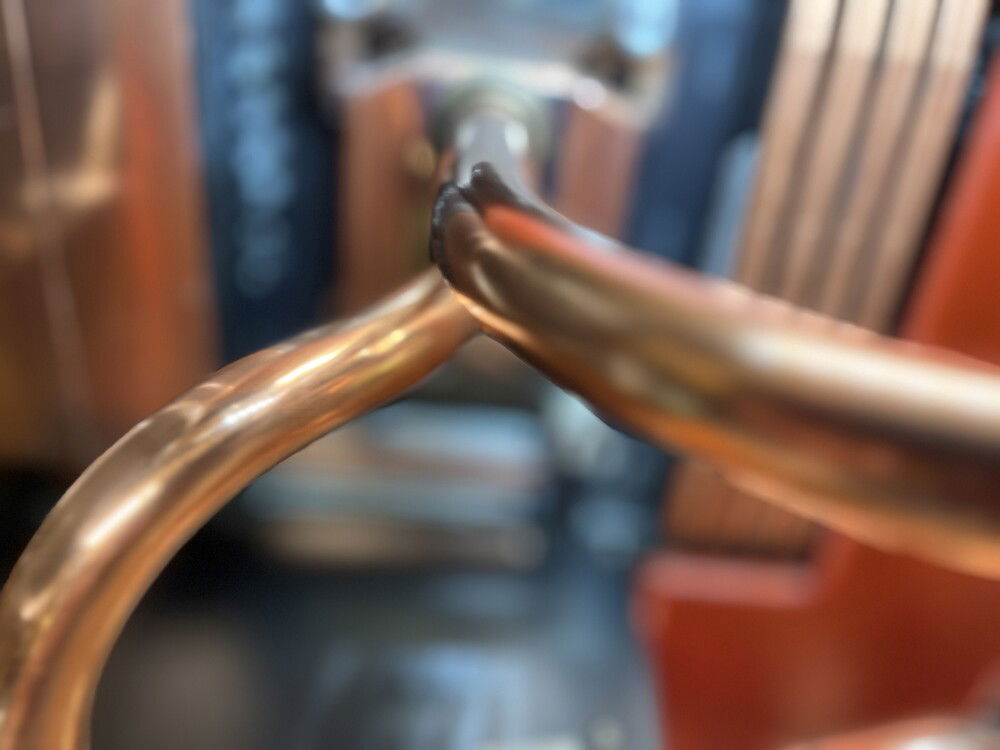
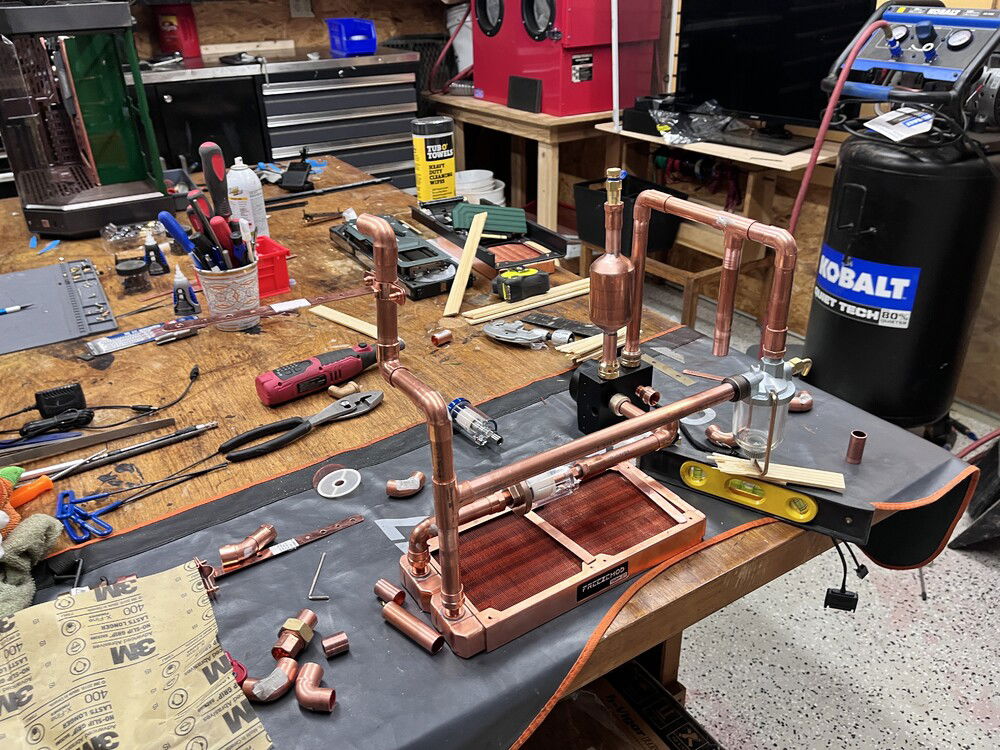
Bending was a mind bender. 40 ft of copper tubing is now waiting to be melted for another project. I purchased $300 worth of bending gear and still a bit unhappy. Next time I think I will build a bender on my table using blocks etc...
After a bit and 20 ft of pipe laying on the floor, I figured I better start getting this right or I will be both out of pipe and really pissed off. So with lessons learned and a bit more patience I worked my way to success. Not perfection, but not horrible.
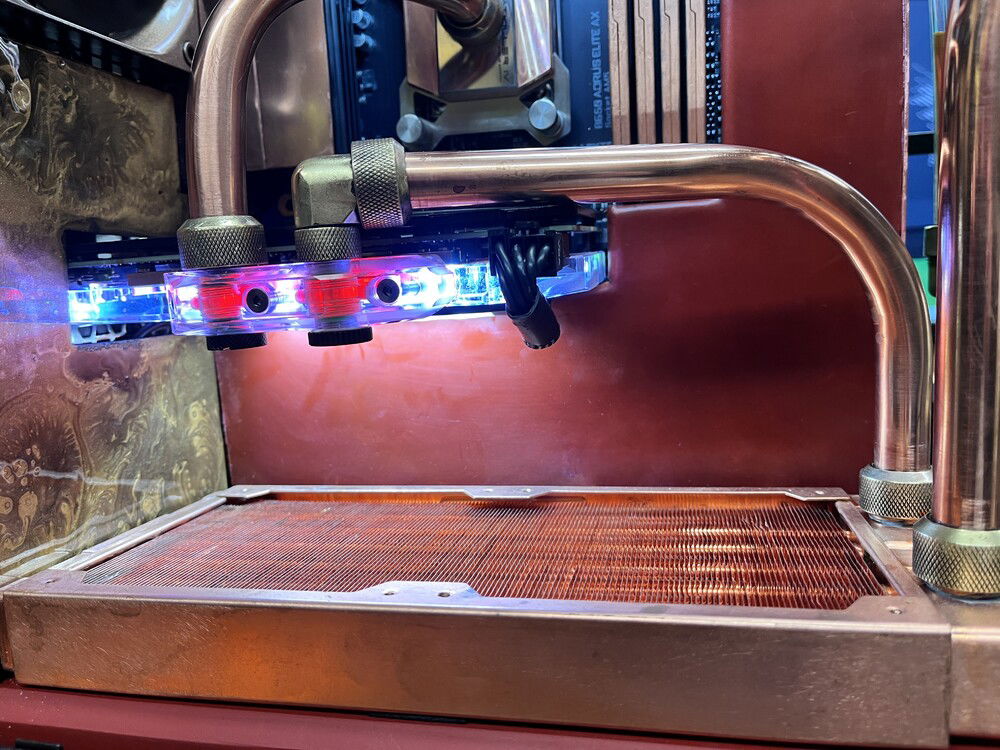
The next pipe was from radiator to GPU return. Fairly straight forward, but very tight in terms of the connectors. Yes, I know that there are 1 inch extensions, but I learned of the options later. The whole fitting thing is an absolute racket and a royal pin in the arse. And no you do not have to buy from these folks, you can actually use automotive NPT 1/4 connectors and they have almost as many choices, however, not in color, but there are ways around that as well.
I first painted the pipes with clear and it looked like crap, so I decided I would just go au-natural. So I have to run a rag with brasso on it once in a while, well I gotta vacuum it out as well. Minor maintenance for me.
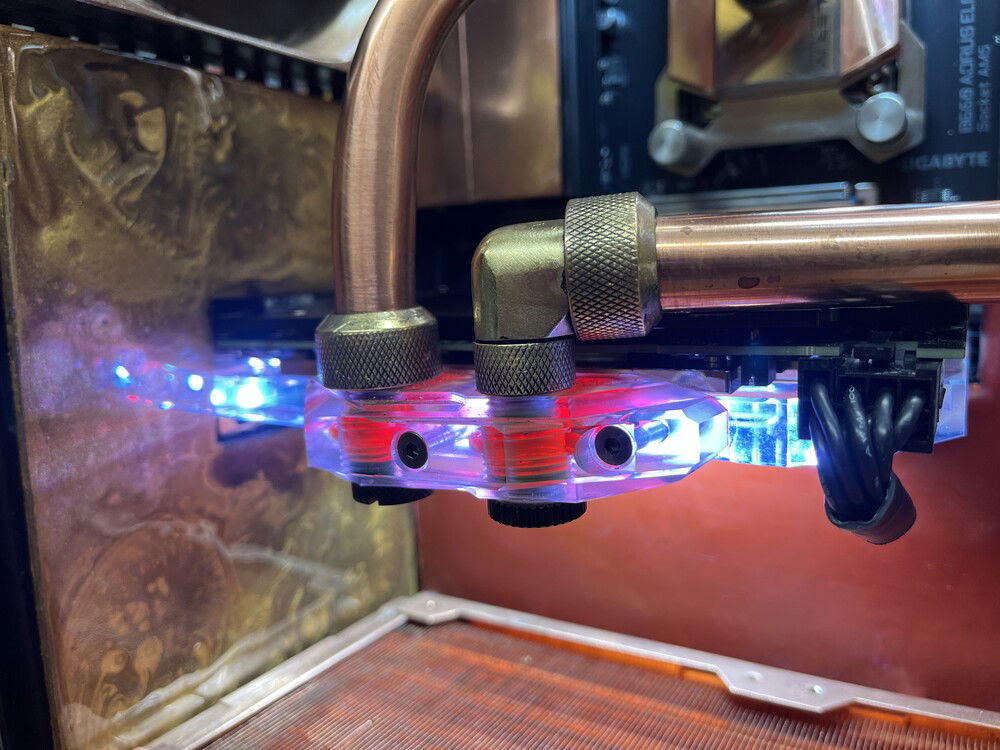
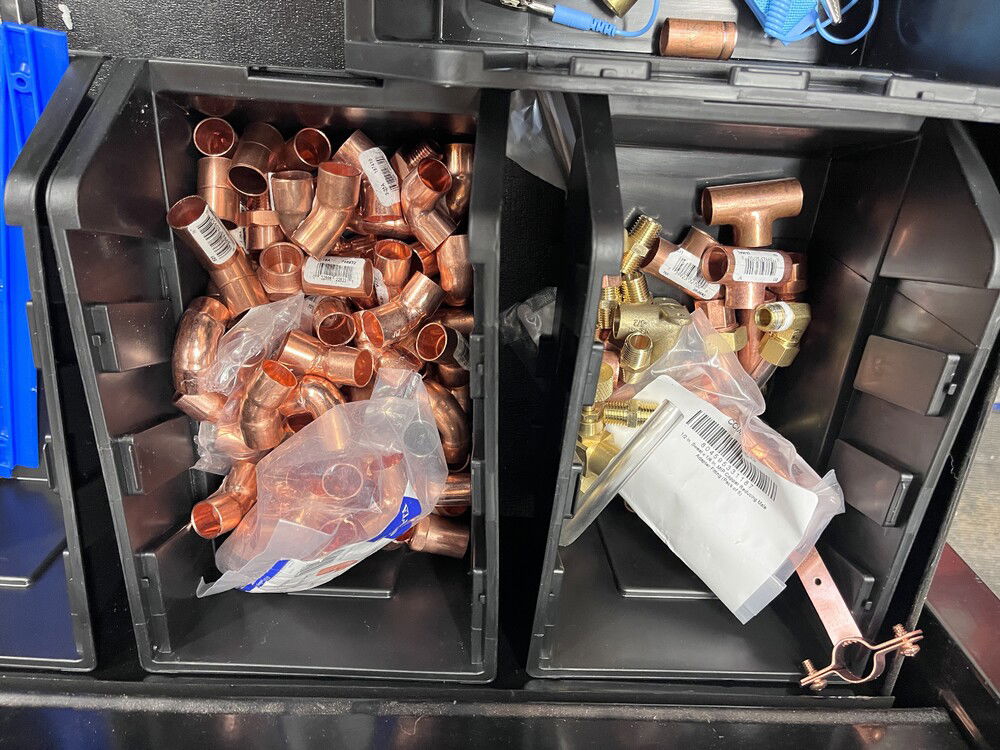
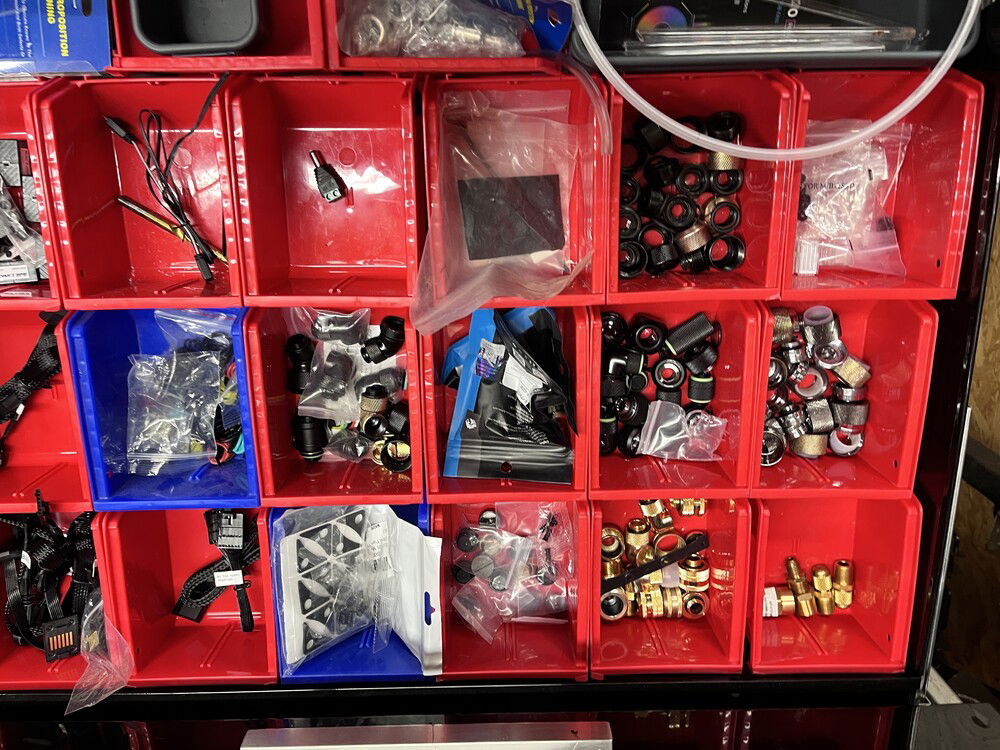
For the fittings, I have more than I care to admit, because I did not know what I was looking for in terms of fit function having never done this before. Again, tossing my best ideas to the wind, I really did not like any of the colors and many of the fittings were aluminum, anodized with different pressure fitments. Ultimately, I started my destruction of bits to learn more about the fittings and discovered the OCC uses brass in one line of fittings. A wire wheel and shazam a brass fitting for my copper lines.
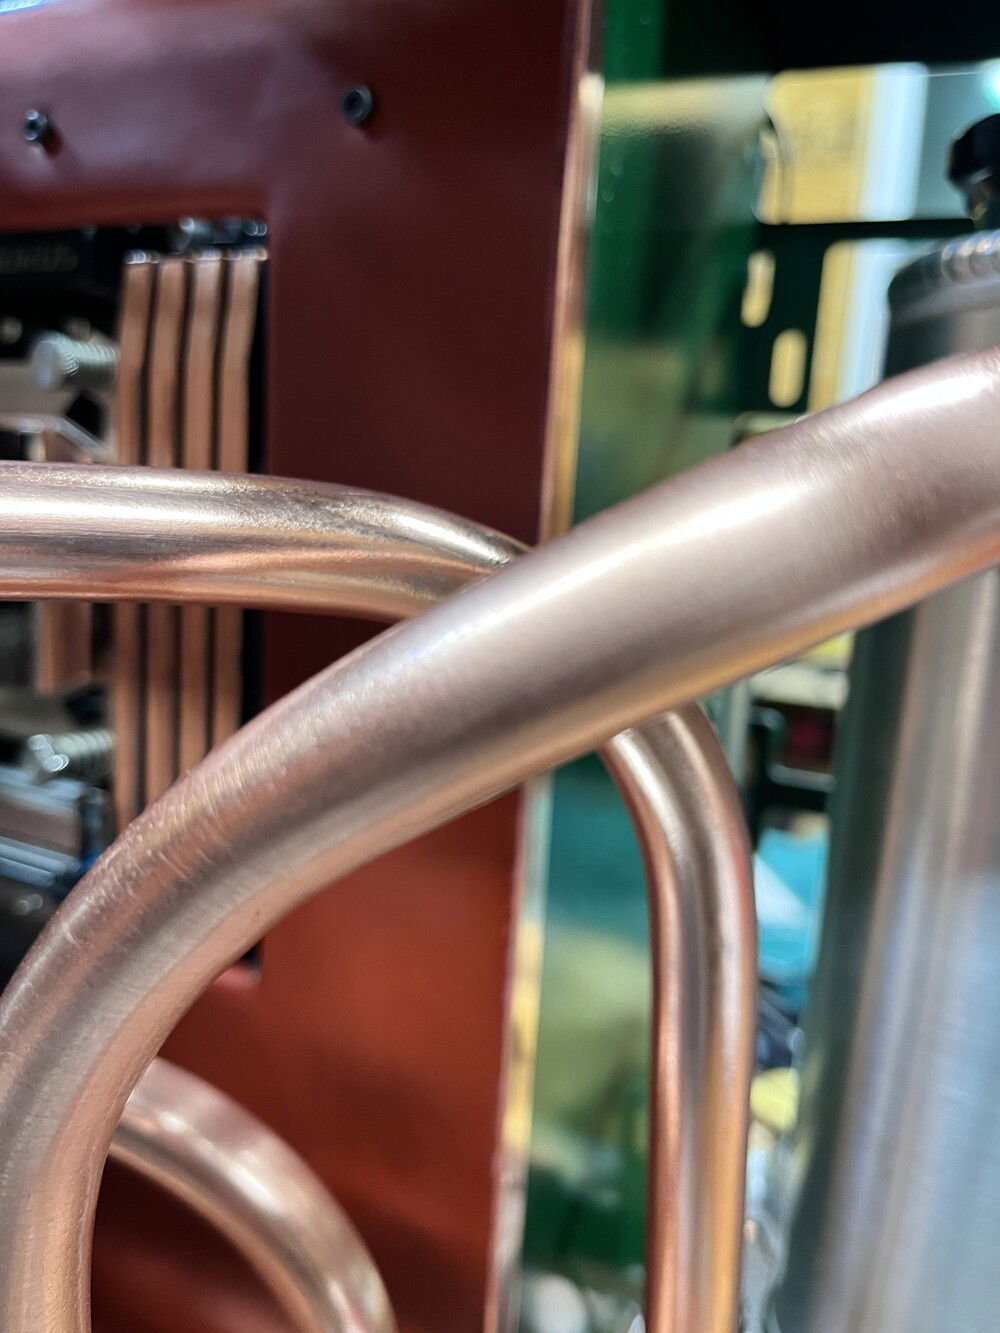
Technical note, all tube ends have to be sanded and a slight angular bevel so that the pipes do not tear the rubber o-rings and they slide in much easier. I also uses a bit of ky jelly to make the engagement between pipe and component.
I would love to do a review of all the parts I used as there were some clear winners and losers. I purchased everything out of pocket so I can be unbiased in terms of what was shit and what was good.
The tank to radiator is actually a complex bend and it took 6 feet of copper for me to gain a level of respect for being stupid. Geometry was and is not a friend of mine, although I like looking at it when it is done correctly.
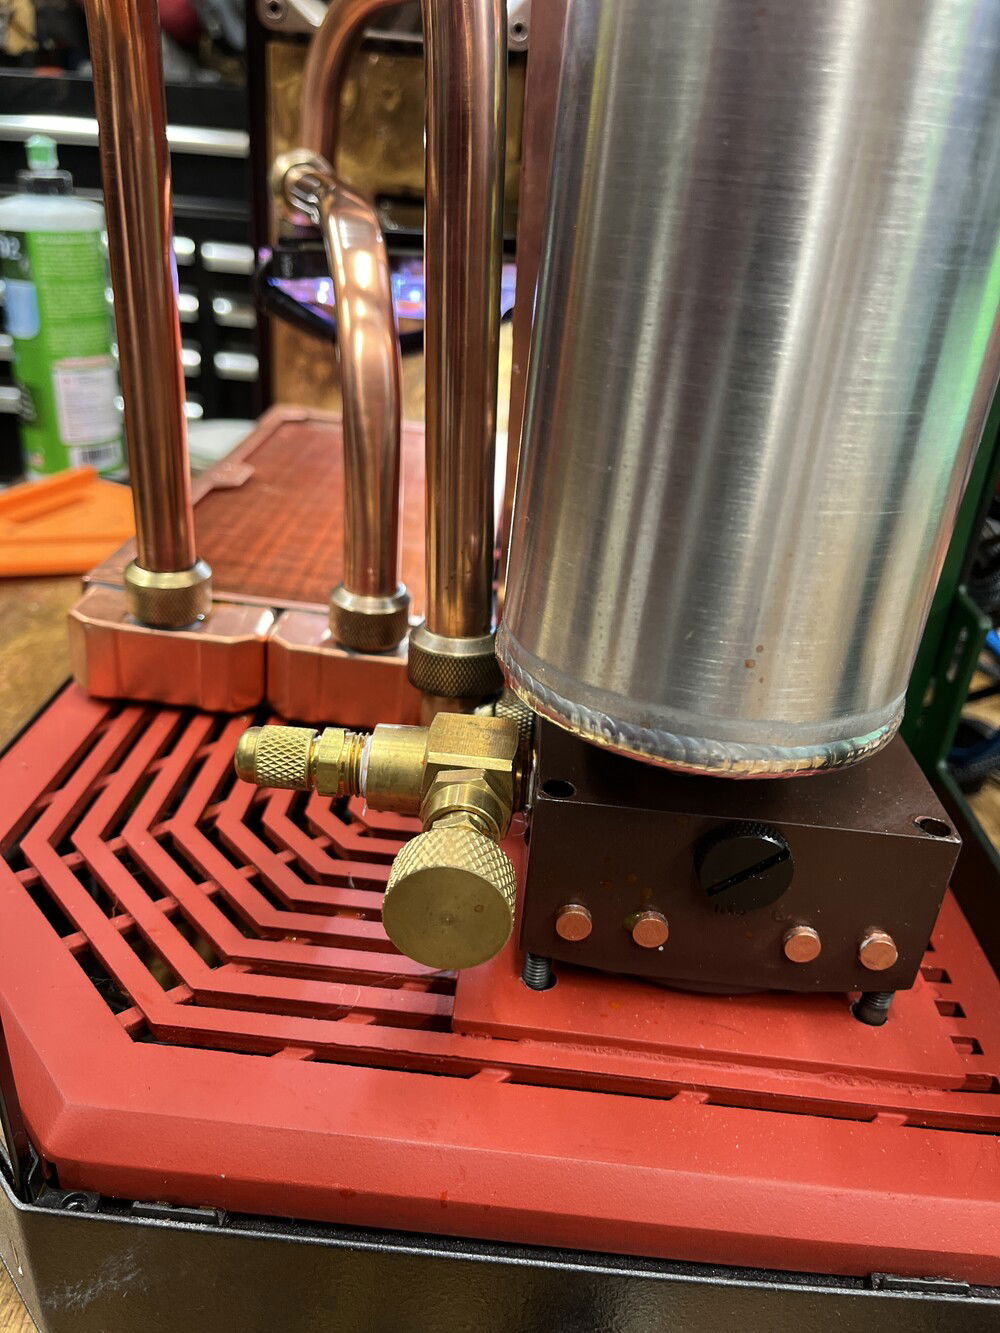
I found some brass fittings that I liked and thought about the function such as the AC fitting to pull the fluid out of the system. They also look good.
When I figured it out finally I had 10 feet of piping left.
You will note some imperfections in the tube angles, and so you know theses were planned.
Copper
AD:
To start: I appreciate those who have moved outside of their comfort zones, this is how we become better at what we do. Yes, screwing up is an important part of learning. I appreciate some folks out there that are frank and can be harsh in comment. Mostly I see the refined products which is cool, but seeing the mess is also helpful. I do not mind sharing my messes. I appreciate constructive comments, but anyone wanting to take the piss and show or tell folks how smart her/she is can please refrain from your comments. This is a place to freely share, not to be ridiculed.
Now now that administration is done here we go into the rabbit hole.
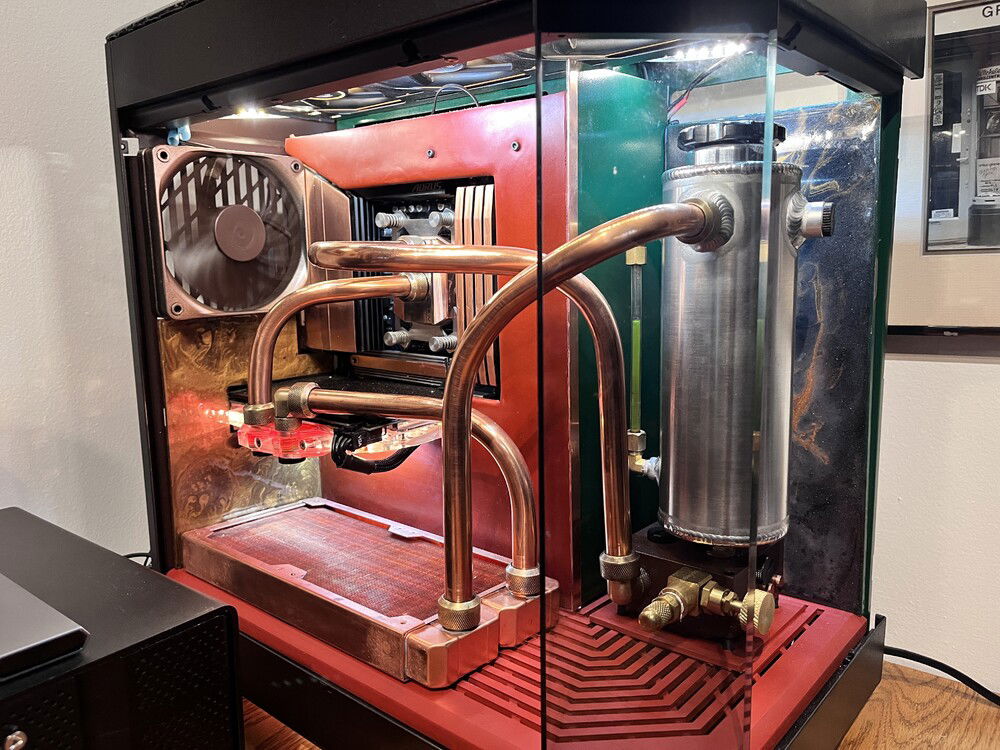
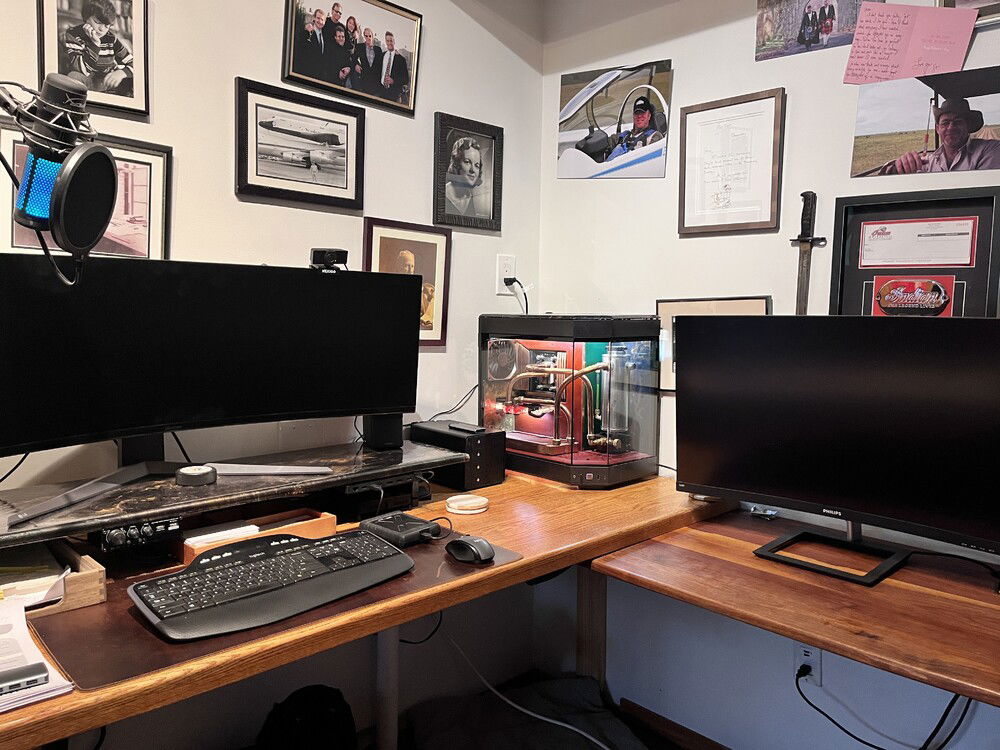
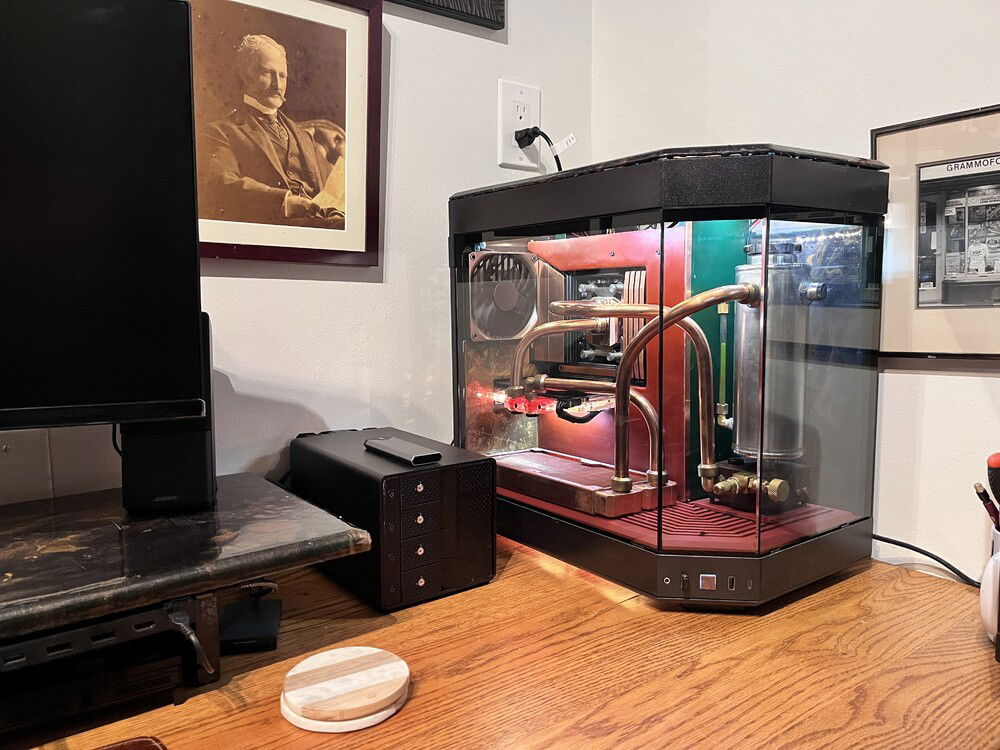
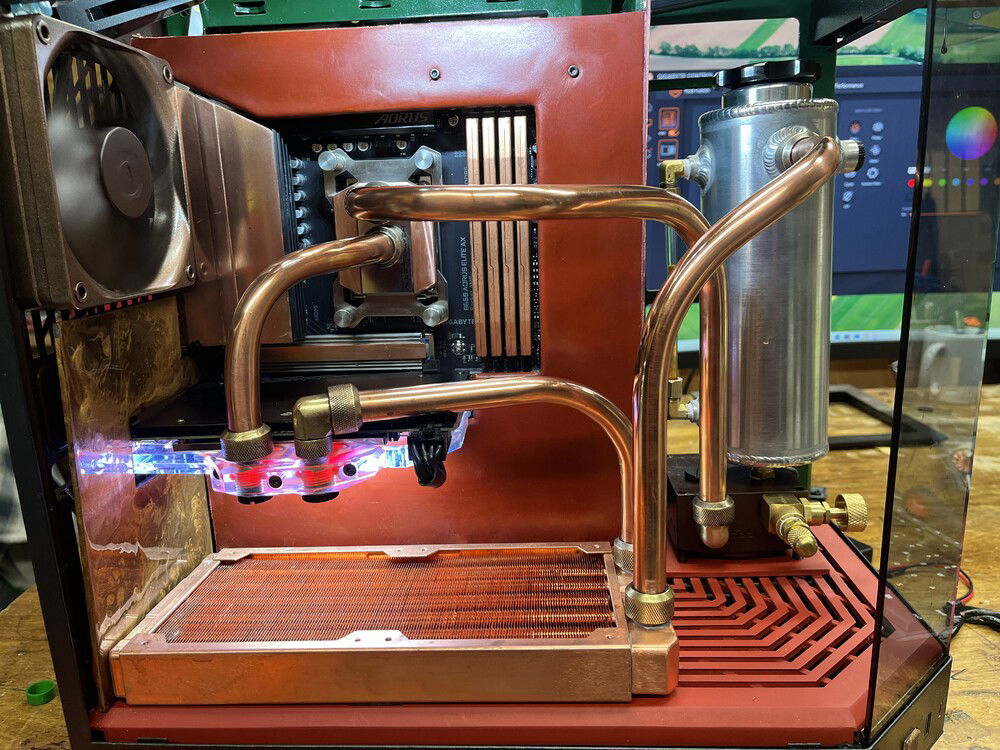
The build was based on an aesthetic approach to create a computer that fit more closely to my sensual comfort. I was thinking of a system that was more part of the environment, not just a brick of technology.
I decided not to go full-out on the tech side, as my needs no longer required the top end, so with a bit of research I struck what I would call middle ground. AMD M5 Ryzen 5 7600x and a mild RTX 3060 to operate a 45 inch and 32 inch monitors.
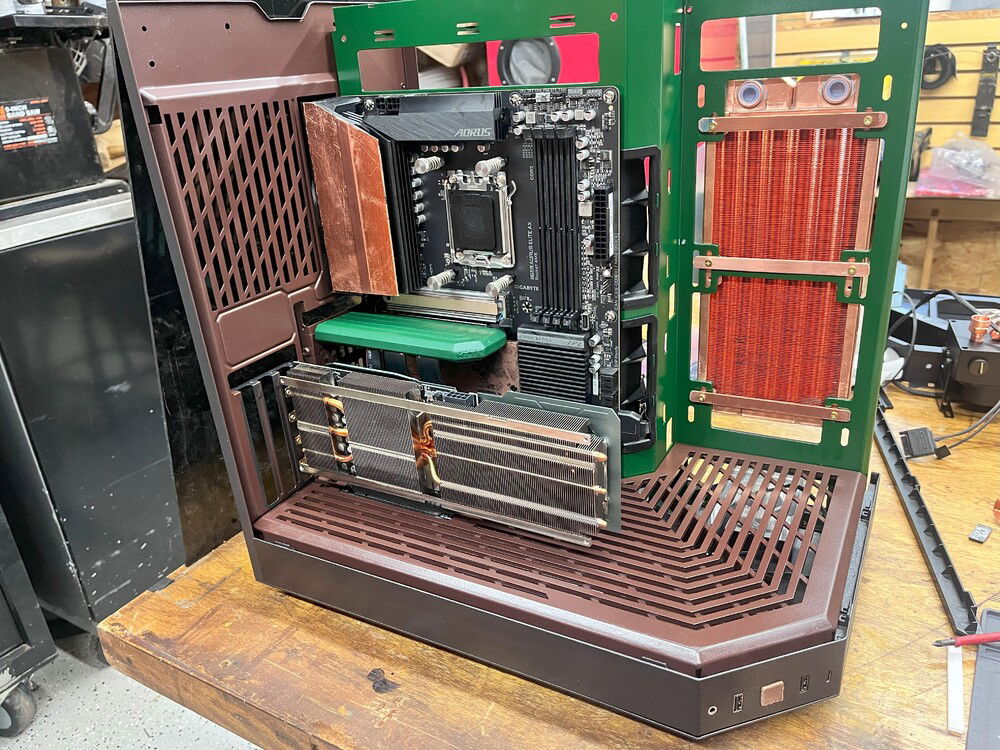
Cases: I liked the Lian Li and CoolerMaster, but the hyte Y70 caught my eye except for the price. Thus, I went for a more reasonable Y60 and have been very pleased with it during the build.
Now for the eye candy, I was looking for something with leather, copper and all that would appeal to my senses. This included touch and smell.
Note: To everyone who has built a system that requires lateral thinking and innovation, I appreciate the time and effort. I learned so much from a small group of adventure builders who shared their experiences. Thanks, bunches.
I took the entire case apart and used an automotive acrylic, a grey Ram paint acrylic with metal flake for the base coat and external color.
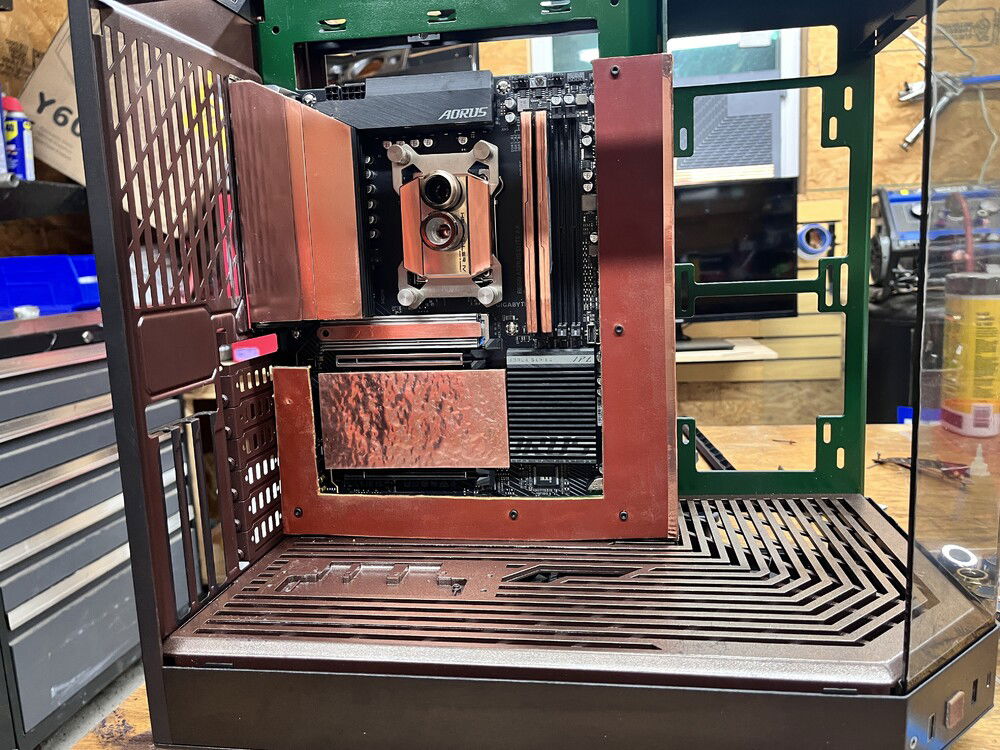
For the interior, I used a variety of materials, including leather, plexiglass, hardboard, copper strips, and copper acrylic paint. The goal was to reduce seeing diodes and resistors, just the emphasis on the CPU and memory.
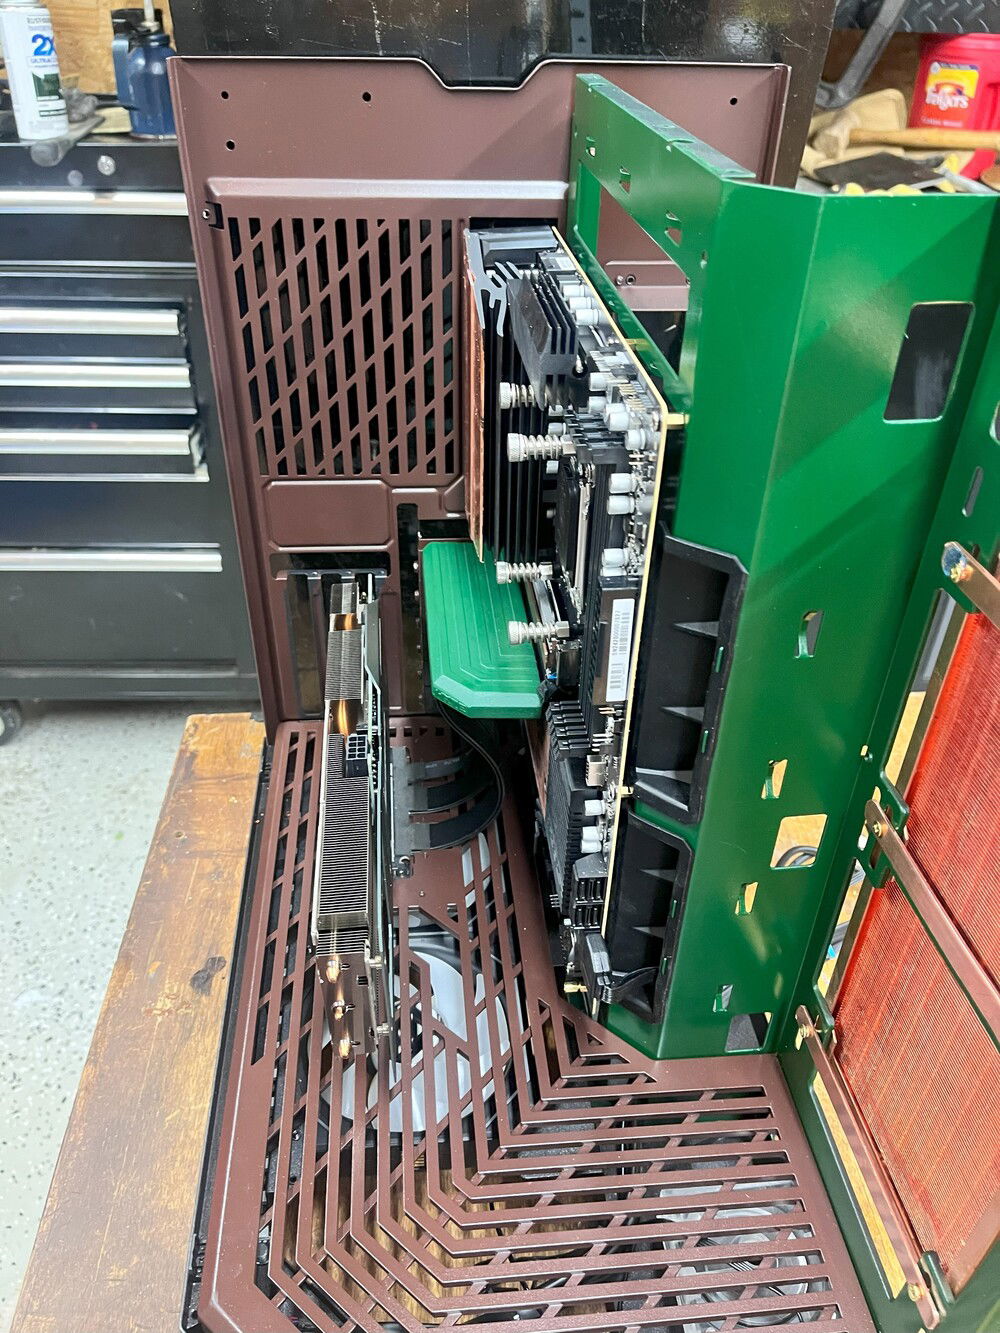
The case did not have a way to mount the GPU horizontally, as this to me looked better than the GPU in a vertical position. It was not very difficult and is very robust.
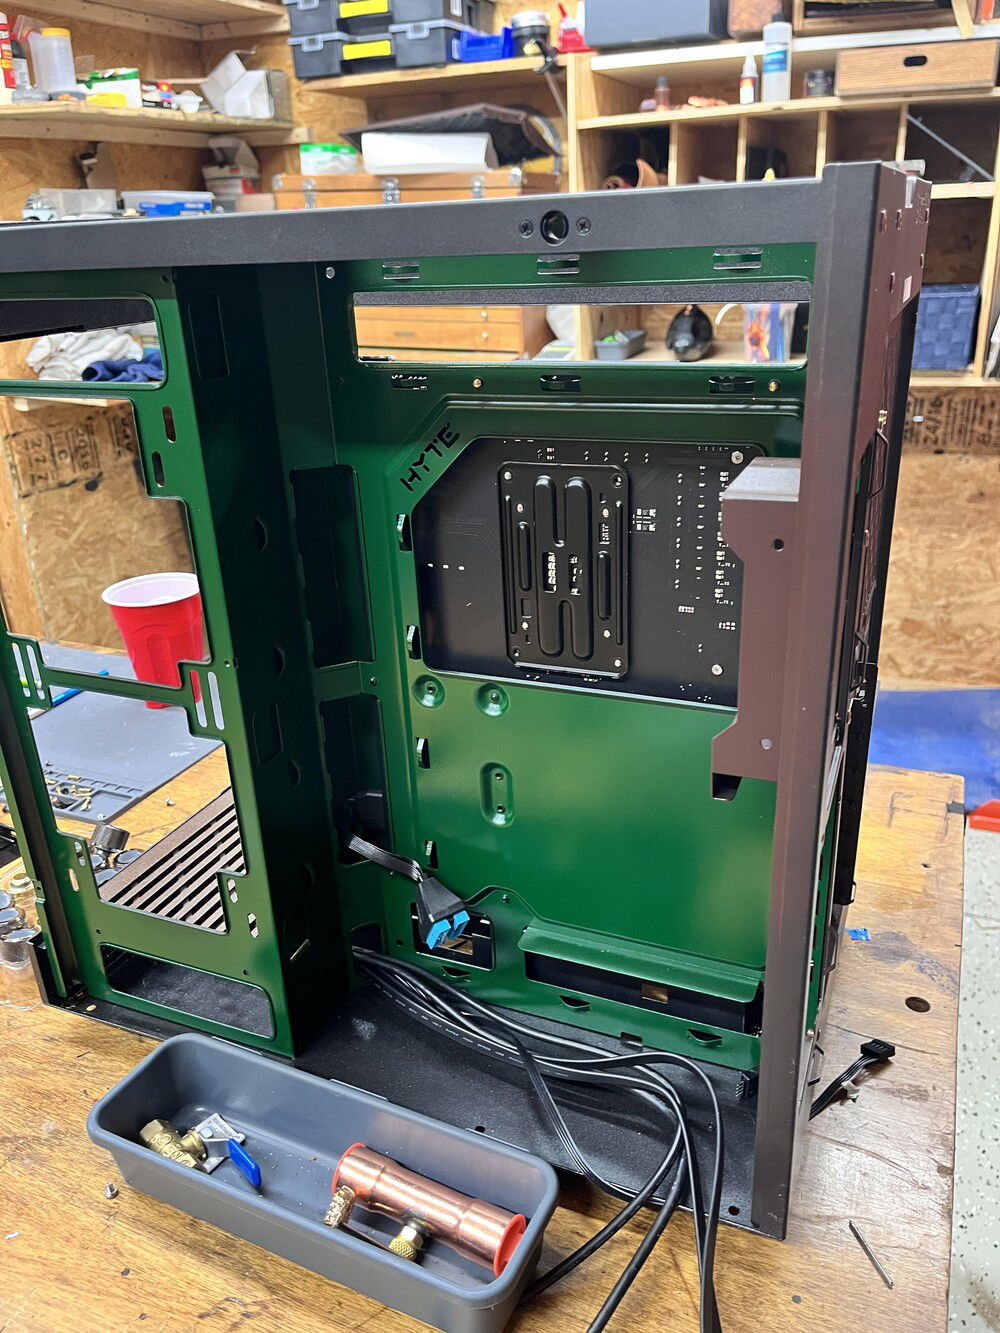
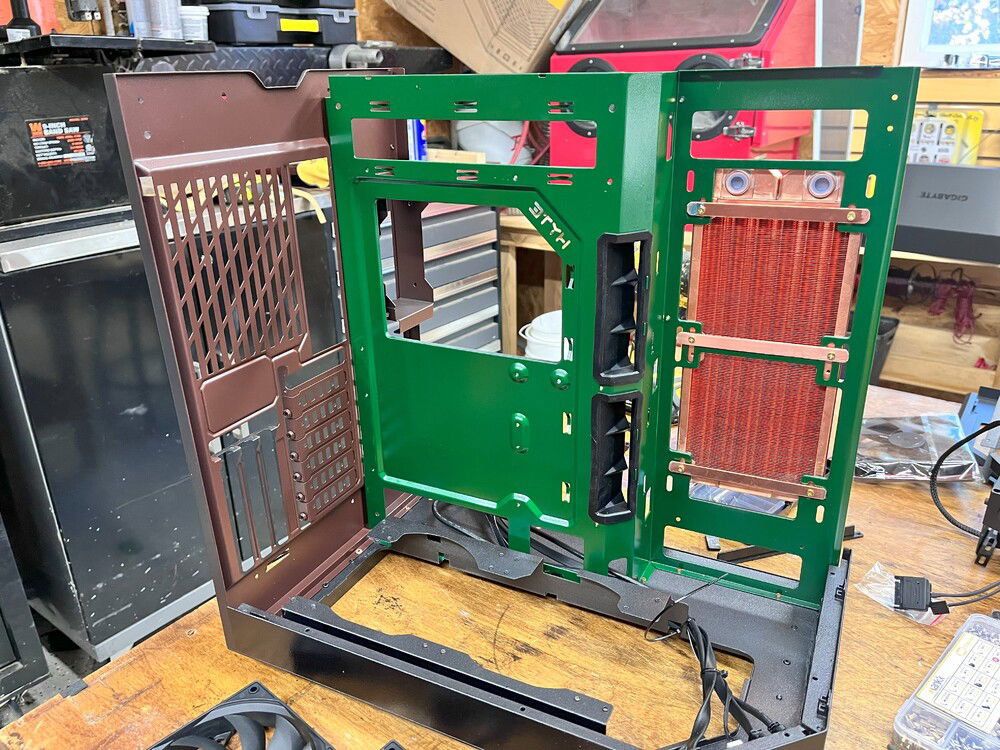
Rebuilding the case I used copper rivets
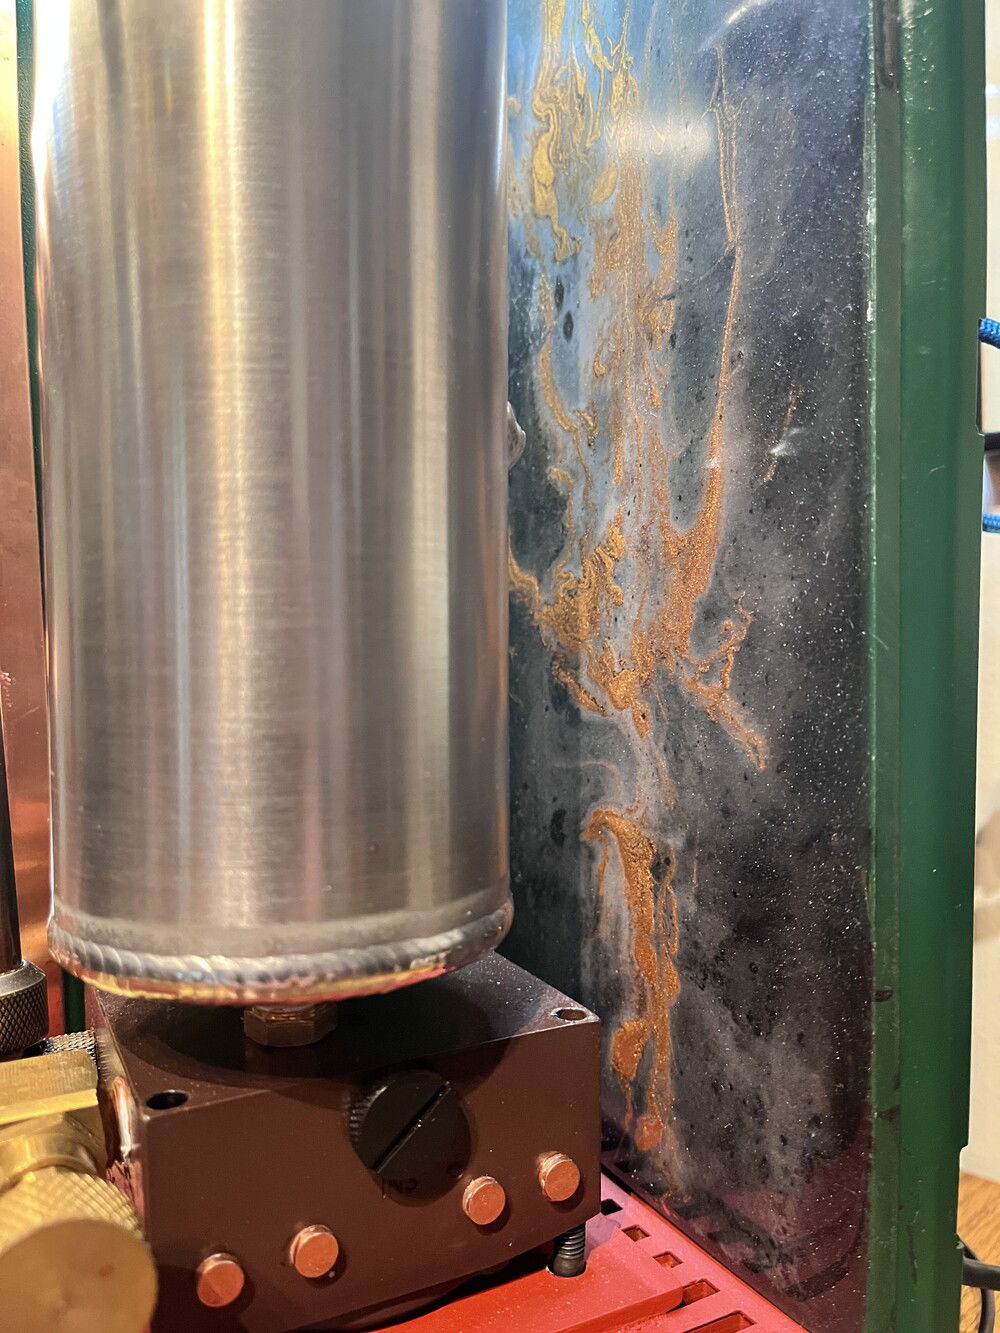
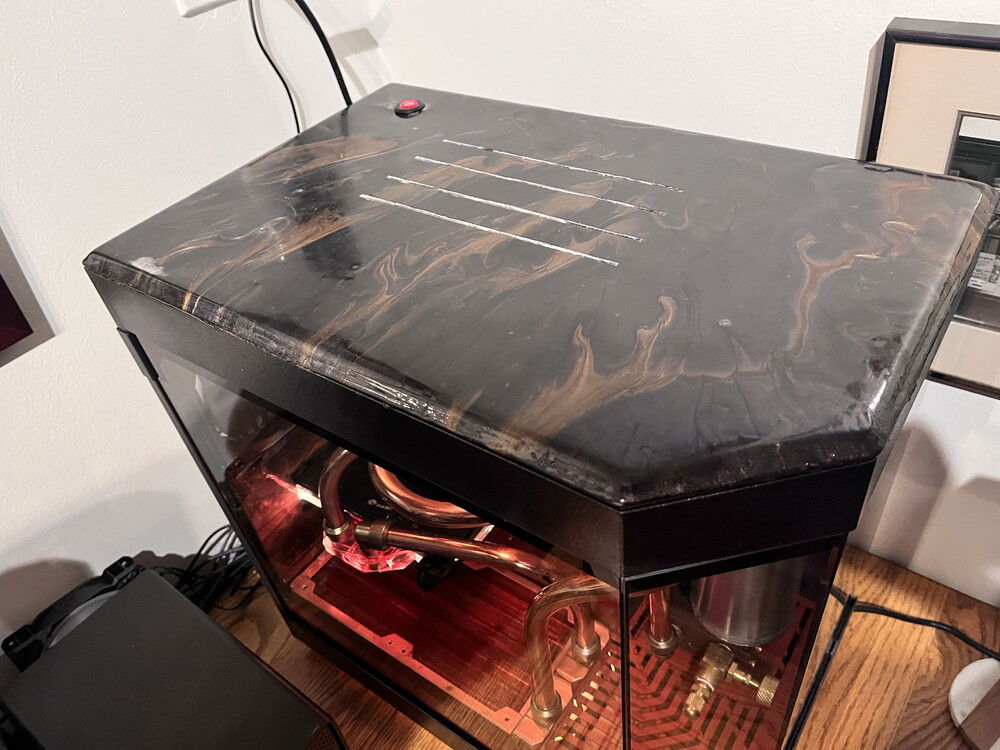
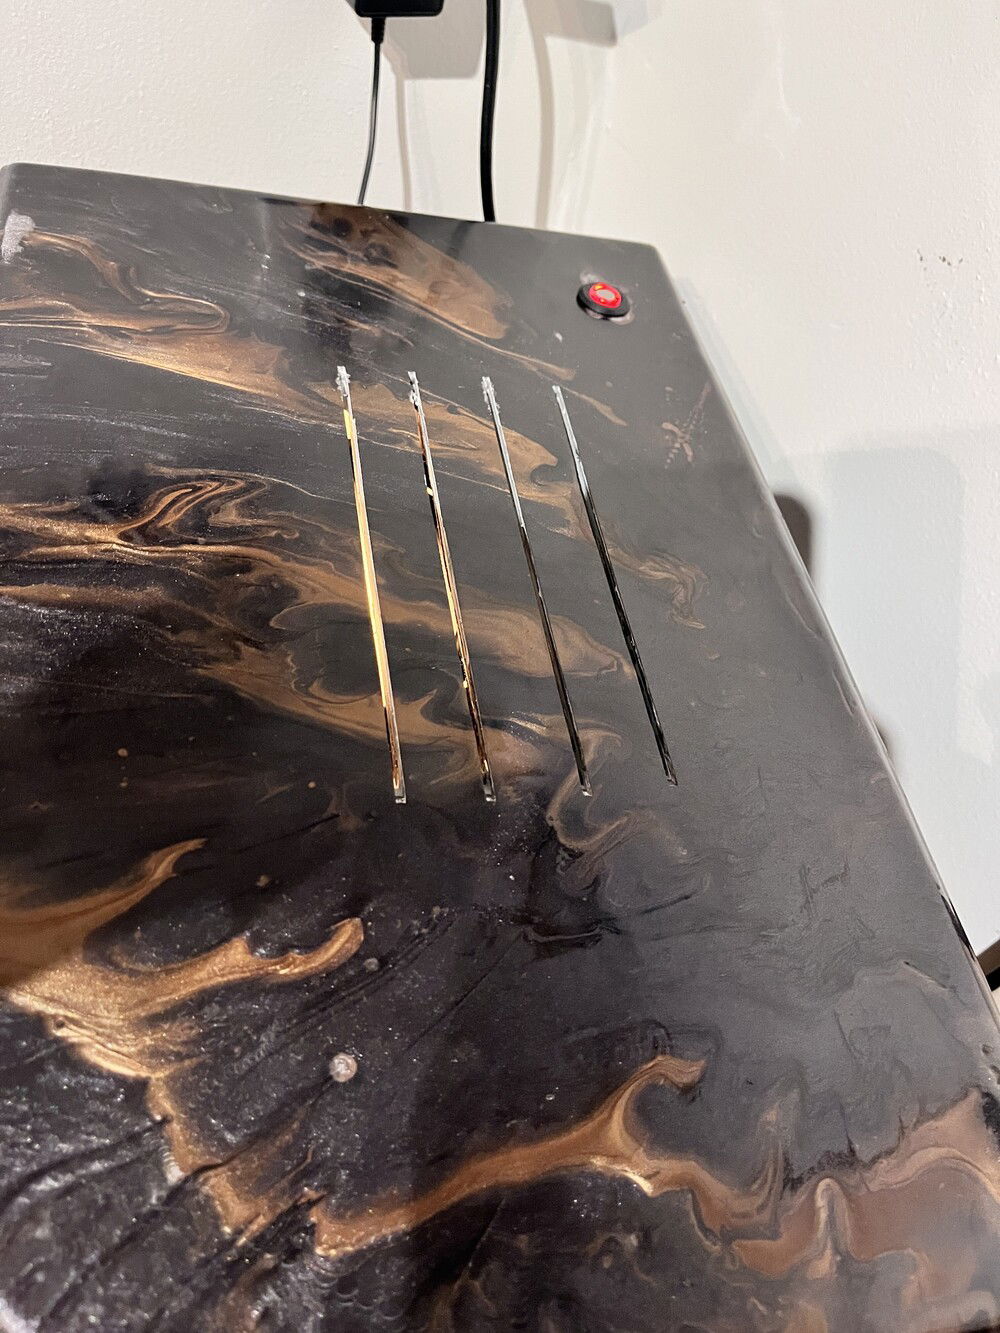
The exterior top is an epoxy countertop material 2 part. I used the automotive paint to provide the base tint, drizzled a copper/gold mixture, and let it harden.
My interest was less about color lighting, than intensity so I used a warm white LED and linked them to a simple rheostat button on top. The existing RGB lighting, I set to an orange.
The copper tube is type L and it took about 40 feet of pipe to end up with about 3 feet of finished product. Quite a learning curve and still I see so many flaws, but this build was not about perfection, but rather about allowing my creativity to flow.
The reservoir is an automotive dump can used in racing to collect any liquids from the various systems. I had to cut the floor of the PC grate and place the pump in the lower portion or basement of the PC.
I could provide quite a parts review for the cooling, as I went through a number of fittings before I ended up with OCC. The best all-around fittings.
My cooler is a copper design and fits 2 120mm fans and keeps my temps on average about 40C and under full load in the 70's still below the melting point.
I think there is too much hype about temps from the various companies trying to sell more fans than are required. As a utilitarian, my build approach is to keep things functional and aesthetically appealing, with no bling.
Now now that administration is done here we go into the rabbit hole.
The build was based on an aesthetic approach to create a computer that fit more closely to my sensual comfort. I was thinking of a system that was more part of the environment, not just a brick of technology.
I decided not to go full-out on the tech side, as my needs no longer required the top end, so with a bit of research I struck what I would call middle ground. AMD M5 Ryzen 5 7600x and a mild RTX 3060 to operate a 45 inch and 32 inch monitors.
Cases: I liked the Lian Li and CoolerMaster, but the hyte Y70 caught my eye except for the price. Thus, I went for a more reasonable Y60 and have been very pleased with it during the build.
Now for the eye candy, I was looking for something with leather, copper and all that would appeal to my senses. This included touch and smell.
Note: To everyone who has built a system that requires lateral thinking and innovation, I appreciate the time and effort. I learned so much from a small group of adventure builders who shared their experiences. Thanks, bunches.
I took the entire case apart and used an automotive acrylic, a grey Ram paint acrylic with metal flake for the base coat and external color.
For the interior, I used a variety of materials, including leather, plexiglass, hardboard, copper strips, and copper acrylic paint. The goal was to reduce seeing diodes and resistors, just the emphasis on the CPU and memory.
The case did not have a way to mount the GPU horizontally, as this to me looked better than the GPU in a vertical position. It was not very difficult and is very robust.
Rebuilding the case I used copper rivets
The exterior top is an epoxy countertop material 2 part. I used the automotive paint to provide the base tint, drizzled a copper/gold mixture, and let it harden.
My interest was less about color lighting, than intensity so I used a warm white LED and linked them to a simple rheostat button on top. The existing RGB lighting, I set to an orange.
The copper tube is type L and it took about 40 feet of pipe to end up with about 3 feet of finished product. Quite a learning curve and still I see so many flaws, but this build was not about perfection, but rather about allowing my creativity to flow.
The reservoir is an automotive dump can used in racing to collect any liquids from the various systems. I had to cut the floor of the PC grate and place the pump in the lower portion or basement of the PC.
I could provide quite a parts review for the cooling, as I went through a number of fittings before I ended up with OCC. The best all-around fittings.
My cooler is a copper design and fits 2 120mm fans and keeps my temps on average about 40C and under full load in the 70's still below the melting point.
I think there is too much hype about temps from the various companies trying to sell more fans than are required. As a utilitarian, my build approach is to keep things functional and aesthetically appealing, with no bling.
Color(s): Copper Gray Green Red
RGB Lighting? No
Theme: Art
Cooling: Custom Liquid Cooling
Size: ATX
Type: General Build
Build Updates
In the begining
The challenges
Starting the cooling drama
The copper epic
On the path of common sense and a better understanding of hydrology and function
Copper bending and fitting frustrations
Hardware
CPU
$ 176.99
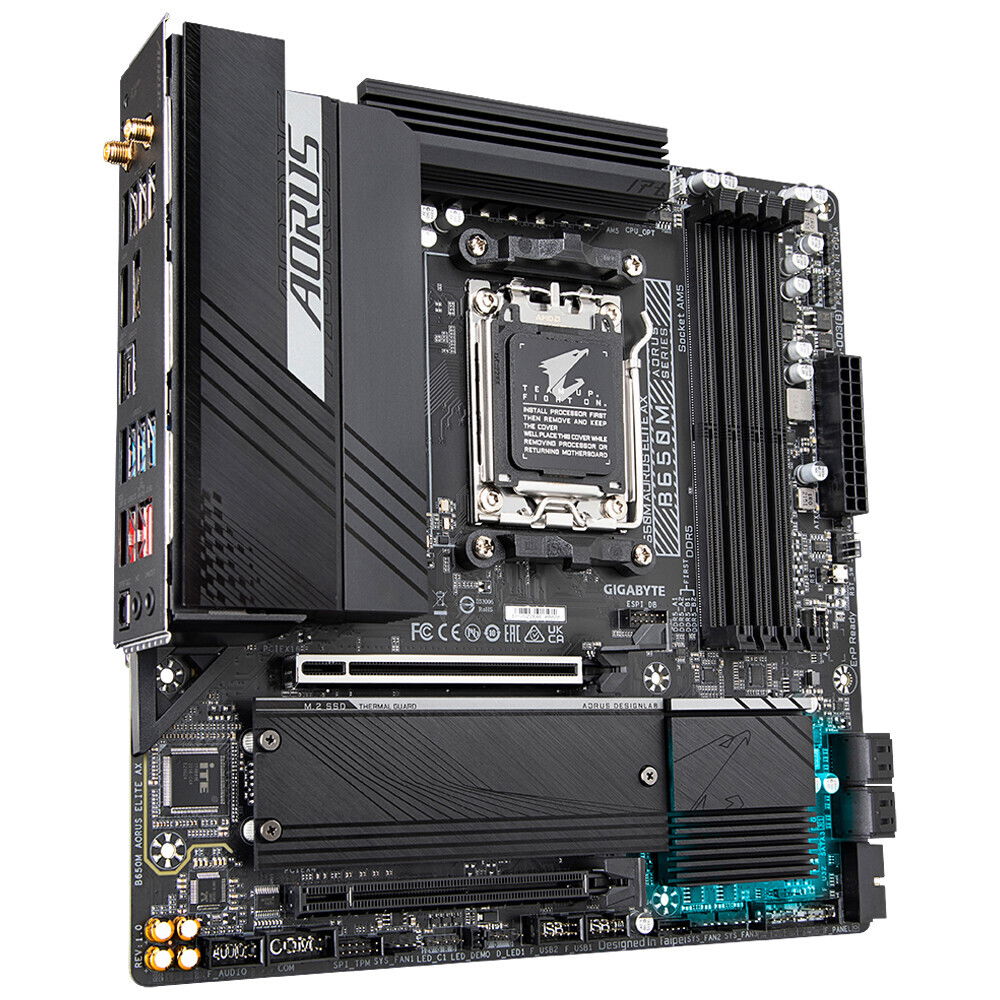
Motherboard
$ 1,207.54
Memory
$ 462.23
Graphics
Storage
$ 189.00
Monitor
$ 1,439.70
Approved by: